
Company Honda Company Ford Company Skoda Company Kia Company Mazda Company Mercedes Company Renault
English Русский
Български
Беларускі
Український
Српски
Hrvatski
Română
Polski
Slovenský
Magyar
Bookmark Articles Sitemap Contacts
ToyotaMan.ru


Camry Corolla Corona Carina Land Cruiser Highlander 4Runner RAV4 Others
4Runner N120 (1989-1995)

Turn signal switch — checking and replacing [Toyota 4Runner N120]

  • Main
  • 4Runner
  • N120 (1989-1995)
  • Electrical equipment
  • Equipment and devices
  • Turn signal switch — checking and replacing
0
Contents: Examination ↓ Replacement ↓

Examination


1. Disconnect the battery from ground.

2. Disable the airbag (see subsection 11.44).

3. Remove the steering wheel.

4. Remove the steering column cover.
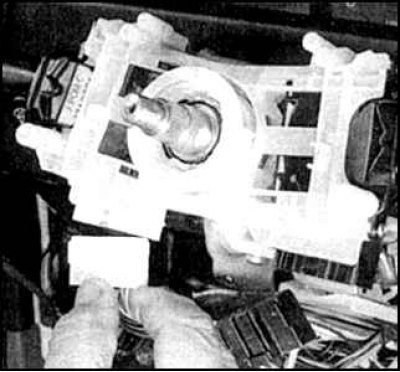


5. Disconnect the connector from the turn signal/headlight switch.
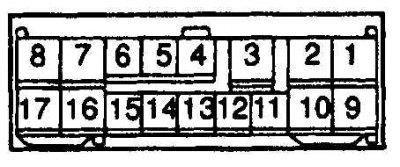


6. Check for continuity between the switch terminals. The turn signal switch terminal numbers are shown in the figure.

7. When the switch is in the "neutral" position, there should be no circuit between the terminals.

8. When the left turn signal is turned on, the circuit should be between terminals 1 and 2.

9. When the right turn signal is turned on, the circuit should be between terminals 2 and 3.

10. If the test results are negative, replace the switch.


Replacement
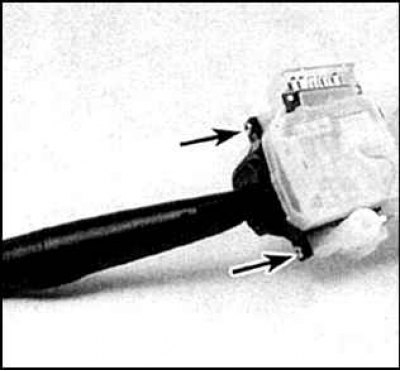


1. Remove the switch from the housing. To do this, unscrew these 2 screws (indicated by arrows).

2. Installation is carried out in reverse order.
This article is available at: russian, bulgarian, belarusian, ukrainian, serbian, croatian, romanian, polish, slovak, hungarian
The article material has been checked: Gribkov Vladimir
Share information:
◀ Previous
4Runner N120: Equipment and devices
Next ▶

Direction indicator/hazard warning flasher
Relay — description and testing
Electrical circuit breakers
Fusible links
Fuses — location and description
Ignition switch and lock drum — checking and replacement
Exterior Light Switch — Checking and Replacing
Windscreen Wiper Switch — Checking and Replacing
Headlight bulbs — replacement
Headlight adjustment
Similar articles on other Toyota models

➥ Checking and replacing the turn signal/hazard warning… Toyota Cruiser 100 (1998-2007)
➥ Checking and replacing the turn signal and hazard warning… Toyota RAV 4 XA10 (1994-2000)
➥ Replacing front turn signal lamps Toyota Camry XV30 (2001-2006)
➥ Replacing fog light and turn signal bulbs Toyota Carina T190 (1992-1996)
➥ Replacing spark plugs. Checking electrical connections Toyota Corolla E80 (1983-1990)
➥ Checking and replacing fuses Toyota Corona T190 (1992-1997)
Link in different formats to this article
Comments and feedback from visitors
No comments yet


Add two numbers 46 + 10


4Runner N120 (1989-1995) 
  • General information
  • User manual
  • Maintenance
  • Power unit
  • 4-cylinder engines
  • 6-cylinder engines
  • Engine overhaul
  • Cooling and heating
  • Fuel system
  • Transmission
  • Mechanical gearbox
  • Automatic gearbox
  • Transfer case
  • Clutch
  • Transmission line
  • Chassis, running gear
  • Brake system
  • Car suspension
  • Steering
  • Body and interior
  • Exterior (external elements)
  • Interior (internal elements)
  • Doors, locks and windows
  • Electrical equipment
  • Equipment and devices
  • Ignition system
  • Power devices
  • Electrical circuits
ToyotaMan.ru © 2018–2026 • Mobile version • Interesting about Toyota • Administration • Sitemap: EN BG BY UA RS HR RO PL SK HU • Search system • Bookmark
Camry Vista-V40 • Camry XV10 • Camry XV20 • Camry XV30 • Corolla Verso-AR10 • Corolla E80 • Corona T190 • Carina T170 • Carina T190 • Land Cruiser J70 (diesel) • Land Cruiser J60 (petrol) • Land Cruiser J100 • Highlander XU20 (petrol) • 4Runner N120 • RAV4 XA10 • RAV4 XA20 • Duet M100 • Dyna Y50 •
We require cookies to enable some interactive features. Is that ok with you?