
Attention! Headlight alignment should be checked every 12 months, when a headlight is replaced or after a front end repair. It should be noted that the described procedure allows only approximately adjusting the headlights, fine adjustment is carried out in a car service.
Headlight adjusting screws
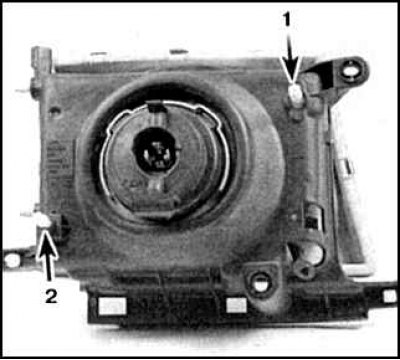
1. Horizontal adjustment screw
2. Vertical adjustment screw
Headlight adjustment scheme
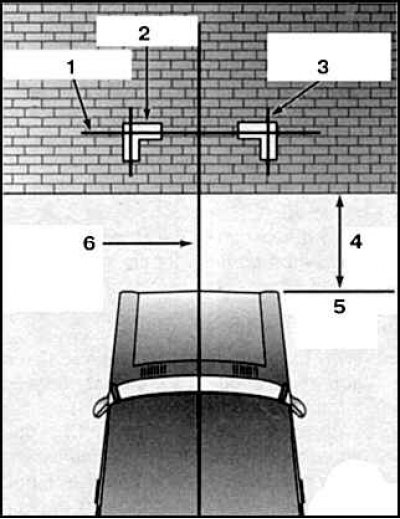
1. A line from the floor to the center of the headlights; 2. Light spot area; 3. Line at a distance from the axis of symmetry of the car to the center of the headlights; 4. Distance 7.5m; 5. The front plane of the headlight; 6. Axis of symmetry of the car
1. There are 2 screws on the headlight housing for vertical and horizontal adjustment (see fig. Headlight adjusting screws).
2. Install the car 7.5 m from the wall.
3. Mark the crosshairs with a tape symmetrically to the axis of the car (see fig. Headlight adjustment scheme). For more accurate marking, drive up to the wall at a distance of about 20 cm.
4. Adjustment is carried out with normal loading of the car and a half-empty tank.
5. Position the dipped beam headlights so that the light spot is 5 cm below the horizontal and 5 cm to the right of the vertical. To lift the beam, turn the screw clockwise and vice versa. The same applies to the adjustment to the left - to the right.
6. Turn on your high beam headlights and adjust the beam so that the spot is strictly on a vertical line, just below the horizontal.
Attention! It may not be possible to precisely set the high and low beams in this way. In this case, try to more accurately adjust the dipped beam, with which you have to drive more often and on which traffic safety depends to a greater extent.
7. Have your headlights adjusted by a workshop as soon as possible.