
Company Honda Company Ford Company Skoda Company Kia Company Mazda Company Mercedes Company Renault
English Русский
Български
Беларускі
Український
Српски
Hrvatski
Română
Polski
Slovenský
Magyar
Bookmark Articles Sitemap Contacts
ToyotaMan.ru


Camry Corolla Corona Carina Land Cruiser Highlander 4Runner RAV4 Others
4Runner N120 (1989-1995)

Engine Mounting Parts — Checking and Replacing [Toyota 4Runner N120]

  • Main
  • 4Runner
  • N120 (1989-1995)
  • Power unit
  • 4-cylinder engines
  • Engine Mounting Parts — Checking and Replacing
0
Contents: Examination ↓ Replacement ↓
Engine mount components generally do not require maintenance, however, if damage to the engine mounts or their aging is detected, they must be replaced immediately.

Examination


1. Raise the vehicle and support it on jack stands, then place a jack stand under the engine oil pan. Place a large board between the pan and the jack stand and carefully lift the engine to relieve the weight on the jack stands. Do not place a board under the oil pan drain plug.
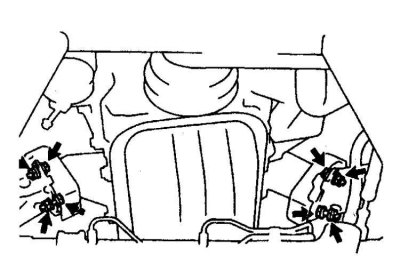


2. Check for presence on supports (indicated by arrows) cracks, hardening or delamination from the metal base.

3. Check if the support plates move relative to the engine or frame (to do this, rock the supports with a crowbar or a large screwdriver). If movement is felt, lower the engine and tighten the mounts.

4. To slow down aging, lubricate the rubber parts of the supports with a preservative.

Replacement


1. Disconnect the battery from ground, lift the car and place it on stands.

2. Loosen the nuts and bolts, lift the engine and remove the support.

3. Installation is carried out in the reverse order. Lubricate the threads of the nuts and bolts with a locking compound and tighten securely.
This article is available at: russian, bulgarian, belarusian, ukrainian, serbian, croatian, romanian, polish, slovak, hungarian
The article material has been checked: Gribkov Vladimir
Share information:
◀ Previous
4Runner N120: 4-cylinder engines
Next ▶

Rear Crankshaft Oil Seal — Replacement
Flywheel (torque converter drive disk)
Oil pump — removal, inspection and installation
Oil pan — removal and installation
Front Crankshaft Oil Seal — Replacement
 
Similar articles on other Toyota models

➥ Suspension and Engine Parts — Checking and Replacing Toyota Cruiser 60/80 (1980-1997, petrol)
➥ Checking and replacing hoses in the engine compartment Toyota Camry XV20 (1996-2001)
➥ Checking and replacing hoses in the engine compartment… Toyota Highlander 1 (2000-2007, petrol)
➥ Checking and replacing hoses in the engine compartment Toyota RAV 4 XA10 (1994-2000)
➥ Checking and replacing engine coolant Toyota Dyna Y50/Y60 (1984-1995)
➥ Replacing spark plugs. Checking electrical connections Toyota Corolla E80 (1983-1990)
Link in different formats to this article
Comments and feedback from visitors
No comments yet


Add two numbers 40 + 12


4Runner N120 (1989-1995) 
  • General information
  • User manual
  • Maintenance
  • Power unit
  • 4-cylinder engines
  • 6-cylinder engines
  • Engine overhaul
  • Cooling and heating
  • Fuel system
  • Transmission
  • Mechanical gearbox
  • Automatic gearbox
  • Transfer case
  • Clutch
  • Transmission line
  • Chassis, running gear
  • Brake system
  • Car suspension
  • Steering
  • Body and interior
  • Exterior (external elements)
  • Interior (internal elements)
  • Doors, locks and windows
  • Electrical equipment
  • Equipment and devices
  • Ignition system
  • Power devices
  • Electrical circuits
ToyotaMan.ru © 2018–2026 • Mobile version • Interesting about Toyota • Administration • Sitemap: EN BG BY UA RS HR RO PL SK HU • Search system • Bookmark
Camry Vista-V40 • Camry XV10 • Camry XV20 • Camry XV30 • Corolla Verso-AR10 • Corolla E80 • Corona T190 • Carina T170 • Carina T190 • Land Cruiser J70 (diesel) • Land Cruiser J60 (petrol) • Land Cruiser J100 • Highlander XU20 (petrol) • 4Runner N120 • RAV4 XA10 • RAV4 XA20 • Duet M100 • Dyna Y50 •
We require cookies to enable some interactive features. Is that ok with you?