
Company Honda Company Ford Company Skoda Company Kia Company Mazda Company Mercedes Company Renault
English Русский
Български
Беларускі
Український
Српски
Hrvatski
Română
Polski
Slovenský
Magyar
Bookmark Articles Sitemap Contacts
ToyotaMan.ru


Camry Corolla Corona Carina Land Cruiser Highlander 4Runner RAV4 Others
Highlander 1 (2000-2007, petrol)

Instrument cluster — removal and installation [Toyota Highlander XU20]

  • Main
  • Highlander
  • XU20 (2000-2007)
  • Electrical equipment
  • Equipment and devices
  • Instrument cluster — removal and installation
0
Warning! The models covered by this manual are equipped with a Supplemental Restraint System (SRS), commonly known as the air bag system. To prevent accidental air bag deployment, which could result in injury, be sure to disable the air bag system before working near air bag components (see paragraph 25).


1. Disconnect the ground wire from the battery (see paragraph 1 of chapter 5).

2. Remove the instrument panel trim panel (see chapter 11).

3. Loosen the screws securing the instrument panel (Fig. 10.3) and pull the instrument panel toward the steering wheel.
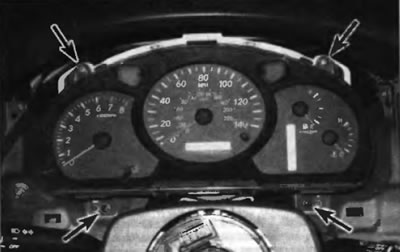


Fig. 10.3. To detach the instrument panel, unscrew the screws


4. Disconnect the electrical connectors on the back of the panel (Fig. 10.4).
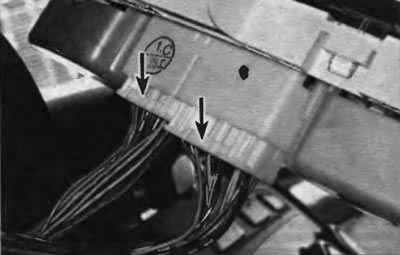


Fig. 10.4. Pull the shield back far enough to disconnect the electrical connectors on the back of it


5. Installation is performed in the reverse order of removal.
This article is available at: russian, bulgarian, belarusian, ukrainian, serbian, croatian, romanian, polish, slovak, hungarian
The article material has been checked: Kondratyeva Ulyana
Share information:
◀ Previous
Highlander 1: Equipment and devices
Next ▶

Front Panel Switches — Replacement
Multi-function switches — replacement
Ignition Switch and Cylinder Replacement
Direction indicator and hazard warning light relay — testing and…
Relays — General Information and Testing
Radio and speakers — removal and installation
Antenna — replacement
Windscreen wiper motor — checking and replacing
Rear Window Defogger System — Checking and Repairing
Headlight bulbs — replacement
Similar articles on other Toyota models

➥ Instrument cluster light controller Toyota Camry XV20 (1996-2001)
➥ Instrument cluster dimmer Toyota Corolla E80 (1983-1990)
➥ Instrument cluster Toyota Corona T190 (1992-1997)
➥ Instrument cluster — device Toyota Carina T190 (1992-1996)
➥ Instrument cluster — removal and installation Toyota Cruiser 60/80 (1980-1997, petrol)
➥ Designation of the symbols of the light indicators of the… Toyota 4Runner N120 (1989-1995)
Link in different formats to this article
Comments and feedback from visitors
No comments yet


Add two numbers 38 + 38


Highlander 1 (2000-2007, petrol) 
  • General information
  • Introduction to the guide
  • Troubleshooting
  • Maintenance
  • Power unit
  • 4-cylinder engine
  • 6-cylinder engine
  • Overhaul of engines
  • Cooling and heating
  • Supply and exhaust system
  • Engine electrical equipment
  • Control system
  • Transmission
  • Automatic gearbox
  • Drive shafts and cardan
  • Chassis, running gear
  • Brake system
  • Car suspension
  • Steering
  • Body and interior
  • Exterior (external elements)
  • Interior (internal elements)
  • Doors, locks and windows
  • Electrical equipment
  • Equipment and devices
  • Electrical circuits
ToyotaMan.ru © 2018–2026 • Mobile version • Interesting about Toyota • Administration • Sitemap: EN BG BY UA RS HR RO PL SK HU • Search system • Bookmark
Camry Vista-V40 • Camry XV10 • Camry XV20 • Camry XV30 • Corolla Verso-AR10 • Corolla E80 • Corona T190 • Carina T170 • Carina T190 • Land Cruiser J70 (diesel) • Land Cruiser J60 (petrol) • Land Cruiser J100 • Highlander XU20 (petrol) • 4Runner N120 • RAV4 XA10 • RAV4 XA20 • Duet M100 • Dyna Y50 •
We require cookies to enable some interactive features. Is that ok with you?