



Flywheel/faceplate
Removal
1. Using the information in the chapter 7A or 7B, remove the gearbox. If leaks are obvious, this is a good time to replace the pump seal/O-ring (for vehicles equipped with automatic transmission).
2. Remove the clutch (see chapter 8) (for vehicles equipped with manual transmission). This is a good opportunity to check/replace clutch components.
3. Use a center punch or paint to mark the flywheel/faceplate and crankshaft to eliminate any possible assembly errors (see Figure 14.3).
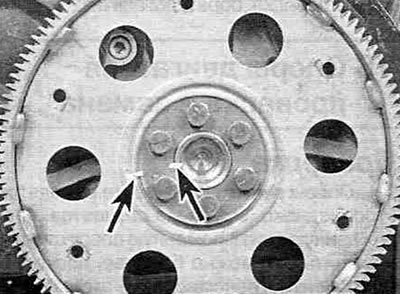
Figure 14.3. Apply alignment marks (shown by arrows) on the flywheel/faceplate and crankshaft.
4. Loosen the flywheel/faceplate mounting bolts to the crankshaft. Lock the flywheel/faceplate from turning by inserting a screwdriver between the teeth of the ring gear.
5. Remove the flywheel/faceplate from the crankshaft. The flywheel is quite heavy, so be careful not to drop it when removing the last bolt. In the automatic transmission, spacer washers are installed on both sides of the faceplate (see Figure 14.5).
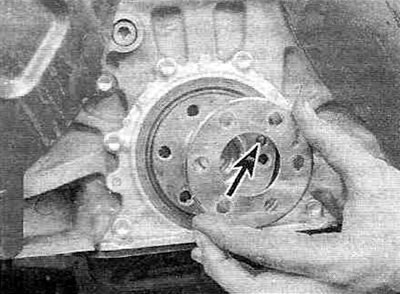
Figure 14.5. When installing spacer washers, align their holes with the mounting pin (shown by the arrow).
After removing them, to avoid getting lost, put them together with the faceplate.
The original text is posted on: Toyotaman.ru
Installation
6. Clean the flywheel from grease and engine oil. Inspect the mating surface for cracks, rivet grooves, burnt areas and burrs. Minor burrs can be removed with sandpaper. Check that there are no damaged or broken teeth on the flywheel ring gear. Place the flywheel on a flat surface and measure the curvature of the mating surface with a straight edge.
7. Clean and inspect the mating surfaces of the flywheel/faceplate and crankshaft. If the rear crankshaft oil seal is leaking, it must be replaced before installing the flywheel/faceplate.
8. Place the flywheel/faceplate on the crankshaft and align the timing marks made during removal. Some engines are equipped with locating pins or holes for special bolts to ensure proper installation of the flywheel/faceplate. When installing bolts, apply a locking sealant to their threaded parts.
9. Lock the flywheel/faceplate from turning by inserting a screwdriver between the teeth of the ring gear. Tighten the bolts to the torque specified in Specifications. Tighten using a cross pattern, in three to four passes.
10. Install the remaining components in the reverse order of removal.