



Share information:
Brake system of the car Toyota RAV4 1 (XA10)

General information about the braking system
According to its purpose and functions, the braking system includes working, spare, parking and emergency systems. The service braking system ensures that the vehicle speed is regulated and stopped with the required...
According to its purpose and functions, the braking system includes working, spare, parking and emergency systems. The service braking system ensures that the vehicle speed is regulated and stopped with the required...

Technical data of the brake system
Below in the table. 11.1 provides general, adjustment and reference data for the brake system, and Table 11.2 provides tightening torques for the main threaded connections.
Below in the table. 11.1 provides general, adjustment and reference data for the brake system, and Table 11.2 provides tightening torques for the main threaded connections.

Anti-lock braking system (ABS)
Braking efficiency is greatest when the tire has maximum grip on the road surface. During braking, the tire slides on the surface, and the rotation speed of the wheel becomes less than the speed of the car. Figure 11.1....
Braking efficiency is greatest when the tire has maximum grip on the road surface. During braking, the tire slides on the surface, and the rotation speed of the wheel becomes less than the speed of the car. Figure 11.1....

Elements of the anti-lock braking system
Modulator It consists of an electric pump and four electromagnetic valves. An electric pump creates pressure and fills the reservoirs in the modulator. The pump and tanks are located in the modulator block. The...
Modulator It consists of an electric pump and four electromagnetic valves. An electric pump creates pressure and fills the reservoirs in the modulator. The pump and tanks are located in the modulator block. The...
Removal and installation of anti-lock braking system components
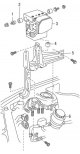
ABS modulator Figure 11.10. ABS modulator for models before 2001 (the modulator of the 1996 4WD models has minor differences): 1 – bolt; 2, 4 – pillow; 3 – ABS modulator; 5 – modulator bracket; 6 – power steering...
ABS modulator Figure 11.10. ABS modulator for models before 2001 (the modulator of the 1996 4WD models has minor differences): 1 – bolt; 2, 4 – pillow; 3 – ABS modulator; 5 – modulator bracket; 6 – power steering...

Replacing the front brake pads
Important! Always replace all brake pads on a single axle, even if only one pad is worn. If the brake pads are to be reinstalled, mark them before removal. Warning! Brake pads generate brake dust, which contains...
Important! Always replace all brake pads on a single axle, even if only one pad is worn. If the brake pads are to be reinstalled, mark them before removal. Warning! Brake pads generate brake dust, which contains...

Replacing the front brake caliper
Warning! Brake pads generate brake dust, which contains asbestos, which is harmful to health. Do not use compressed air or inhale the dust when cleaning brake pads. Caution! Use only a special brake cleaner to clean...
Warning! Brake pads generate brake dust, which contains asbestos, which is harmful to health. Do not use compressed air or inhale the dust when cleaning brake pads. Caution! Use only a special brake cleaner to clean...

Checking and replacing brake discs — removal, inspection and installation
Important! If one brake disc needs to be replaced, replace both to ensure uniform braking. When replacing brake discs, also replace the brake pads. Examination Apply the parking brake and block the rear wheels with...
Important! If one brake disc needs to be replaced, replace both to ensure uniform braking. When replacing brake discs, also replace the brake pads. Examination Apply the parking brake and block the rear wheels with...

Replacing rear brake pads
Important! Always replace all brake pads on a single axle, even if only one pad is worn. If the brake pads are to be reinstalled, mark them before removal. Warning! Brake pads generate dust containing asbestos, which is...
Important! Always replace all brake pads on a single axle, even if only one pad is worn. If the brake pads are to be reinstalled, mark them before removal. Warning! Brake pads generate dust containing asbestos, which is...

Replacing the wheel brake cylinder
Important! Always replace wheel cylinders in pairs, even if only one brake cylinder has failed. Note: If there is a brake fluid leak from the wheel cylinder, it is recommended to replace it rather than repair it....
Important! Always replace wheel cylinders in pairs, even if only one brake cylinder has failed. Note: If there is a brake fluid leak from the wheel cylinder, it is recommended to replace it rather than repair it....

Replacing the brake master cylinder
Removal On pre-2001 models, remove the air cleaner cover and fuse/relay box on the left side of the engine compartment. Figure 11.35. Master brake cylinder: A – electrical connector; B – brake pipe connection points; C...
Removal On pre-2001 models, remove the air cleaner cover and fuse/relay box on the left side of the engine compartment. Figure 11.35. Master brake cylinder: A – electrical connector; B – brake pipe connection points; C...

Replacing the brake fluid reservoir sealing rings
The brake fluid reservoir can be replaced without removing the master cylinder. If there are brake fluid leaks between the master cylinder and the reservoir, replace the reservoir sealing rings. Remove the cap from the...
The brake fluid reservoir can be replaced without removing the master cylinder. If there are brake fluid leaks between the master cylinder and the reservoir, replace the reservoir sealing rings. Remove the cap from the...

Replacing brake pipes and hoses
Brake pipes and hoses are used to supply brake fluid from the master cylinder to the wheel cylinders. The connection of the tubes to the brake cylinders and distribution devices is made using union nuts. The ends of the...
Brake pipes and hoses are used to supply brake fluid from the master cylinder to the wheel cylinders. The connection of the tubes to the brake cylinders and distribution devices is made using union nuts. The ends of the...
Bleeding the hydraulic brake system
Bleeding the hydraulic brake system is necessary to remove air, which significantly reduces braking efficiency. Air can enter the hydraulic drive due to depressurization of the system during repairs or replacement of...
Bleeding the hydraulic brake system is necessary to remove air, which significantly reduces braking efficiency. Air can enter the hydraulic drive due to depressurization of the system during repairs or replacement of...

Checking and replacing the brake booster
Examination The brake booster increases the force applied to the brake pedal, thereby making the vehicle easier to control. The operating principle of the vacuum brake booster is based on the use of vacuum in the intake...
Examination The brake booster increases the force applied to the brake pedal, thereby making the vehicle easier to control. The operating principle of the vacuum brake booster is based on the use of vacuum in the intake...

Adjusting the parking brake
If the parking brake lever clicks 5 to 8 times when fully tightened, the adjustment is correct. If the travel is less than 5 clicks, the brake pads will be partially pressed against the brake disc. If the stroke is more...
If the parking brake lever clicks 5 to 8 times when fully tightened, the adjustment is correct. If the travel is less than 5 clicks, the brake pads will be partially pressed against the brake disc. If the stroke is more...

Replacing the parking brake cables
Replacing the rear cable The rear parking brake cable connects the rear wheel brake mechanisms to the compensator. Relieve the pressure in the fuel system and disconnect the ground wire from the battery. Block the front...
Replacing the rear cable The rear parking brake cable connects the rear wheel brake mechanisms to the compensator. Relieve the pressure in the fuel system and disconnect the ground wire from the battery. Block the front...
Adjusting the brake pedal position
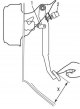
Pedal installation height Figure 11.44. Brake pedal installation height: 1 – pusher; 2 – brake light switch; X – brake pedal installation height Measure the brake pedal installation height, which should be within the...
Pedal installation height Figure 11.44. Brake pedal installation height: 1 – pusher; 2 – brake light switch; X – brake pedal installation height Measure the brake pedal installation height, which should be within the...
Checking and replacing the brake light switch
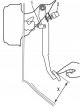
Examination Figure 11.44. Brake pedal installation height: 1 – pusher; 2 – brake light switch; X – brake pedal installation height The brake light switch is mounted on a bracket near the top of the brake pedal (see...
Examination Figure 11.44. Brake pedal installation height: 1 – pusher; 2 – brake light switch; X – brake pedal installation height The brake light switch is mounted on a bracket near the top of the brake pedal (see...
This section is available on: russian, bulgarian, belarusian, ukrainian, serbian, croatian, romanian, polish, slovak, hungarian
Similar sections for other Toyota models
➥ Brake system Toyota 4Runner N120 (1989-1995)
➥ Brake system Toyota Cruiser 70 (1985-1996, diesel)
➥ Brake system Toyota Highlander 1 (2000-2007, petrol)
➥ Brake system Toyota Camry XV20 (1996-2001)
➥ Brake system Toyota Corona T190 (1992-1997)
➥ Brake system Toyota Corolla E80 (1983-1990)
Link in different formats to this article
TEXTHTMLBB Code
- General information
- Introduction to manual
- User manual
- Daily care
- Maintenance (petrol)
- Maintenance (diesel)
- Troubleshooting
- Power unit
- Gasoline engines (before 2000)
- Petrol engines (since 2001)
- Diesel engines
- Engine overhaul
- Cooling and heating
- Fuel system (petrol)
- Fuel system (diesel)
- Engine electrical equipment
- Control system (petrol)
- Control system (diesel)
- Transmission
- Manual gearbox
- Automatic gearbox
- Clutch and drive shafts
- Chassis, running gear
- Brake system
- Front suspension
- Rear suspension
- Steering system
- Body and interior
- Exterior (external elements)
- Interior (internal elements)
- Doors, locks and windows
- Electrical equipment
- Equipment and devices
- Electrical circuits
- General information
- User manual
- Maintenance
- Power unit
- Petrol engine 3S-FE
- Petrol engine 1AZ-FE
- Engine overhaul
- Cooling and air conditioning
- Fuel and exhaust system
- Ignition system
- Toxicity reduction system
- Transmission
- Clutch
- Mechanical gearbox
- Automatic gearbox
- Cardan and drive shafts
- Chassis, running gear
- Brake system
- Car suspension
- Steering
- Body and interior
- Exterior (external elements)
- Interior (internal elements)
- Doors, locks and windows
- Electrical equipment
- Equipment and devices
- Power devices
- Electrical circuits