



Oil pan
Removal
1. Disconnect the cable from the negative battery terminal.
2. Apply the parking brake and chock the rear wheels.
3. Raise the front wheels and install safety supports.
4. Remove the lower engine guards, if equipped.
5. Drain the engine oil and remove the oil filter (see Chapter 1A). Pull out the oil dipstick.
6. Unscrew the three nuts securing the intake pipe to the exhaust manifold, then the two bolts and nuts that secure the catalytic converter to the rest of the exhaust system (see chapter 4A).
7. Unscrew the two mounting bolts and remove the exhaust pipe bracket, then remove the exhaust pipe itself (see paragraph 6).
8. Remove the front (from the radiator side) gearbox mounting bracket to the cylinder block (see Figure 12.8).
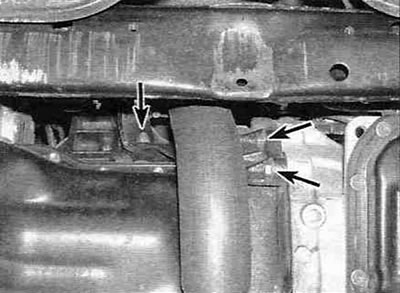
Figure 12.8. Unscrew the bolts (shown by arrows) front (from the radiator side) bracket for mounting the unit to the gearbox.
9. After unscrewing the mounting bolts, remove the engine oil pan. If it is "rooted" to the block, carefully pry it with a small screwdriver or plastic knife, pushing it (him) into the joint (see Figure 12.9).
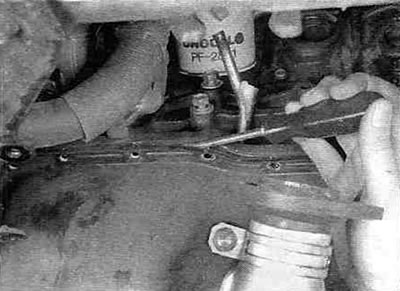
Fig. 12.9. Using a screwdriver, carefully remove the oil pan from the cylinder block - be careful not to damage the joint.
When removing, try not to damage the mating surfaces of the pan and the block, so as not to cause leaks.
Installation
10. Using a soft scraper, remove any traces of old gasket and sealant from the mating edges of the block and pan, then wipe them with a rag soaked in lacquer thinner or acetone.
11. Make sure that the threaded holes for the oil pan mounting bolts in the cylinder block are clean.
12. Check that the pallet mating flange is not warped, especially around the bolt holes. If necessary, straighten the pallet by placing a wooden block under its joining edge and lightly tapping it with a hammer.
13. Inspect the oil receiver assembly for cracks and ensure that the oil receiver screen is not clogged with deposits. If the oil pickup assembly has been removed, thoroughly clean the screen and replace the O-ring and gasket, then reinstall the assembly. Tighten the mounting bolts/nuts to the torque specified in Specifications.
14. Apply a 5mm wide bead of RTV sealant to the tray mating flange (see Figure 12.14).
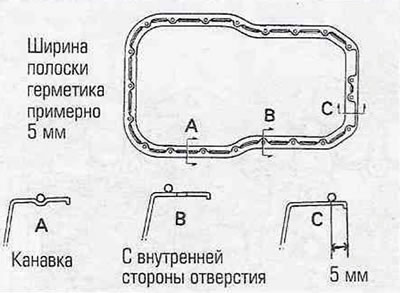
Figure 12.14. Apply a bead of RTV sealant to the oil pan flange.
Note: The tray must be installed no later than 5 minutes after applying the sealant.
15. Carefully install the pan onto the engine block and tighten the mounting bolts. Starting from the center, tighten the pan mounting bolts to the torque specified in the Specifications, making three or four passes.
16. Installation of the remaining components is carried out in the reverse order of removal. Fill with oil and install a new oil filter. Replace the gaskets on each side of the downpipe.
17. Start the engine, check the oil pressure and for leaks.