



Contents: Removal ↓ Installation ↓
Oil pan and related parts on 3.0L engine
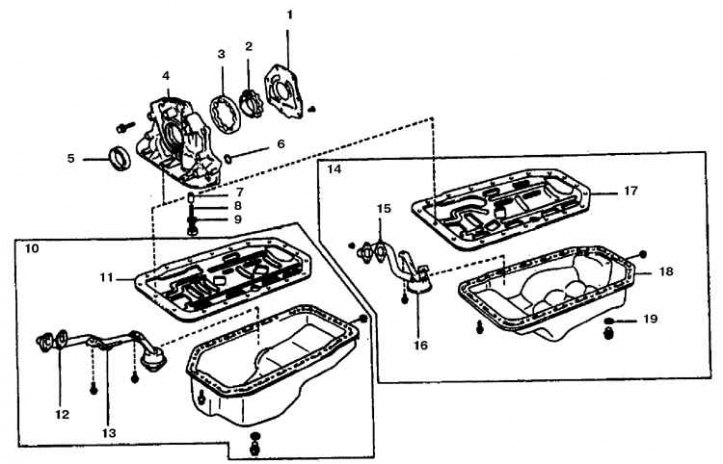
1. Oil pump cover; 2. Drive gear; 3. Driven gear; 4. Body; 5. Seal; 6. Seal; 7. Pressure reducing valve; 8. Spring; 9, 12, 15, 19. Gasket; 10. For rear-wheel drive vehicles; 11, 17. Oil deflector; 13, 16. Oil receiver; 14. For all-wheel drive vehicles; 18. Pallet
Oil pan and related parts on 3.4L engine
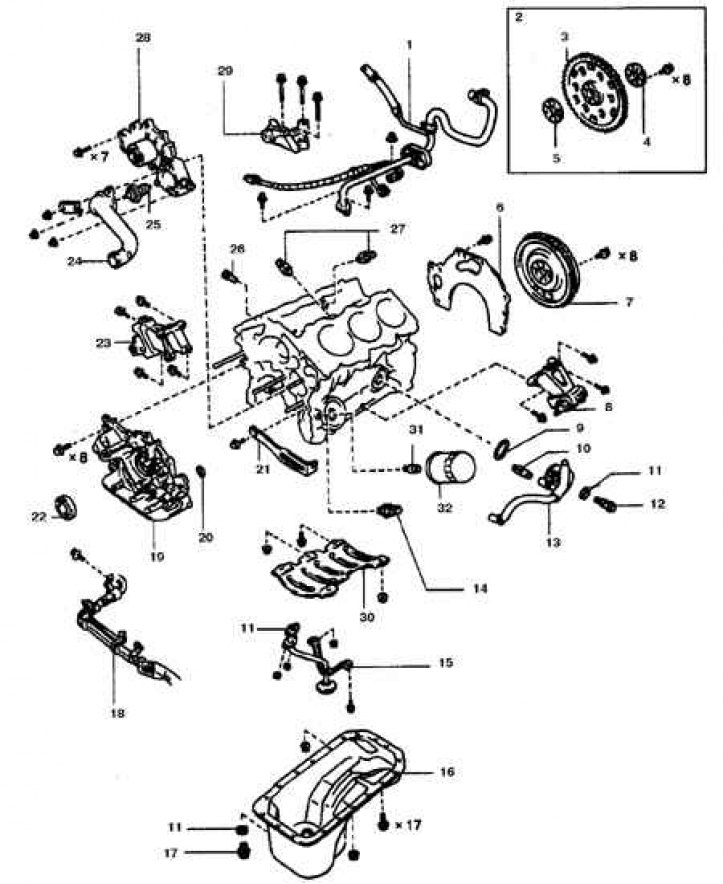
1. Bypass pipe with knock sensor wire; 2. For automatic transmission; 3. Leading disk; 4, 5. Spacers; 6. Back plate; 7. Flywheel; 8, 23. Engine bracket; 9, 20. Seal; 10. Oil cooler nipple; 11. Gasket; 12. Hollow bolt; 13. Oil cooler; 14. Oil pressure alarm sensor; 15. Oil receiver; 16. Pallet; 17. Cork; 18. Starter cable; 19. Oil pump; 21. Generator bracket; 22. Seal; 24. Coolant inlet pipe; 25. Thermostat; 26. Drain plug; 27. Knock sensor; 28. Coolant pump; 29. Bracket; 30. Oil deflector; 31. Oil filter nipple; 32. Oil filter
Attention! To remove the sump on all-wheel drive vehicles, you will need to remove the axle shafts and front gearbox. Therefore, to remove the sump on these vehicles, it is recommended to remove the engine, as this operation is somewhat simpler.
Removal
1. Remove the engine mudguards.
2. Disconnect the battery from ground.
3. Raise the car.
4. On all-wheel drive vehicles, remove the axle shafts and front differential.
5. Drain the oil and remove the oil filter.
6. Remove the timing belt.
7. Remove the lower flywheel housing.
(View the full text on the portal: www.ToyotaMAN.ru)
8. Loosen the bolts and remove the oil pan. If necessary, move it with light blows.
Installation
1. Remove any remaining seal from the split surfaces of the cylinder block and the oil pan. Wash the sealing surfaces with solvent.
2. Make sure the threaded holes in the cylinder block are clean.
3. Check the split surface of the tray for deformations, especially near the bolt holes. If necessary, straighten the surface with a hammer.
4. Install the oil deflector (if it was filmed).
5. Check the condition of the oil receiver, the presence of cracks and clogging of the coarse filter.
6. Apply a bead of sealant with a diameter of approximately 3 mm to the sealing surface of the tray.
7. Carefully install the pan and tighten the bolts. Tighten the pan bolts to the specified torque in three or four steps, starting from the center.
8. Further assembly is performed in the reverse order. Fill the engine with oil and replace the filter. Replace the exhaust pipe muffler gaskets.
9. Start the engine and check for leaks.