
Company Honda Company Ford Company Skoda Company Kia Company Mazda Company Mercedes Company Renault
English Русский
Български
Беларускі
Український
Српски
Hrvatski
Română
Polski
Slovenský
Magyar
Bookmark Articles Sitemap Contacts
ToyotaMan.ru


Camry Corolla Corona Carina Land Cruiser Highlander 4Runner RAV4 Others
4Runner N120 (1989-1995)

Cylinder heads — removal and installation [Toyota 4Runner N120]

  • Main
  • 4Runner
  • N120 (1989-1995)
  • Power unit
  • 6-cylinder engines
  • Cylinder heads — removal and installation
0
Contents: Removal ↓ Installation ↓

Cylinder Head Bolt Tightening Sequence for 3.0L Engines
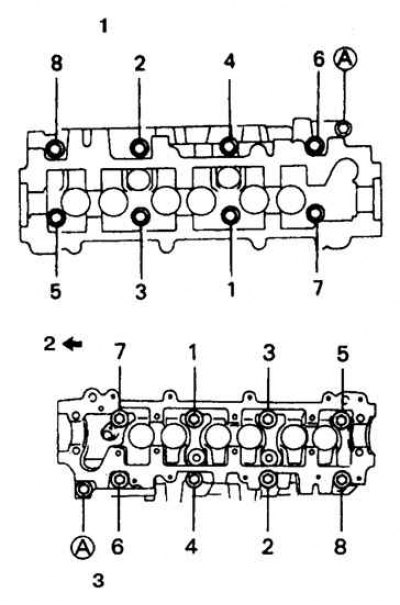


1. Right head
2. To the front
3. Left head


Cylinder Head Bolt Tightening Sequence for 3.4L Engines
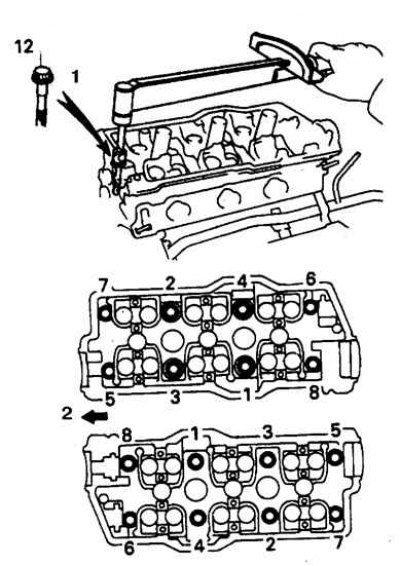


1. 12-point slotted bolt
2. To the front


Removal


1. Disconnect the battery from ground.

2. Drain the coolant.

3. Remove the equalizer chamber, fuel lines and injectors.

4. Remove the exhaust manifold.

5. Remove the generator and distributor (if provided).

6. Remove the intake manifold

7. Remove the timing belt, camshaft sprockets and upper tensioner roller.

8. Remove the top belt cover.

9. Remove the camshaft from the head being dismantled.
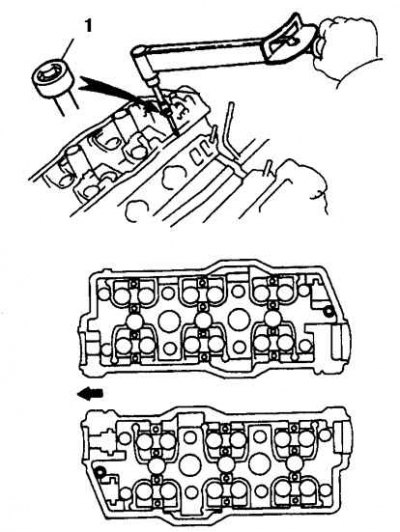


10. On 3.4L engines, remove the internal spline bolts (one per head) (1 - Hex key).


11. Loosen the cylinder head bolts in the sequence shown, loosening each bolt 1/4 turn at a time (see Fig. Cylinder Head Bolt Tightening Order for 3.0L Engines or Fig. Cylinder Head Bolt Tightening Order for 3.4L Engines).

12. Carefully remove the cylinder head by lightly tapping it through a wooden spacer.

13. Perform the same procedures for the other head.

Installation


1. Clean the mating surfaces of the cylinder head and block.

2. Carefully (taking care to prevent dirt from getting into the holes) scrape off any carbon deposits and remaining gasket material.

3. Check the split surfaces of the cylinder head and block for burrs, chips, dents and other damage. Minor damage can be removed with a file; in case of serious damage, the head or block must be re-ground.

4. Blow out all channels and holes with compressed air, and tap the threads.

5. Run the threads of the bolts with a die.
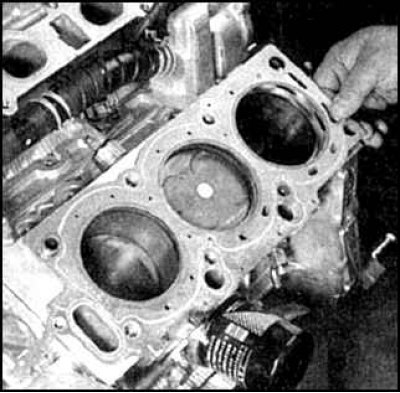


6. Place new gaskets on the cylinder block, aligning them with the pins.

7. Carefully install the head onto the cylinder block without disturbing the position of the gasket.

8. Lubricate the thrust surfaces of the bolt heads with engine oil.


9. Screw the cylinder head bolts into their original positions by hand. Gradually tighten the bolts to the torque of the 1st stage (see subsection 3.2.1) in the specified sequence (see Fig. Cylinder Head Bolt Tightening Order for 3.0L Engines or Fig. Cylinder Head Bolt Tightening Order for 3.4L Engines). Do not tighten bolts with internal slots.

10. Tighten the bolts in 2 stages, 90° at each stage, following the sequence.

11. On 3.4L engines, tighten the female spline bolt to the specified torque.

12. Do the same for the other head.

13. Then the assembly is performed in the reverse order. Fill the cooling system with liquid. Start the engine, make sure there are no leaks.
This article is available at: russian, bulgarian, belarusian, ukrainian, serbian, croatian, romanian, polish, slovak, hungarian
The article material has been checked: Gribkov Vladimir
Share information:
◀ Previous
4Runner N120: 6-cylinder engines
Next ▶

Camshafts and tappets — removal, inspection and installation
Camshaft Seals — Replacement
Front Crankshaft Oil Seal — Replacement
Timing Belt — Removal, Checking and Installation
Exhaust manifolds — removal and installation
Oil pan — removal and installation
Oil pump — removal, inspection and installation
Rear Crankshaft Oil Seal — Replacement
Engine Mounting Parts — Checking and Replacing
Similar articles on other Toyota models

➥ Cylinder heads — removal and installation Toyota Camry XV20 (1996-2001)
➥ Removal and installation cylinder heads Toyota Cruiser 100 (1998-2007)
➥ Cylinder heads — removal and installation Toyota Highlander 1 (2000-2007, petrol)
➥ Cylinder head — petrol 1.3 liters Toyota Corolla E80 (1983-1990)
➥ Cylinder head (3S-FE, 4S-FE) — removal Toyota Corona T190 (1992-1997)
➥ Removal the cylinder head Toyota Carina T190 (1992-1996)
Link in different formats to this article
Comments and feedback from visitors
No comments yet


Add two numbers 30 + 29


4Runner N120 (1989-1995) 
  • General information
  • User manual
  • Maintenance
  • Power unit
  • 4-cylinder engines
  • 6-cylinder engines
  • Engine overhaul
  • Cooling and heating
  • Fuel system
  • Transmission
  • Mechanical gearbox
  • Automatic gearbox
  • Transfer case
  • Clutch
  • Transmission line
  • Chassis, running gear
  • Brake system
  • Car suspension
  • Steering
  • Body and interior
  • Exterior (external elements)
  • Interior (internal elements)
  • Doors, locks and windows
  • Electrical equipment
  • Equipment and devices
  • Ignition system
  • Power devices
  • Electrical circuits
ToyotaMan.ru © 2018–2026 • Mobile version • Interesting about Toyota • Administration • Sitemap: EN BG BY UA RS HR RO PL SK HU • Search system • Bookmark
Camry Vista-V40 • Camry XV10 • Camry XV20 • Camry XV30 • Corolla Verso-AR10 • Corolla E80 • Corona T190 • Carina T170 • Carina T190 • Land Cruiser J70 (diesel) • Land Cruiser J60 (petrol) • Land Cruiser J100 • Highlander XU20 (petrol) • 4Runner N120 • RAV4 XA10 • RAV4 XA20 • Duet M100 • Dyna Y50 •
We require cookies to enable some interactive features. Is that ok with you?