



Contents: Removal ↓ Installation ↓
Warning! Gasoline is extremely flammable and explosive, so exercise caution when working with any fuel system components.
Caution! Work must be carried out in a well-ventilated area, preferably with windows and doors open to create a draft.
Caution! Do not use open flames, electric welding, or tools that may generate sparks. Make sure there is a charged fire extinguisher in the immediate vicinity of the work area.
Caution! Use goggles to protect your eyes from fuel. If fuel comes into contact with your skin, wash the area with plenty of water.
Caution! When working with the fuel system, maintain cleanliness, as dirt entering the system channels can block them, which will impair normal engine operation.
Removal
Note: Depending on the year of manufacture and vehicle configuration, the location of electrical wires, lines, and hoses in the engine compartment may vary. Therefore, before disconnecting electrical connectors and disconnecting pipes or hoses, it is recommended to mark them with adhesive tape.
Note: The engine is removed downwards together with the gearbox.
Proceed with removal in the following order:
- raise the car on a lift;
- relieve pressure in the fuel system;
- turn off the ignition and disconnect the ground wire from the battery;
- remove the hood. Remove the ventilation chamber cover located at the base of the windshield;
- protect your fenders with covers to prevent damage to the paintwork;
- remove the air filter housing;
- disconnect the accelerator cable and move it to the side together with the bracket;
- remove the battery. On vehicles since 2001, remove the battery support;
- on vehicles before 2001, remove the activated carbon canister;
- unscrew the nuts securing the front wheels and drive shafts to the hubs;
- drain the engine oil and coolant;
- on vehicles since 2001, remove the expansion tank;
- remove the accessory drive belts;
- label and disconnect the engine vacuum and coolant hoses, electrical connectors, ground wires, and fuel lines;
- release the clamps and disconnect the wiring harnesses from the engine. Also disconnect the wires from the powertrain control module (PCM) in the passenger compartment and pull the wires from the passenger compartment into the engine compartment;
- remove the generator and starter;
- remove the power steering pump;
- remove the radiator fan, fan shroud and radiator. The radiator fan, fan shroud and radiator do not need to be removed. However, this will eliminate the possibility of damaging them when removing the engine. If the radiator remains installed in the vehicle, disconnect the automatic transmission oil cooler lines from it;
- on models with air conditioning, remove the air conditioning compressor mounting bolts. Move the air conditioning compressor with the wires and tubes attached to it to the side and secure it to the body with soft wire;
The original is published on the website: ToyotaMAN.ru
Caution! Do not open the air conditioning system cooling circuit.
- separate the exhaust pipe from the exhaust manifold;
- disconnect the gearbox control rods. Also disconnect all electrical connectors from the transmission;
- if the vehicle has a manual transmission, remove the clutch slave cylinder from the transmission housing;
- remove the front drive shafts. On all-wheel drive vehicles, remove the driveshaft;
- on vehicles since 2001, disconnect the links from the anti-roll bar;
- remove the 2 bolts securing the steering gear to the front cross member and the hinge bolts to the lower wishbones;
- attach the chain of the lifting device to the engine and tighten it so that the weight of the engine and gearbox is supported by the lifting device;
- check that nothing but the supports connects the engine and gearbox to the car;
- unscrew the central bolt securing the left support to the gearbox;
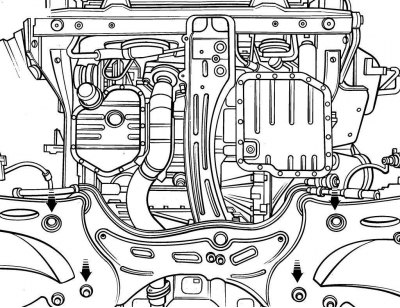
Figure 3.98. Location of front and cross beam mounting bolts
- unscrew the bolts (figure 3.98) and remove the front and cross beams;
- slowly lower the engine and gearbox. Disconnect the hoist chain from the engine;
- unscrew the bolts and separate the gearbox from the engine;
- remove the bolts, flywheel/drive plate and mount the engine on a stand.
Installation
Perform installation in the following order:
- check the condition of the power unit mounts and replace them if necessary;
- on vehicles with a manual transmission, check the condition of the clutch. Apply a thin coat of high temperature grease to the splines of the transmission input shaft;
- move the gearbox towards the engine so that the input shaft of the gearbox enters the splines of the driven disk of the clutch. To align the splines of the transmission input shaft with the splines of the clutch driven disc, it may be necessary to rotate the engine crankshaft slightly. When installing the gearbox, the input shaft should not hang on the clutch disc;
- having moved the gearbox forward, install the clutch housing on the guide bushings of the cylinder block;
- bolt the gearbox to the engine;
- install the engine with gearbox under the engine compartment of the car;
- attach the chain of the lifting device to the engine and lift the engine with the gearbox;
- install and bolt the front and cross beams.
Further installation of the engine is carried out in the reverse order of removal, taking into account the following.
Fill with engine oil and coolant.
Check the level and top up the power steering and gearbox fluid if necessary.
Start the engine and check for fluid leaks.