



Cooling system maintenance - fluid removal, flushing and filling

Caution! Avoid contact with skin or painted surfaces of the vehicle. Any spilled antifreeze should be washed away immediately with plenty of water. Store antifreeze in a closed container out of the reach of children and pets, as they may be attracted by the liquid's sweet smell. Swallowing even a small amount of antifreeze can be fatal! Clean up any spilled antifreeze immediately. Keep the antifreeze container tightly closed. Repair any detected antifreeze leaks immediately. When disposing of liquid, follow the law. Under certain conditions, antifreeze may be flammable - read the container label carefully for safety precautions.
Caution! If the ignition is on, the radiator fan may start at any time. When working near a fan, make sure the ignition key is turned to the OFF position.
Note: Toyota Standard coolant should be used at these coolant change intervals (only red/green), but not Toyota Long life coolant (pink).
1. The cooling system should be periodically flushed and the coolant replaced. This will prevent the formation of corrosion, which adversely affects the operation of the engine and can cause it to fail. When servicing the cooling system, check the hoses and radiator cap, making any necessary replacements.
Fluid removal
2. Apply the handbrake and lock the wheels. If the engine is hot, allow it to cool for several hours before beginning this procedure. If necessary, remove the lower engine cover.
3. After the engine has cooled completely, remove the radiator cap.
4. Place a large bowl under the left side of the radiator to collect the liquid. Attach a 10mm diameter piece of hose to the drain outlet to direct the flow of liquid into a basin (some models have this hose installed), then open the drain tap (for this purpose you may need pliers) (see Figure 25.4).
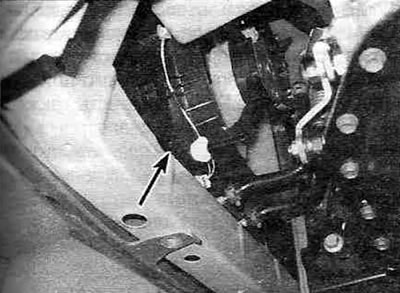
Figure 25.4. On most models, to access the drain hose at the bottom of the radiator, you must first remove the cover. Before opening the tap, place a short piece of hose with an internal diameter of 10 mm onto the plastic fitting (shown by the arrow).
5. As soon as the liquid stops flowing out, place a basin under the block drain plug and, after unscrewing the plug, drain the liquid from the cooling jacket.
6. While the fluid is draining, check the condition of the hoses and clamps. Replace damaged parts (see paragraph 11).
Flushing
7. Drain the liquid, remove the thermostat (see chapter 3). Install the housing without the thermostat. This is necessary to completely flush the system.
8. Close the radiator drain cock. Move the heater control lever to the HOT position to flush the heater core along with the rest of the system.
9. Disconnect the upper hose from the radiator, insert a garden hose into the radiator and flush the system until clean water comes out of the upper radiator hose (see Figure 25.9).
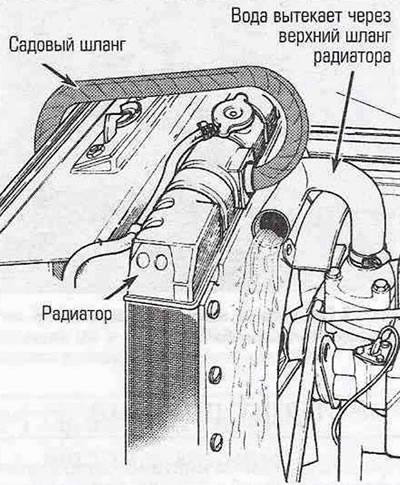
Figure 25.9. Remove the thermostat and, after disconnecting the upper radiator hose, flush the radiator and the cooling jacket of the cylinder block using a garden hose.
10. If the radiator is clogged with deposits, remove it (see chapter 3) and rinse with running water in the opposite direction. Insert a water hose into the lower radiator hose and flush it until clean water comes out of the upper hose. If the radiator requires repair, contact a specialized workshop.
11. You can try to get rid of deposits in the radiator using various chemical cleaners. When using them, follow the manufacturer's instructions.
Note: If the fluid is changed regularly and the radiator is flushed regularly, no additional cleaning "additives" or "cleaners" are required.
12. Disconnect the expansion tank hose from the radiator, remove the tank and flush it (see chapter 3). The damaged tank must be replaced. Install the expansion tank in place and connect the tank hose to the radiator.
Filling
13. Close and tighten the radiator drain cock. Install and/or tighten the engine block drain plug. Reinstall the thermostat (see chapter 3).
14. Move the heater control handle to the position corresponding to maximum heating.
15. Slowly add new fluid (a mixture of equal parts antifreeze and water) under the cut of the radiator neck.
16. Remove the radiator cap, start the engine and let it run until the thermostat opens (the coolant will begin to circulate through the radiator and its upper hose will heat up).
17. Turn off the engine and let it cool. Add fluid to the level of the radiator filler neck.
18. Pinch the upper radiator hose to force out air and add more fluid if necessary. Close the radiator cap.
19. Start the engine and warm it up to normal operating temperature (before turning on the cooling system fan), make sure there are no leaks. If removed, install the lower engine cover.