
Attention! Wait for the engine to cool down before starting this procedure.
Attention! Do not allow antifreeze to come into contact with the skin or paintwork of the vehicle. Splashes should be washed off immediately with plenty of water. Antifreeze is highly toxic if swallowed. Never leave antifreeze in open containers or in puddles on the driveway or garage floor. Antifreeze must be disposed of properly in accordance with local codes and regulations in designated areas.
1. The cooling system should be periodically drained, flushed, and topped up with the proper mixture of antifreeze and water to prevent rust and corrosion, which can degrade cooling system performance and cause engine damage. When servicing the cooling system, check all hoses and radiator cap and replace if necessary.
Drain
2. Apply the parking brake and chock the wheels. If the vehicle has just been driven, allow several hours for the engine to cool down before beginning this procedure.
3. Once the engine is completely cool, remove the radiator cap.
4. Place a large container under the radiator drain cock to collect the escaping coolant. Connect a 9.5 mm ID hose to the drain cock to direct the coolant into a container (some models are already equipped with a hose), then open the drain roll (pliers may be required to turn the faucet) (pic. 26.4).
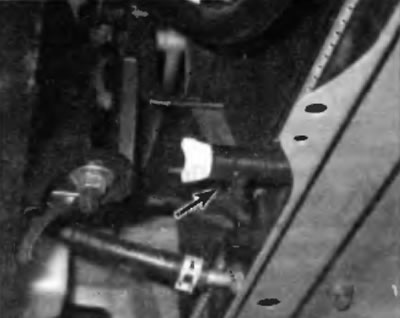
Pic. 26.4. On most models, access to the drain cock at the bottom of the radiator will require the removal of a mudguard
5. After the coolant stops flowing from the radiator, move the container under the drain plug (And) cylinder block. Loosen the plugs and allow the coolant contained in the cylinder block to drain. On models with four-cylinder engines, the block drain plug is located on the front side of the cylinder block. V6 models have one plug on each side of the block (pic. 26.5).
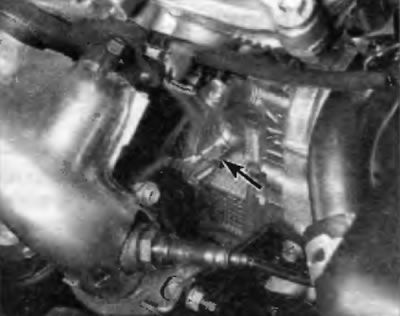
Ryas. 26.5. The V6 engine has a coolant drain edge similar to the one shown; it is located on the front and rear sides of the cylinder block
6. While draining the coolant, check the condition of the radiator hoses, heater hoses and clamps (if necessary, contact paragraph 11).
7. Replace damaged clamps or hoses (see chapter 3).
Flushing
8. After the system is completely empty, remove the thermostat from the engine (see chapter 3). Then reinstall the thermostat housing without the thermostat. This will flush the system.
9. Replace the drain plug (And) cylinder block and tighten the radiator drain plug. Set the heating system controls to the maximum heat position so that the heater core is flushed at the same time as the rest of the cooling system.
10. Disconnect the upper radiator hose from the radiator. Insert a garden hose into the upper radiator inlet, turn on the water supply and flush the system. Flushing should be performed until clean water comes out of the upper radiator hose (pic. 26.10).
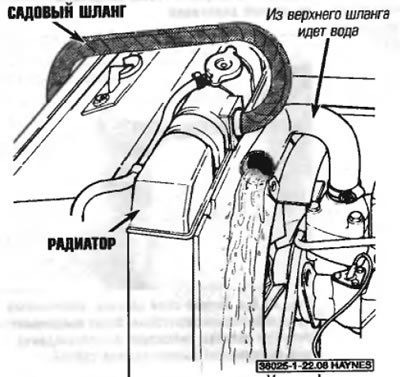
Ryas. 26.10. With the thermostat removed, disconnect the upper radiator hose and flush the radiator and engine block with a mix of garden hose
11. In severe cases of contamination or blockage of the radiator, remove the radiator (see chapter 3) and hand it over for cleaning and necessary repairs to the appropriate organization. Most of the deposits can be removed by chemical attack with special cleaners, which can be purchased at an auto parts store. Follow the procedure given in the manufacturer's instructions.
Note. By regularly draining the coolant and refilling the system with the proper antifreeze/water mixture, there should be no need for cleaning or descaling chemicals.
12. After flushing, empty the radiator and remove the cylinder block drain plugs again to drain the water from the system.
Refueling
13. Close and tighten the radiator drain cock. Screw in and tighten the drain plug of the cylinder block.
14. Set the heater temperature control to the maximum heat position.
15. Slowly pour new coolant into the radiator until it is full. Pour coolant into the reservoir up to the bottom mark.
16. Do not install the radiator cap and let the engine run in a well ventilated area until the thermostat opens (coolant will not flow through the radiator and the upper radiator hose will become hot).
17. Turn off the engine and let it cool down. Add more coolant to bring the level back up to the ledge on the radiator filler neck.
18. Squeeze the upper radiator hose to remove air, then add more coolant if necessary. Install the radiator cap.
19. Start the engine and allow it to reach normal operating temperature. Then check it for leaks.