
Company Honda Company Ford Company Skoda Company Kia Company Mazda Company Mercedes Company Renault
English Русский
Български
Беларускі
Український
Српски
Hrvatski
Română
Polski
Slovenský
Magyar
Bookmark Articles Sitemap Contacts
ToyotaMan.ru


Camry Corolla Corona Carina Land Cruiser Highlander 4Runner RAV4 Others
RAV 4 XA20 (2000-2005) RAV 4 XA10 (1994-2000)

Oil pan — removal and installation [Toyota RAV4 XA20]

  • Main
  • RAV4
  • XA20 (2000-2005)
  • Power unit
  • Petrol engines (since 2001)
  • Oil pan — removal and installation
0

Oil pan


Removal


1. Disconnect the cable from the negative battery terminal.

2. Apply the parking brake and chock the rear wheels.

3. Raise the front wheels and install safety supports.

4. Remove the lower engine guards, if equipped.

5. Drain the engine oil and remove the oil filter (see Chapter 1A). Pull out the oil dipstick.

6. After unscrewing the mounting bolts, remove the engine oil pan. If it is "rooted" to the block, carefully pry it with a small screwdriver or plastic knife, pushing it (him) into the joint (see figure 13.6, a, b).
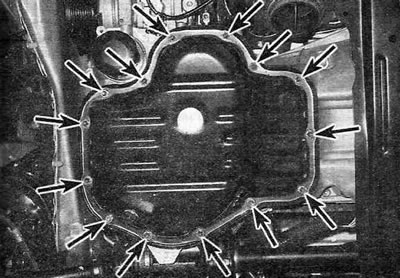


Figure 13.6,a. Oil pan mounting bolts.
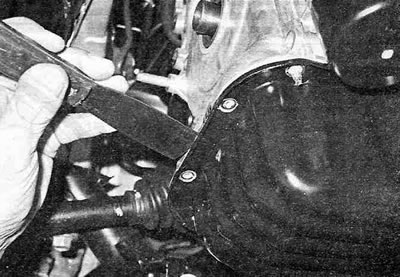


Figure 13.6, b. Using a screwdriver or plastic knife, carefully pry the oil pan off the cylinder block—oil may leak through a damaged joint.


When removing, try not to damage the mating surfaces of the pan and the block, so as not to cause leaks.

Installation


7. Using a soft scraper, remove any traces of old gasket and sealant from the mating edges of the block and pan, then wipe them with a rag soaked in lacquer thinner or acetone.

8. Make sure that the threaded holes for the oil pan mounting bolts in the cylinder block are clean.

9. Check that the pallet mating flange is not warped, especially around the bolt holes. If necessary, straighten the pallet by placing a wooden block under its joining edge and lightly tapping it with a hammer.

10. Inspect the oil receiver assembly for cracks and ensure that the oil receiver screen is not clogged with deposits. If the oil pickup assembly has been removed, thoroughly clean the screen and replace the gasket, then reinstall the assembly. Tighten the mounting bolts/nuts to the torque specified in Specifications.

The material is republished from an online website: ToyotaMan.ru

11. Apply a 5mm wide bead of RTV sealant to the tray mating flange (see Figure 13.11).
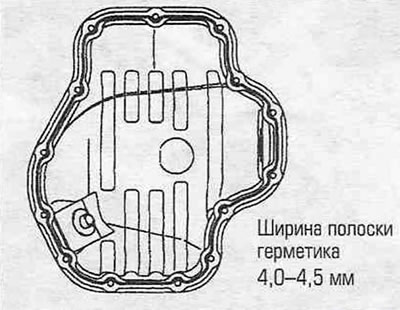


Figure 13.11. Diagram of applying sealant to the mating flange of the oil pan.


Note: Follow the sealant manufacturer's recommendations during assembly and allow for the sealant's curing time.


12. Carefully install the pan onto the engine block and tighten the mounting bolts.

13. Starting from the center, tighten the pan mounting bolts to the torque specified in Specifications, making three or four passes.

14. Installation of the remaining components is carried out in the reverse order of removal. Wait at least an hour for the sealant to harden, then add oil and install a new oil filter.

15. Start the engine, check the oil pressure and for leaks.
This article is available at: russian, bulgarian, belarusian, ukrainian, serbian, croatian, romanian, polish, slovak, hungarian
The article material has been checked: Kondratyeva Ulyana
Share information:
◀ Previous
RAV 4 XA20: Petrol engines (since 2001)
Next ▶

Front crankshaft oil seal — replacement
Crankshaft pulley/damper — removal and installation
Cylinder head — removal and installation
Exhaust manifold — removal and installation
Intake manifold — removal and installation
Oil pump — removal and installation
Rear crankshaft oil seal — replacement
Link in different formats to this article
Comments and feedback from visitors
No comments yet


Add two numbers 15 + 29


RAV 4 XA20 (2000-2005) 
  • General information
  • Introduction to manual
  • User manual
  • Daily care
  • Maintenance (petrol)
  • Maintenance (diesel)
  • Troubleshooting
  • Power unit
  • Gasoline engines (before 2000)
  • Petrol engines (since 2001)
  • Diesel engines
  • Engine overhaul
  • Cooling and heating
  • Fuel system (petrol)
  • Fuel system (diesel)
  • Engine electrical equipment
  • Control system (petrol)
  • Control system (diesel)
  • Transmission
  • Manual gearbox
  • Automatic gearbox
  • Clutch and drive shafts
  • Chassis, running gear
  • Brake system
  • Front suspension
  • Rear suspension
  • Steering system
  • Body and interior
  • Exterior (external elements)
  • Interior (internal elements)
  • Doors, locks and windows
  • Electrical equipment
  • Equipment and devices
  • Electrical circuits
RAV 4 XA10 (1994-2000) 
  • General information
  • User manual
  • Maintenance
  • Power unit
  • Petrol engine 3S-FE
  • Petrol engine 1AZ-FE
  • Engine overhaul
  • Cooling and air conditioning
  • Fuel and exhaust system
  • Ignition system
  • Toxicity reduction system
  • Transmission
  • Clutch
  • Mechanical gearbox
  • Automatic gearbox
  • Cardan and drive shafts
  • Chassis, running gear
  • Brake system
  • Car suspension
  • Steering
  • Body and interior
  • Exterior (external elements)
  • Interior (internal elements)
  • Doors, locks and windows
  • Electrical equipment
  • Equipment and devices
  • Power devices
  • Electrical circuits
ToyotaMan.ru © 2018–2026 • Mobile version • Interesting about Toyota • Administration • Sitemap: EN BG BY UA RS HR RO PL SK HU • Search system • Bookmark
Camry Vista-V40 • Camry XV10 • Camry XV20 • Camry XV30 • Corolla Verso-AR10 • Corolla E80 • Corona T190 • Carina T170 • Carina T190 • Land Cruiser J70 (diesel) • Land Cruiser J60 (petrol) • Land Cruiser J100 • Highlander XU20 (petrol) • 4Runner N120 • RAV4 XA10 • RAV4 XA20 • Duet M100 • Dyna Y50 •
We require cookies to enable some interactive features. Is that ok with you?