



Exhaust manifold
Caution: The engine must be completely cool before starting this procedure.
Removal
1. Remove the negative battery terminal.
2. Raise the front of the vehicle with a jack and install safety supports. Get under the car and remove the lower engine covers.
3. Apply penetrating oil to the exhaust pipe mounting bolts and springs to facilitate loosening, then remove the bolts and disconnect the exhaust pipe intake from the exhaust manifold. Be careful not to damage the oxygen sensor (see figure 9.3).
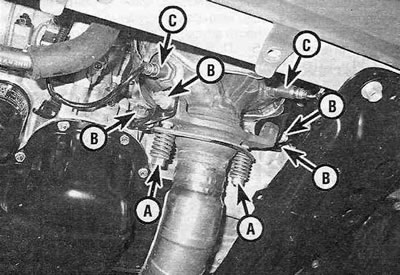
Figure 9.3. Working under the vehicle, loosen the bolts securing the exhaust pipe to the exhaust manifold (A) and lower the downpipe. Be careful not to damage the oxygen sensor (C).
B - Bolts for fastening the lower supports of the exhaust manifold.
4. Unscrew the bolts securing the lower supports of the exhaust manifold and remove it from the engine. Also disconnect the oxygen sensor connector.
5. Working in the engine compartment, remove the upper heat shield of the exhaust manifold (see Figure 9.5).
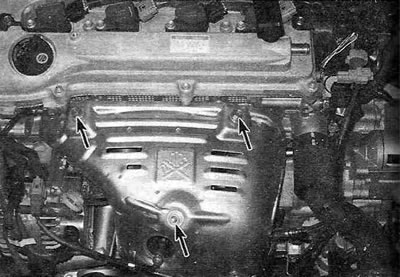
Figure 9.5. Working in the engine compartment, unscrew the upper heat shield mounting bolts (shown by arrows)...
Note: The exhaust manifold also has a lower heat-insulating shield, which is installed on the underside of the vehicle. There is no need to remove it.
6. Loosen the mounting nuts and remove the exhaust manifold and its gasket (see Figure 9.6).
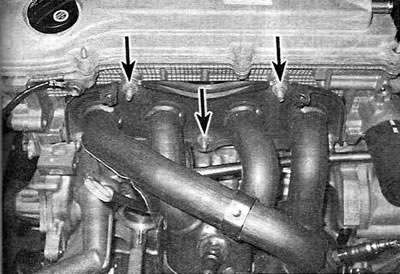
Figure 9.6... and the exhaust manifold mounting nuts, then remove it from the pins on the cylinder head and pull it out of the engine compartment.
[The material is republished from an online website: www.toyotaman.ru]
Installation
7. Using a scraper, remove all traces of old gasket and carbon deposits from the mating surfaces of the exhaust manifold and cylinder head. If the gasket shows signs of leakage, check the mating flange for warpage using a steel ruler and a set of flat feeler gauges. In case of significant curvature (see Specifications) the exhaust manifold must be replaced.
Note: If the exhaust manifold is being replaced, the lower heat shield must be removed and installed on the new manifold.
8. Position the new gasket, aligning it with the guide pins on the cylinder head, taking into account the guide marks and arrows that may be applied to the gasket.
9. Install the exhaust manifold and tighten the mounting nuts. Working from the center outward, tighten the nuts to the specified torque Specifications moments in three or four identical passes.
10. Installation of the remaining components is carried out in the reverse order of their removal.
11. Start the engine and check for exhaust leaks.