



Cardan shaft hanger bearing (4WD models)
Removal
1. Remove the driveshaft (see paragraph 11).
2. Apply marks of relative position to the flanges of the connection of the two parts of the cardan shaft at the suspension bearing (see Figure 12.2).
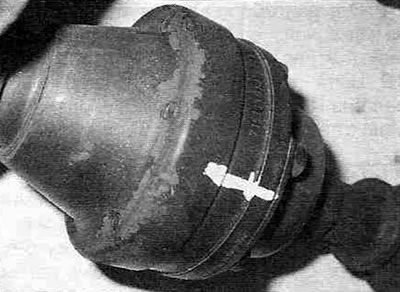
Figure 12.2. Apply flange alignment marks.
3. Using a hex bit, remove the six mounting bolts and separate the two driveshaft halves from each other.
4. Using a hammer and punch, chip the flange mounting nut.
5. Clamp the intermediate shaft in a vice using wooden blocks to secure the front flange, loosen the nut and remove the washer.
Warning. Do not overtighten the vice, otherwise the shaft may be damaged.
6. Apply alignment marks to the shaft and front flange (see Figure 12.6).
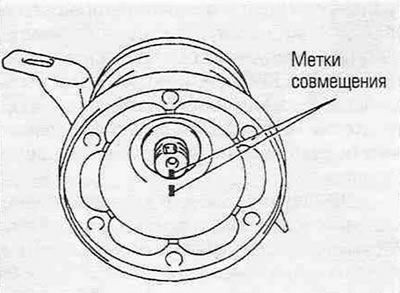
Figure 12.6. Apply alignment marks to the shaft and flange.
(See the source on the internet resource: ToyotaMan.ru)
7. Using a two-jaw puller, remove the flange from the shaft.
8. Remove the washer and slide the hanger bearing off the shaft.
9. Clamp the driveshaft in a vice and check for smooth operation and absence of binding of the rear driveshaft joint. If damage is obvious or grease leaks from under the joint boot are visible, the rear part of the shaft must be replaced.
Installation
10. Install the hanger bearing and washer onto the intermediate shaft (see Figure 12.10).
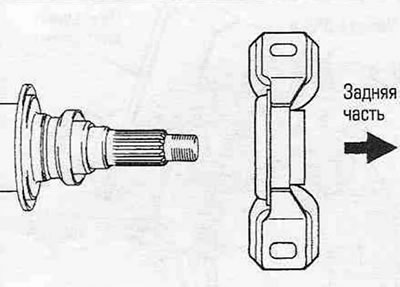
Figure 12.10. Install the hanger bearing as shown.
11. Install the flange onto the intermediate shaft, aligning the marks made during removal, then install a new washer and tighten the new nut.
12. Clamp the intermediate shaft in a vice using wooden blocks to secure the front flange and tighten the nut to the specified torque Specifications of this chapter.
13. Using a punch and a hammer, tap the collar of the nut into the recess on the shaft flange.
14. Having aligned the marks on the flanges, connect both parts of the cardan shaft to each other. Place washers on the bolts, tighten the bolts gradually and tighten them.
15. Lubricate the lips of the transfer case oil seal with multi-purpose grease. Carefully insert the intermediate shaft fork into the transfer case, then tighten the hanger bearing bracket mounting bolts. Tighten the bolts gradually.
16. Connect the flange of the cardan shaft to the flange of the differential drive gear, aligning the marks. Tighten the mounting bolts to the specified torque Specifications of this chapter.
17. Have an assistant press the brake pedal and hold it in that position while you use a hex bit to securely tighten the flange mounting bolts on both sides of the driveshaft.
18. Adjust the position of the hanger bearing as described in paragraph 11.