
Company Honda Company Ford Company Skoda Company Kia Company Mazda Company Mercedes Company Renault
English Русский
Български
Беларускі
Український
Српски
Hrvatski
Română
Polski
Slovenský
Magyar
Bookmark Articles Sitemap Contacts
ToyotaMan.ru


Camry Corolla Corona Carina Land Cruiser Highlander 4Runner RAV4 Others
RAV 4 XA20 (2000-2005) RAV 4 XA10 (1994-2000)

Driveshaft (4WD models) — Inspection, removal and installation [Toyota RAV4 XA20]

  • Main
  • RAV4
  • XA20 (2000-2005)
  • Transmission
  • Clutch and drive shafts
  • Driveshaft (4WD models) — Inspection, removal and installation
0

Cardan shaft (4WD models)


Examination


1. Raise the rear of the vehicle with a jack and install secure safety supports. Chock the front wheels of the car to prevent it from rolling off the supports. Release the handbrake and move the gearshift lever to neutral.

2. After moving under the vehicle, inspect the driveshaft. Check the shaft tubular body for dents and cracks. The defective shaft must be replaced.

3. Check for oil leaks at the front and rear ends of the shaft. A leak where the driveshaft connects to the transfer case indicates a damaged transfer case seal. If the leak is observed at the point where the shaft connects to the differential, it means that the pinion seal has become loose.

4. While under the vehicle, have an assistant turn the rear wheel so you can observe the rotation of the driveshaft. Check the operation of the shaft joints - they should rotate without jamming, make no noise and have no play. Listen to the hanger bearing; any noise coming from it indicates wear or damage. Also check the rubber damper of the suspension bearing for cracks and delamination.

5. The cardan shaft joints can be checked even when the shaft is not rotating. Grasp the hinge on both sides and try to turn it. Any movement in the hinge itself is a sign of significant wear. Try also to move the cardan shaft upwards - there should be no movement in the joints. If wear on the joints is evident, replace the front or rear driveshaft as a set.

6. Lastly, check the tightening of the driveshaft mounting bolts.

Removal


8. Raise the rear of the vehicle with a jack and install secure safety supports. Chock the front wheels of the car to prevent it from rolling off the supports. Release the handbrake and move the gearshift lever to neutral.

9. Mark the relative positions of the drive shaft and differential pinion flanges (see Figure 11.9) - this will help to accurately install the cardan shaft in its original place during assembly.
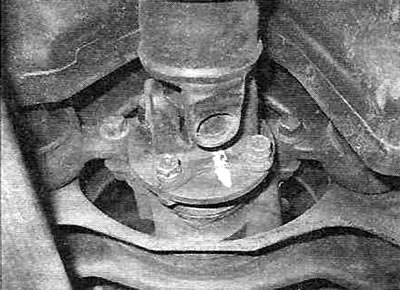


Figure 11.9. Mark the relative positions of the flanges of the drive shaft and the differential pinion.


10. Loosen the rear hinge mounting bolts by turning the propeller shaft (or a wheel) for better access. Remove four bolts, nuts and washers (see Figure 11.10).
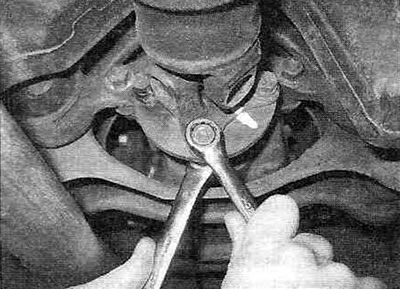


Figure 11.10. While holding the nut with the second open-end wrench, loosen all four bolts.


11. Loosen the bolts securing the suspension bearing bracket to the bottom of the vehicle (see figure 11.11).
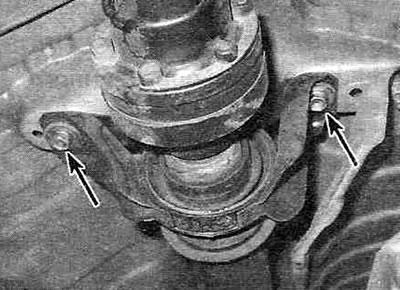


Figure 11.11. The hanger bearing bracket is secured with two bolts.


12. Pull the front of the driveshaft out of the transmission and remove the driveshaft assembly from the vehicle.

Installation


13. Lubricate the lips of the transfer case oil seal with multi-purpose grease. Carefully insert the intermediate shaft crosspiece into the transfer case, then tighten the hanger bearing bracket bolts, but do not tighten them yet.

The article was copied from the portal ToyotaMan

14. Connect the flange of the propeller shaft to the flange of the differential drive gear, aligning the relative position marks made during removal. Tighten the mounting bolts to the specified torque Specifications.

15. Adjust the position of the suspension bearing (see figure 11.15, a, b), then tighten the mounting bolts to the specified torque Specifications.
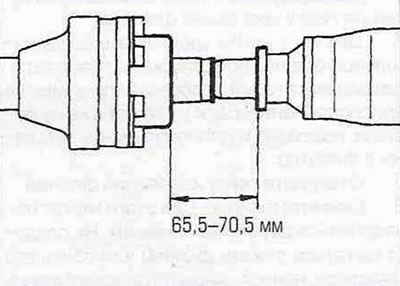


Figure 11.15,a. Adjust the gap between the rear hinge cover and the flange of the rear propeller shaft as shown...
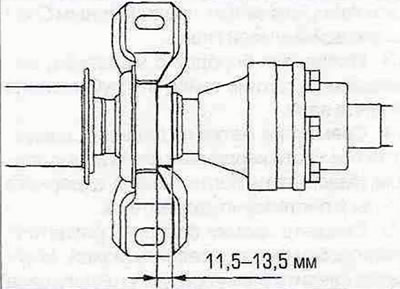


Figure 11.15,b....then adjust the distance between the rear of the suspension bearing and the rubber damper.
This article is available at: russian, bulgarian, belarusian, ukrainian, serbian, croatian, romanian, polish, slovak, hungarian
The article material has been checked: Kondratyeva Ulyana
Share information:
◀ Previous
RAV 4 XA20: Clutch and drive shafts
Next ▶

CV joint covers — replacement
Drive shafts — removal and installation
Engine start contact sensor — removal and installation
Clutch release mechanism — removal, inspection and installation
Clutch assembly — removal, inspection and installation
Driveshaft Bearing (4WD Models) — Removal and Installation
Rear Differential Seals (4WD Models) — Replacement
Rear Differential (4WD Models) — Removal and Installation
Similar articles on other Toyota models

➥ Checking the driveshaft (4WD models) Toyota Carina T190 (1992-1996)
➥ Removal the generator (models with engine 1 and 2 AZ-FE) Toyota Camry XV30 (2001-2006)
➥ Trunk lid (non-European models) Toyota Corolla E80 (1983-1990)
➥ Features of the transmission of 4WD models Toyota Corona T190 (1992-1997)
➥ Pneumatic line diaphragm (early models) Toyota Cruiser 60/80 (1980-1997, petrol)
➥ Checking the Transfer Case Transmission Fluid Level (4WD… Toyota Highlander 1 (2000-2007, petrol)
Link in different formats to this article
Comments and feedback from visitors
No comments yet


Add two numbers 38 + 17


RAV 4 XA20 (2000-2005) 
  • General information
  • Introduction to manual
  • User manual
  • Daily care
  • Maintenance (petrol)
  • Maintenance (diesel)
  • Troubleshooting
  • Power unit
  • Gasoline engines (before 2000)
  • Petrol engines (since 2001)
  • Diesel engines
  • Engine overhaul
  • Cooling and heating
  • Fuel system (petrol)
  • Fuel system (diesel)
  • Engine electrical equipment
  • Control system (petrol)
  • Control system (diesel)
  • Transmission
  • Manual gearbox
  • Automatic gearbox
  • Clutch and drive shafts
  • Chassis, running gear
  • Brake system
  • Front suspension
  • Rear suspension
  • Steering system
  • Body and interior
  • Exterior (external elements)
  • Interior (internal elements)
  • Doors, locks and windows
  • Electrical equipment
  • Equipment and devices
  • Electrical circuits
RAV 4 XA10 (1994-2000) 
  • General information
  • User manual
  • Maintenance
  • Power unit
  • Petrol engine 3S-FE
  • Petrol engine 1AZ-FE
  • Engine overhaul
  • Cooling and air conditioning
  • Fuel and exhaust system
  • Ignition system
  • Toxicity reduction system
  • Transmission
  • Clutch
  • Mechanical gearbox
  • Automatic gearbox
  • Cardan and drive shafts
  • Chassis, running gear
  • Brake system
  • Car suspension
  • Steering
  • Body and interior
  • Exterior (external elements)
  • Interior (internal elements)
  • Doors, locks and windows
  • Electrical equipment
  • Equipment and devices
  • Power devices
  • Electrical circuits
ToyotaMan.ru © 2018–2026 • Mobile version • Interesting about Toyota • Administration • Sitemap: EN BG BY UA RS HR RO PL SK HU • Search system • Bookmark
Camry Vista-V40 • Camry XV10 • Camry XV20 • Camry XV30 • Corolla Verso-AR10 • Corolla E80 • Corona T190 • Carina T170 • Carina T190 • Land Cruiser J70 (diesel) • Land Cruiser J60 (petrol) • Land Cruiser J100 • Highlander XU20 (petrol) • 4Runner N120 • RAV4 XA10 • RAV4 XA20 • Duet M100 • Dyna Y50 •
We require cookies to enable some interactive features. Is that ok with you?