



Differential input shaft flange seal
Removal
1. Raise the rear of the vehicle with a jack and install secure safety supports. Chock the front wheels of the car to prevent it from rolling off the supports. Release the handbrake and move the gearshift lever to neutral.
2. Mark the relative positions of the driveshaft and differential input shaft flanges (see Figure 11.9), then, after unscrewing the mounting bolts, separate the flanges (see paragraph 11). Tie the cardan shaft with wire (it must not be allowed to exert its weight on the suspension bearing).
3. Using a hammer and punch, chip the flange mounting nut.
4. A special device is required to hold the connecting flange when releasing the self-tightening nut. If you don't have access to one, a chain oil filter remover will work.
5. Unscrew the flange mounting nut.
6. Remove the flange. A two-jaw puller may be needed for this. Do not attempt to press the flange out or knock it off with a hammer by striking the flange itself or the pinion shaft.
7. Carefully pry up the old seal and discard it.
Installation
8. Lubricate the lips of the new oil seal and fill the space between them with wheel bearing grease, then press it evenly into place using a special mandrel or a large socket head. Make sure the seal is installed correctly and to its full depth.
9. Install the flange. If necessary, help him by tightening the mounting nut. Do not hammer the flange into place. Tighten the nut to the initial torque specified in Specifications of this chapter.
10. Using a suitable torque wrench (with a pointer indicator), determine the torque required to turn the pinion shaft and tighten the pinion flange nut in small torque increments (no more than 12 Nm at a time), until the dynamometer reading matches the preload value (preload) bearing specified in the Specifications of this chapter. If the maximum tightening torque of the nut occurs before the specified bearing preload is reached, the bearing spacer in the differential will have to be replaced.
11. Having reached the prescribed preload value, hammer the collar of the nut into the recess of the drive gear shaft.
12. Attach the propeller shaft flange to the differential receiving flange (see paragraph 11). Check the oil level in the differential and, if necessary, top it up to the norm (see chapter 1A or 1B).
Output shaft seals
Limited slip differential
13. Raise the rear of the vehicle with a jack and install secure safety supports. Chock the front wheels of the car to prevent it from rolling off the supports. Release the handbrake and move the gearshift lever to neutral.
14. Remove the output shaft using an impact puller. It can also be removed by carefully prying the flange away from the differential housing using, for example, two large screwdrivers or pry bars placed on either side of the flange.
15. Carefully pry up the shaft seal with a special tool or a large screwdriver, being careful not to scratch the seal seat.
[The article was copied from the portal: ToyotaMAN.ru]
16. Using a special mandrel or a large socket head, press in the new oil seal. Make sure the seal is installed correctly and to its full depth.
17. Lubricate the lips of the new oil seal with multipurpose grease, then install the shaft, being careful not to damage the lips of the oil seal.
18. Check the oil level in the differential and, if necessary, top it up to the norm (see chapter 1A or 1B).
Conventional differential
19. If the vehicle is equipped with a conventional differential without a lock, remove the differential from the vehicle (see paragraph 14).
20. After installing the differential on the workbench, unscrew the differential housing cover mounting bolts and separate the cover from the differential.
21. Use needle-nose pliers to remove the retaining ring from the differential output shaft (see Figure 13.21) and remove the shaft.
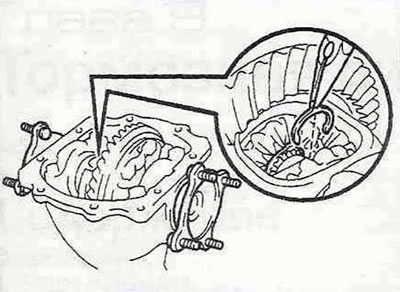
Figure 13.21. Using needle-nose pliers, remove the snap rings (differential without locking).
22. Carefully pry up the axle shaft seal with a special tool or a large screwdriver, being careful not to scratch the seal seat.
23. Using a special mandrel or a large socket head, press in the new oil seal. Make sure the seal is installed correctly and to its full depth.
24. Lubricate the lips of the new oil seal with multipurpose grease, then install the shaft, being careful not to damage the lips of the oil seal.
25. Using needle-nose pliers, install a new shaft snap ring.
26. Remove any remaining old sealant from the mating surfaces of the cover and differential housing.
27. Apply a thin bead of sealant to the mating surface of the differential housing, then carefully install the cover and tighten the mounting bolts. Tighten the mounting bolts to the specified torque Specifications of this chapter.
28. Installation of the remaining components is carried out in the reverse order of their removal.