
Relieve pressure in the fuel system.
Metal fuel pipes are laid under the bottom of the car and secured with clips and self-tapping screws. Periodically inspect them for leaks and damage.
If there is dirt in the filter and fuel lines when replacing the fuel filter, be sure to disconnect the lines and blow them with compressed air. Also check the condition of the strainer on the fuel pump assembly.
Never use copper or aluminum tubes to replace steel tubes installed on the vehicle, as they may not be able to withstand the vibration of the vehicle.
Since the fuel lines are under high pressure, they require special maintenance.
Some fuel lines have o-ring threaded connections that must be unscrewed before servicing or replacing components. In such connections, flare nuts are used, which, when tightening the nut, additionally crimp the connection. Check sealing rings for cracks and damage and replace if necessary. If steel tubes are being replaced, install only original tubes.
Flexible fuel hoses must be located at least 100 mm from the components of the exhaust system and 250 mm from the catalytic converter.
Some models are equipped with nylon fuel hoses with quick connectors. In this case, if it is necessary to replace one hose, replace the hoses complete with quick connectors.
Replace fuel pipes/hoses as follows.
Relieve pressure in the fuel system.
Release all clamps securing the tube/hose to the vehicle body.
On conventional steel fuel line and hose connections, loosen the clamp then pull the hose tube out. Turning the tube and hose in opposite directions facilitates the separation process.
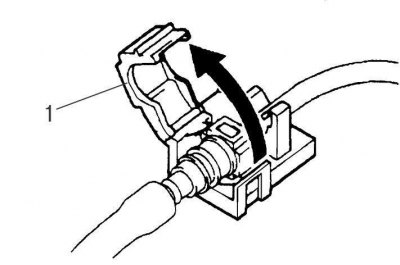
Pic. 5.3. Clamp opening (1) quick connector
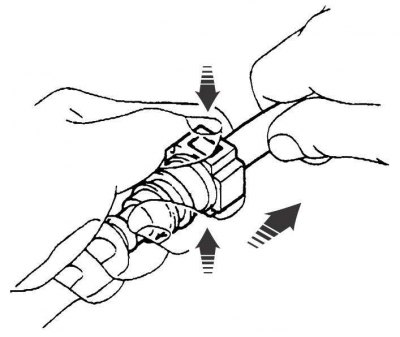
Pic. 5.4. Pressing the latches and removing the tubing from the quick connector
If the hoses are connected with a quick connector, open and remove the clamp, then press the latches on both sides with one hand, and remove the tube from the connector with the other hand (pic. 5.3, 5.4).
Be sure to install new O-rings when connecting pipes and hoses (if provided by design).
On quick connectors, align the tubing with the connector and insert the tubing into the connector until it snaps into place.
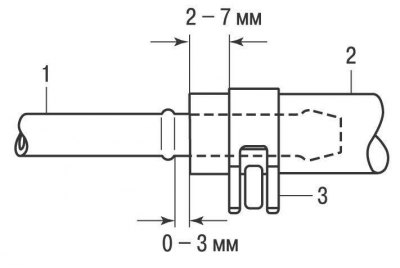
Pic. 5.5. Conventional hose to steel tube connection: 1 - steel tube; 2 - hose; 3 - collar
When connecting a hose to a steel pipe normally, slide the hose onto the pipe and secure the connection with a clamp (pic. 5.5).