



Note: At the time of preparation of this repair manual, there is no information available on the resistance value of the ignition coil primary winding on models from 1998 to 2000, or data on testing ignition coils/commutators on models from 2001 onwards.
Note: Check the resistance of the ignition coil windings on a cold engine, as the resistance will be higher on a hot engine. The windows are immediately disabled.
Check the ignition coils as follows:
Check the resistance of the primary winding of the ignition coil, for which:
- turn off the ignition and disconnect the electrical connectors from each ignition coil;
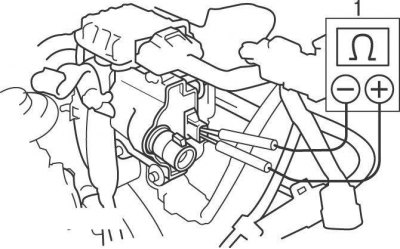
Figure 6.1. Connecting an ohmmeter (1) to the electrical connector terminals to measure the resistance of the ignition coil primary winding on 1996 to 1998 models
- using an ohmmeter connected to the contacts, measure the resistance, which should correspond to the value given in the technical data, otherwise, replace the ignition coil (figure 6.1) - the ignition coil on models from 1996 to 1998 is mounted on a bracket on the engine compartment bulkhead;
Check the resistance of the secondary winding of the ignition coil, for which:
- turn off the ignition;
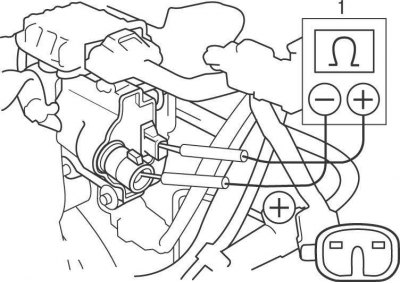
Figure 6.2. Connecting an ohmmeter (1) to measure the resistance of the secondary winding of the ignition coil on 1996 to 1998 models
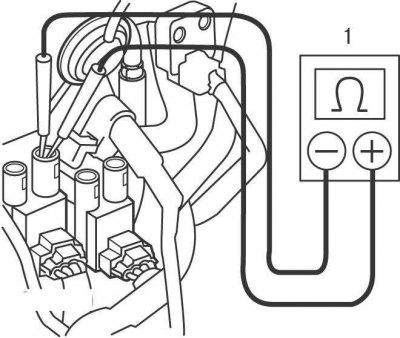
Figure 6.3. Connecting an ohmmeter (1) to measure the resistance of the secondary winding of the ignition coil on models from 1998 to 2001
- mark and disconnect the high-voltage wires from the ignition coils; using an ohmmeter connected to one contact of the electrical connector and the contact of the high-voltage wire, measure the resistance (figure 6.2, 6.3);
- if the resistance is not as required, replace the ignition coil.
Replace the ignition coils as follows:
Turn off the ignition and disconnect the ground wire from the battery.
For models from 1996 to 1998, carry out further work in the following order:
- disconnect the electrical connector and high-voltage wire from the ignition coil;
- unscrew the bolts and remove the ignition coil together with the bracket from the engine compartment bulkhead;
- unscrew the bolts and remove the ignition coil from the bracket;
For models from 1998 to 2001, carry out the work in the following order:
- remove the throttle body from the intake manifold;
- remove the air filter cover;
- label and disconnect the electrical connectors from each ignition coil pack;
- mark and disconnect the wires from the spark plugs;
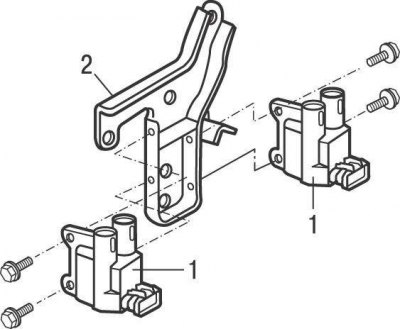
Figure 6.4. Ignition coils (1) and bracket (2) for 1998 to 2001 models
- unscrew the bolts and remove the ignition coil from the engine together with the bracket (figure 6.4);
- the ignition coil is mounted on a bracket on the left side of the cylinder head;
- unscrew the bolts and remove the ignition coil from the bracket.
For models from 2001, carry out the work in the following order:
(The material is reprinted from an online resource: ToyotaMan)
- remove the front section of the air filter housing;
- each ignition coil/commutator assembly is secured with one bolt;
- remove the bolt, disconnect the electrical connector, and pull up and twist to remove the ignition coil/switch assembly from the engine.
Installation is carried out in the reverse order of removal.