
Note. The door is quite heavy and somewhat cumbersome to remove and install. This procedure should be performed by at least two people.
Removal and installation
1. Fully raise the glass in the corresponding door and disconnect the ground wire from the battery (see paragraph 1 of chapter 5).
2. Fully open the door and support it from below with jacks or blocks, laying rags so as not to damage the paintwork.
3. Remove the door trim panel and waterproofing sheet as described in paragraph 15.
4. Disconnect all electric sockets, disconnect wires of weight and release clips of fastening of a plait of electroconducting not a door.
Note. To facilitate assembly, it is recommended to mark all connections with labels.
5. Working from the door side, disconnect the rubber stocking laid between the body and the door. Then pull the wiring harness through the hole in the stocking and remove it from the door.
6. Turn out a bolt of fastening of a rack of the limiter of opening of a door (pic. 16.6).
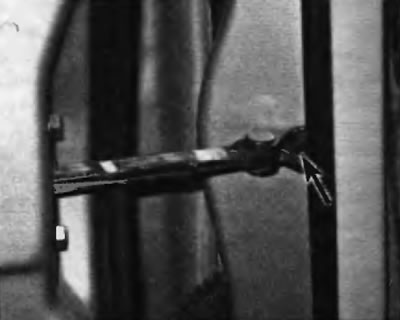
Pic. 16.6. Align the bolt of fastening of a rack of the limiter of opening of a door
7. Circle the door hinges along the contour with a marker or scriber to make it easier to align the position during assembly.
8. Have an assistant support the door and remove the hinge-to-door bolts while supporting the door (pic. 16.8), and remove the door.
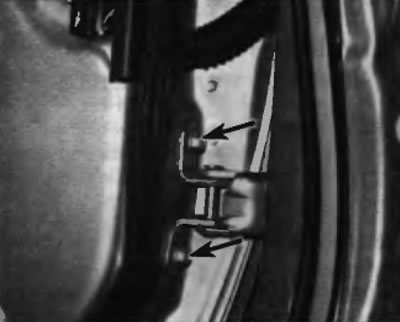
Pic. 16.8. Turn out bolts of fastening of a hinge of a door (the arrows show the bolts of the lower hinge, for the upper hinge it is the same)
Note. Before unscrewing the bolts, circle the hinges along the contour.
9. Installation is carried out in the reverse order of removal.
Adjustment
10. Proper alignment of the door to the body is the most important part of the proper operation of the door. First check the door hinge pins for excessive play. Fully open the door and try to raise and lower it without causing the body to move. If the door has a play of 1.5 mm or more, the hinges should be replaced.
11. Adjustment of the position of the door relative to the body is performed by releasing the bolts securing the hinges to the body or the hinges to the door and moving the door. Proper body alignment is achieved when the top edge of the door is parallel to the roof, the front door is flush with the fender, the rear door is flush with the rear side panel, and the bottom edges of the doors are flush with the bottom trim panel. If this cannot be achieved by adjusting the hinge-to-body or door bolts, body alignment shims can be used and placed behind the hinges to ensure proper alignment.
12. To adjust the closed position of the door, circle the door lock striker with a marker or scriber to provide a base, and then make sure the door latch engages in the center of the lock striker. If this is not the case, first adjust the vertical position.
13. Finally, adjust the transverse position of the striker so that the door surface is flush with the B-pillar or rear side panel and still engages securely with the latch mechanism (pic. 16.13).
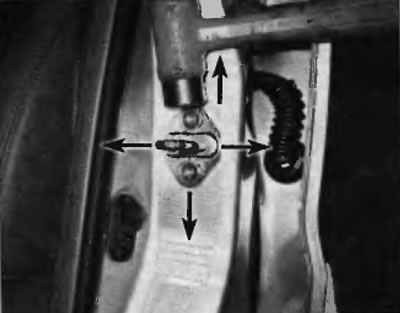
Pic. 16.13. Adjust the position of the locking part of the door lock by loosening the screws and tapping on the mating part of the lock to move it in the desired direction