
Company Honda Company Ford Company Skoda Company Kia Company Mazda Company Mercedes Company Renault
English Русский
Български
Беларускі
Український
Српски
Hrvatski
Română
Polski
Slovenský
Magyar
Bookmark Articles Sitemap Contacts
ToyotaMan.ru


Camry Corolla Corona Carina Land Cruiser Highlander 4Runner RAV4 Others
Highlander 1 (2000-2007, petrol)

Headlight housing — replacement [Toyota Highlander XU20]

  • Main
  • Highlander
  • XU20 (2000-2007)
  • Electrical equipment
  • Equipment and devices
  • Headlight housing — replacement
0
Warning! The gas in gas-discharge lamps is under pressure. Therefore, the lamps may break if dropped or scratched on the glass surface. Use eye protection when handling lamps. If possible, hold the lamp only by the base. Do not touch the surface of the lamp with your fingers without first putting on gloves, because the fat present on the skin can cause the lamp to overheat and fail prematurely. If you do touch the surface of the lamp, wipe it with alcohol.


1. Disconnect the ground wire from the battery (see paragraph 1 of chapter 5).

2. Unscrew the upper headlight mounting bolts (Fig. 16.2).
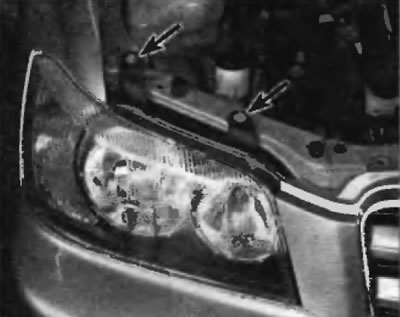


Fig. 16.2. To detach the upper section of the headlight housing from the upper radiator cross member, remove the two bolts (the Toyota model is shown, similar for Lexus)


3. Remove the grille and bumper trim (see chapter 11).

4. On 1999-2003 Lexus models, remove the two headlight housing mounting nuts on the outer edge of the headlight housing. On 2004 and later Lexus models, remove the headlight housing mounting bolt located on the outer lower corner of the housing.

5. On Lexus models, release the locating pin on the upper support bracket by simply pulling the support bracket straight up.


6. Release the two headlight housing clips located on the underside of the housing (Fig. 16.6) and pull the housing out just enough to access the electrical connectors on the underside of the headlight assembly.
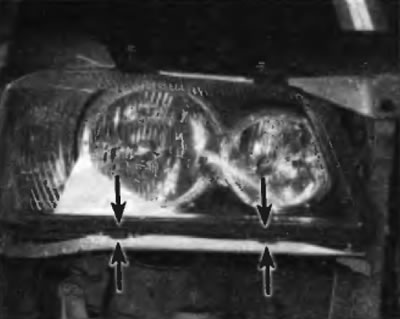


Fig. 16.6. To release the two headlight housing fasteners, grasp the headlight and gently pull it outward (the Toyota model is shown, similar for Lexus)


7. Disconnect the electrical connectors on the headlight housing (fig. 16.7, a). There are two electrical connectors for the headlights (Fig. 15.2) and a third connector for the turn signals/parking lights and side lights (fig. 16.7, b).
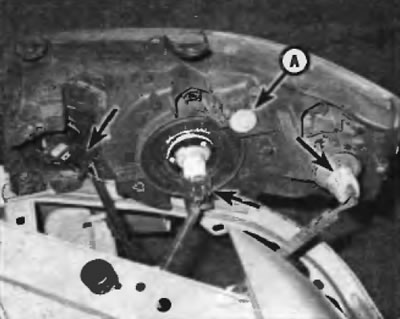


Fig. 16.7, a. Pull out the headlight housing and disconnect the electrical connectors of the headlights and turn signals/side lights. After installing the headlight housing, adjust the headlights using the vertical adjuster (A) (see paragraph 17)
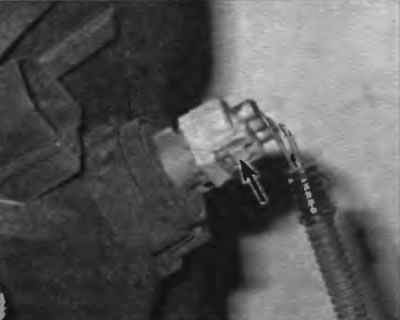


Fig. 16.7, b. To disconnect the electrical connector of the front turn signal/parking light and side marker light, press the locking tab and disconnect the connector


8. If the headlight housing itself is damaged, you will need to replace it. But if the damage is only a broken headlight housing support bracket, Lexus and Toyota sell headlight housing support bracket repair kits.


9. Installation is performed in the reverse order of removal.

(The text is quoted from the source website toyotaman)

10. Finally, check the headlight adjustment (see paragraph 17).
This article is available at: russian, bulgarian, belarusian, ukrainian, serbian, croatian, romanian, polish, slovak, hungarian
The article material has been checked: Kondratyeva Ulyana
Share information:
◀ Previous
Highlander 1: Equipment and devices
Next ▶

Headlight bulbs — replacement
Rear Window Defogger System — Checking and Repairing
Windscreen wiper motor — checking and replacing
Antenna — replacement
Radio and speakers — removal and installation
Headlights — adjustment
Sound signal — check and replacement
Replacing lamps
Electrically adjustable exterior rear view mirrors — description
Cruise control system — description
Similar articles on other Toyota models

➥ Halogen headlight housing — removal and installation Toyota Camry XV20 (1996-2001)
➥ Halogen headlight housing — removal and installation Toyota Cruiser 60/80 (1980-1997, petrol)
➥ Headlight housing — removal and installation Toyota 4Runner N120 (1989-1995)
➥ Headlight housing — removal and installation Toyota RAV 4 XA20 (2000-2005)
➥ Headlight cleaner Toyota Corolla E80 (1983-1990)
➥ Checking the headlight relay Toyota Corona T190 (1992-1997)
Link in different formats to this article
Comments and feedback from visitors
No comments yet


Add two numbers 28 + 21


Highlander 1 (2000-2007, petrol) 
  • General information
  • Introduction to the guide
  • Troubleshooting
  • Maintenance
  • Power unit
  • 4-cylinder engine
  • 6-cylinder engine
  • Overhaul of engines
  • Cooling and heating
  • Supply and exhaust system
  • Engine electrical equipment
  • Control system
  • Transmission
  • Automatic gearbox
  • Drive shafts and cardan
  • Chassis, running gear
  • Brake system
  • Car suspension
  • Steering
  • Body and interior
  • Exterior (external elements)
  • Interior (internal elements)
  • Doors, locks and windows
  • Electrical equipment
  • Equipment and devices
  • Electrical circuits
ToyotaMan.ru © 2018–2026 • Mobile version • Interesting about Toyota • Administration • Sitemap: EN BG BY UA RS HR RO PL SK HU • Search system • Bookmark
Camry Vista-V40 • Camry XV10 • Camry XV20 • Camry XV30 • Corolla Verso-AR10 • Corolla E80 • Corona T190 • Carina T170 • Carina T190 • Land Cruiser J70 (diesel) • Land Cruiser J60 (petrol) • Land Cruiser J100 • Highlander XU20 (petrol) • 4Runner N120 • RAV4 XA10 • RAV4 XA20 • Duet M100 • Dyna Y50 •
We require cookies to enable some interactive features. Is that ok with you?