Company Honda Company Ford Company Skoda Company Kia Company Mazda Company Mercedes Company Renault
English Русский
Български
Беларускі
Український
Српски
Hrvatski
Română
Polski
Slovenský
Magyar
Bookmark Articles Sitemap Contacts
ToyotaMan.ru


Camry Corolla Corona Carina Land Cruiser Highlander 4Runner RAV4 Others
Highlander 1 (2000-2007, petrol)

Headlights — adjustment [Toyota Highlander XU20]

  • Main
  • Highlander
  • XU20 (2000-2007)
  • Electrical equipment
  • Equipment and devices
  • Headlights — adjustment
0
Note: The headlights must be correctly adjusted. If the headlights are not adjusted correctly, they can blind oncoming drivers and cause a serious accident or seriously impair your visibility. The headlight adjustment should be checked every 12 months and whenever new headlights are installed or when body work is carried out on the front of the vehicle. It should be noted that the following procedure is only an intermediate step that provides temporary adjustment. The final headlight adjustment should be carried out at a workshop that has the appropriate equipment.


Note: Not all models described in this manual are equipped with horizontal adjustment screws.


1. There are several ways to adjust the headlights. The easiest way requires masking tape, a blank wall, and a flat horizontal surface.

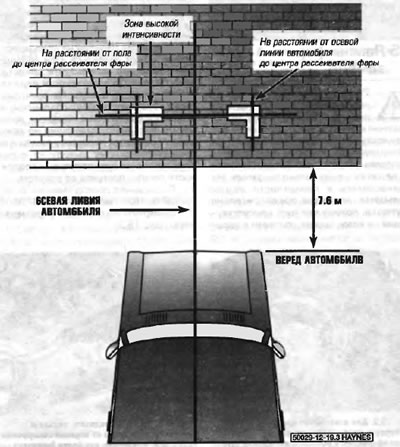
2. Apply masking tape vertically to the wall to mark the center line of the car and the center lines of both headlights (Fig. 17.2).


Fig. 17.2. Headlight adjustment


3. Apply masking tape horizontally at the center line of all headlights.

Note: It may be easier to apply the tape to the wall correctly when the car is parked a few inches away from it.


4. Adjustment should be performed with the vehicle parked approximately 7.6 m from the wall, level, with the fuel tank half full and no heavy loads in the vehicle.

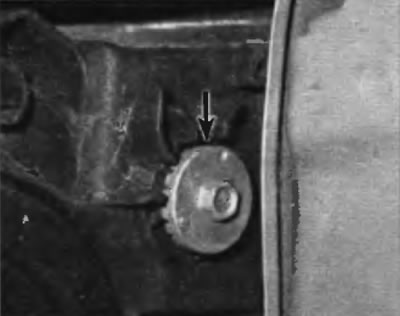
5. Starting with the low beam adjustment, position the high intensity zone of the light so that it is 5 cm below the horizontal line. Make the adjustment by turning the vertical adjustment screw to raise or lower the beam (Fig. 17.5). If you cannot find the adjustment knob, contact fig. 16.7, a.


Fig. 17.5. To turn the vertical adjustment knob, insert a Phillips screwdriver into the gap at the top, engage the head of the screwdriver with the teeth on the knob and turn the knob


6. When adjusting the high beam, keep in mind that the high intensity light area should be vertically centered with respect to the symmetry line located just below the marked horizontal line.

Application: It is not possible to precisely adjust both high and low beam headlights at the same time. A compromise is necessary, and in this case, keep in mind that low beam is used more and has a greater impact on driver safety.


7. At the earliest opportunity, contact your dealer's service department or a non-specialized service station to have your headlights professionally adjusted.
This article is available at: russian, bulgarian, belarusian, ukrainian, serbian, croatian, romanian, polish, slovak, hungarian
The article material has been checked: Kondratyeva Ulyana
Share information:
◀ Previous
Highlander 1: Equipment and devices
Next ▶

Headlight housing — replacement
Headlight bulbs — replacement
Rear Window Defogger System — Checking and Repairing
Windscreen wiper motor — checking and replacing
Antenna — replacement
Sound signal — check and replacement
Replacing lamps
Electrically adjustable exterior rear view mirrors — description
Cruise control system — description
Electric window lifter — description
Similar articles on other Toyota models

➥ Headlights — adjustment, replacement, removal Toyota Camry Vista V40 (1994-1998)
➥ Headlights — Removal, Installation and Adjustment Toyota Cruiser 60/80 (1980-1997, petrol)
➥ Headlights — adjustment Toyota RAV 4 XA20 (2000-2005)
➥ Headrests (with vertical adjustment) Toyota Corolla E80 (1983-1990)
➥ Adjustment of valve timing (3S-GE) Toyota Corona T190 (1992-1997)
➥ Fuel injection pump adjustment Toyota Carina T190 (1992-1996)
Link in different formats to this article
Comments and feedback from visitors
No comments yet


Add two numbers 29 + 28


Highlander 1 (2000-2007, petrol) 
  • General information
  • Introduction to the guide
  • Troubleshooting
  • Maintenance
  • Power unit
  • 4-cylinder engine
  • 6-cylinder engine
  • Overhaul of engines
  • Cooling and heating
  • Supply and exhaust system
  • Engine electrical equipment
  • Control system
  • Transmission
  • Automatic gearbox
  • Drive shafts and cardan
  • Chassis, running gear
  • Brake system
  • Car suspension
  • Steering
  • Body and interior
  • Exterior (external elements)
  • Interior (internal elements)
  • Doors, locks and windows
  • Electrical equipment
  • Equipment and devices
  • Electrical circuits
ToyotaMan.ru © 2018–2026 • Mobile version • Interesting about Toyota • Administration • Sitemap: EN BG BY UA RS HR RO PL SK HU • Search system • Bookmark
Camry Vista-V40 • Camry XV10 • Camry XV20 • Camry XV30 • Corolla Verso-AR10 • Corolla E80 • Corona T190 • Carina T170 • Carina T190 • Land Cruiser J70 (diesel) • Land Cruiser J60 (petrol) • Land Cruiser J100 • Highlander XU20 (petrol) • 4Runner N120 • RAV4 XA10 • RAV4 XA20 • Duet M100 • Dyna Y50 •
We require cookies to enable some interactive features. Is that ok with you?