
Company Honda Company Ford Company Skoda Company Kia Company Mazda Company Mercedes Company Renault
English Русский
Български
Беларускі
Український
Српски
Hrvatski
Română
Polski
Slovenský
Magyar
Bookmark Articles Sitemap Contacts
ToyotaMan.ru


Camry Corolla Corona Carina Land Cruiser Highlander 4Runner RAV4 Others
Highlander 1 (2000-2007, petrol)

Battery Cables — Checking and Replacing [Toyota Highlander XU20]

  • Main
  • Highlander
  • XU20 (2000-2007)
  • Power unit
  • Engine electrical equipment
  • Battery Cables — Checking and Replacing
0
1. Periodically inspect each battery cable along its entire length for damage, cracks in the casing, or burnt insulation and traces of corrosion. Poor condition of battery cables can cause problems with starting and deterioration of the dynamic characteristics of the engine.

2. Inspect the ends of the wires for cracks in the clamps, broken wires and corrosion (see chapter 1). White fluffy deposits under the insulation at the end of the wires near the clamp are a sign of corrosion in the wire. Such a wire should be replaced. Check the terminals for bolts, deformation and corrosion.

3. When removing wires, always disconnect the ground wire first and connect it last. Otherwise, you may accidentally short-circuit the battery terminals with the tool used to release the clamps on the battery terminals. Even if you are replacing only the positive wire, disconnect the ground wire from the battery first.

4. Disconnect the old cables from the battery, then follow each one to the ends and disconnect them from the starter solenoid and ground terminals (fig. 4.4, a, b). To ensure proper installation, mark the wiring diagram for each wire. To access one of the ground wire bolts, you will need to remove the battery tray (fig. 3.7).
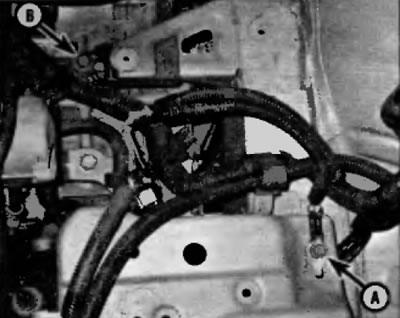


Fig. 4.4, a. The battery ground wire is bolted to the battery shelf support bracket (A) and to the gearbox in the block with the drive axle (P)
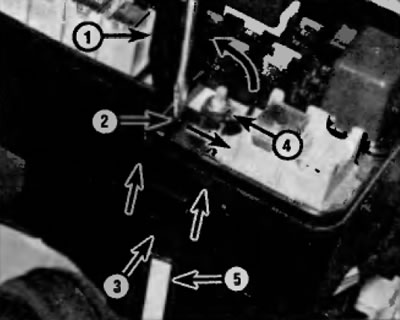


Fig. 4.4, b. Connect the wire from the battery to the starter to the fuse box of the relay in the engine compartment. To disconnect it, lift the cover (1), pry up with a screwdriver and release the lug (2), lift and remove the drive cover (3), then unscrew the nut (4) and disconnect the wire (5) from the terminal


5. If you are replacing any or both wires, take them with you when you purchase new ones. Wires should always be replaced with identical wires. Wires have features that make them easy to recognize. Positive wires are usually red and have a larger cross-section. Ground wires are usually black and have a smaller cross-section.


6. Clean the threads on the solenoid terminal or ground point with a wire brush to remove rust and corrosion. To prevent future corrosion, apply a thin coat of battery terminal corrosion inhibitor or petroleum jelly to the threads.

7. Connect the wire to the electromagnet ground plate and tighten the nut/bolt securely.

8. Before connecting the new wire to the battery, make sure that its length is sufficient to secure it to the battery terminal without pulling on it.

9. First connect the positive cable to the battery, then the ground cable.
This article is available at: russian, bulgarian, belarusian, ukrainian, serbian, croatian, romanian, polish, slovak, hungarian
The article material has been checked: Kondratyeva Ulyana
Share information:
◀ Previous
Highlander 1: Engine electrical equipment
Next ▶

Battery — Checking and Replacing
Battery — starting from an external battery
General information, precautions and disconnecting the battery
Engine Electrical System Specifications
Ignition system — general information and precautions
Ignition system — check
Ignition coils — replacement
Charging system — general information and precautions
Charging system — check
Similar articles on other Toyota models

➥ Battery — Checking and Replacing Toyota Camry XV20 (1996-2001)
➥ Power Cables — Checking and Replacing Toyota Cruiser 60/80 (1980-1997, petrol)
➥ Replacing battery cables Toyota RAV 4 XA10 (1994-2000)
➥ Replacing spark plugs. Checking electrical connections Toyota Corolla E80 (1983-1990)
➥ Checking and replacing fuses Toyota Corona T190 (1992-1997)
➥ Checking and replacing fuses and fuse links Toyota Carina T190 (1992-1996)
Link in different formats to this article
Comments and feedback from visitors
No comments yet


Add two numbers 16 + 36


Highlander 1 (2000-2007, petrol) 
  • General information
  • Introduction to the guide
  • Troubleshooting
  • Maintenance
  • Power unit
  • 4-cylinder engine
  • 6-cylinder engine
  • Overhaul of engines
  • Cooling and heating
  • Supply and exhaust system
  • Engine electrical equipment
  • Control system
  • Transmission
  • Automatic gearbox
  • Drive shafts and cardan
  • Chassis, running gear
  • Brake system
  • Car suspension
  • Steering
  • Body and interior
  • Exterior (external elements)
  • Interior (internal elements)
  • Doors, locks and windows
  • Electrical equipment
  • Equipment and devices
  • Electrical circuits
ToyotaMan.ru © 2018–2026 • Mobile version • Interesting about Toyota • Administration • Sitemap: EN BG BY UA RS HR RO PL SK HU • Search system • Bookmark
Camry Vista-V40 • Camry XV10 • Camry XV20 • Camry XV30 • Corolla Verso-AR10 • Corolla E80 • Corona T190 • Carina T170 • Carina T190 • Land Cruiser J70 (diesel) • Land Cruiser J60 (petrol) • Land Cruiser J100 • Highlander XU20 (petrol) • 4Runner N120 • RAV4 XA10 • RAV4 XA20 • Duet M100 • Dyna Y50 •
We require cookies to enable some interactive features. Is that ok with you?