
Company Honda Company Ford Company Skoda Company Kia Company Mazda Company Mercedes Company Renault
English Русский
Български
Беларускі
Український
Српски
Hrvatski
Română
Polski
Slovenský
Magyar
Bookmark Articles Sitemap Contacts
ToyotaMan.ru


Camry Corolla Corona Carina Land Cruiser Highlander 4Runner RAV4 Others
Highlander 1 (2000-2007, petrol)

Charging system — check [Toyota Highlander XU20]

  • Main
  • Highlander
  • XU20 (2000-2007)
  • Power unit
  • Engine electrical equipment
  • Charging system — check
0
1. If a fault occurs in the charging circuit, do not rush to assume that the generator is to blame. First, check the following points:
  • a) Make sure that the wire clamps on the battery terminals are clean and securely fastened.
  • b) Check the battery status (see paragraph 3). If it does not pass all the tests, replace it.
  • c) Check the external electrical wiring and generator connections.
  • d) Check the condition and tension of the drive belt (see chapter 1)
  • d) Check the reliability of the tightening of the generator mounting bolts
  • e) Start the engine and check for any unusual noise coming from the generator.
  • g) Check the fuse link (see chapter 12). If it is burnt out, find out the reason and repair the electrical circuit.
  • h) Check the charging system indicator light on the instrument panel. It should light when the ignition key is turned to the on position (the engine is not working). If it does not light, check the electrical circuit between the generator and the test lamp (see "Electrical diagrams" at the end of Chapter 12).
  • i) Check the fuses that are located in series with the charging system electrical circuit (see "Electrical diagrams" at the end of Chapter 12).

2. With the ignition off, check the battery voltage with all electrical consumers off. It should be approximately in the range of 12.5-12.9 V (Fig. 3.2). If the engine has been running for the last hour, it may be slightly higher.

3. Connect the ammeter to the charging system following the manufacturer's instructions. Start the engine and check the battery voltage and current. The reading should now be approximately 13.2-14.8 V (Fig. 9.3).
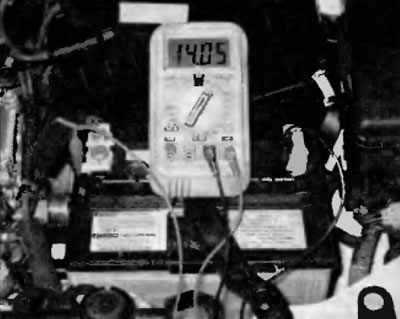


Fig. 9.3. To check the charging voltage, connect a voltmeter to the battery terminals and check the battery voltage with the engine running


4. Load the battery. To do this, turn on the high beam headlights and the air conditioning system and set the blower speed to maximum. Increase the engine speed to 2000 rpm and check the voltage and current. If the charging system is working properly, the voltage should remain above 13.5 V, and the current should be at least 30 A (and depending on the battery condition it may be less than 30 A).

5. If the voltage rises above 15.0 V when performing any test, the voltage regulator is faulty.

6. If the voltage reading is less than the specified charging voltage, the alternator is probably faulty. Have the charging system checked by your dealer service department or other properly equipped person.

(The full article is posted on the website: toyotaman.ru)

Note: Many auto parts stores can test the alternator on a bench after it has been removed from the vehicle. Ask about this service at your local auto parts store; in many stores this service is provided free of charge.
This article is available at: russian, bulgarian, belarusian, ukrainian, serbian, croatian, romanian, polish, slovak, hungarian
The article material has been checked: Kondratyeva Ulyana
Share information:
◀ Previous
Highlander 1: Engine electrical equipment
Next ▶

Charging system — general information and precautions
Ignition coils — replacement
Ignition system — check
Ignition system — general information and precautions
Battery Cables — Checking and Replacing
Generator — removal and installation
Starting System — General Information and Precautions
Starter and electrical circuit — check
Starter — removal and installation
Similar articles on other Toyota models

➥ Charging system — check Toyota RAV 4 XA20 (2000-2005)
➥ Location of charging and ignition system units Toyota Camry XV20 (1996-2001)
➥ Charging system — design description Toyota Corolla Verso 3 (2004-2009)
➥ Operating principle and precautions of the charging system Toyota Corona T190 (1992-1997)
➥ Precautions when working with the charging system Toyota Carina T190 (1992-1996)
➥ Battery Charging System — Design Description Toyota Cruiser 60/80 (1980-1997, petrol)
Link in different formats to this article
Comments and feedback from visitors
No comments yet


Add two numbers 47 + 22


Highlander 1 (2000-2007, petrol) 
  • General information
  • Introduction to the guide
  • Troubleshooting
  • Maintenance
  • Power unit
  • 4-cylinder engine
  • 6-cylinder engine
  • Overhaul of engines
  • Cooling and heating
  • Supply and exhaust system
  • Engine electrical equipment
  • Control system
  • Transmission
  • Automatic gearbox
  • Drive shafts and cardan
  • Chassis, running gear
  • Brake system
  • Car suspension
  • Steering
  • Body and interior
  • Exterior (external elements)
  • Interior (internal elements)
  • Doors, locks and windows
  • Electrical equipment
  • Equipment and devices
  • Electrical circuits
ToyotaMan.ru © 2018–2026 • Mobile version • Interesting about Toyota • Administration • Sitemap: EN BG BY UA RS HR RO PL SK HU • Search system • Bookmark
Camry Vista-V40 • Camry XV10 • Camry XV20 • Camry XV30 • Corolla Verso-AR10 • Corolla E80 • Corona T190 • Carina T170 • Carina T190 • Land Cruiser J70 (diesel) • Land Cruiser J60 (petrol) • Land Cruiser J100 • Highlander XU20 (petrol) • 4Runner N120 • RAV4 XA10 • RAV4 XA20 • Duet M100 • Dyna Y50 •
We require cookies to enable some interactive features. Is that ok with you?