



Contents: Removal ↓ Installation ↓
Removal
Caution! The fuel system is under constant pressure, so relieve the pressure in the fuel system before disconnecting the lines.
Caution! The air conditioning system is under high pressure, so do not open the air conditioning system refrigeration circuit until the refrigerant has been recovered.
Caution! The air conditioning system must be serviced by technicians trained in safe operating procedures, using specialized equipment, and adhering to safety regulations for collecting and storing automotive refrigerant.
Note: Removing the transmission on all-wheel drive models is a very labor-intensive job. The manufacturer recommends removing the power unit assembly and then disconnecting the gearbox from the engine.
Turn off the ignition and disconnect the ground wire from the battery.
Relieve pressure in the fuel system.
Remove the hood.
Remove the air filter housing.
Disconnect the accelerator cable and move it to the side along with the bracket.
Remove the battery. On vehicles produced since 2001, remove the battery support.
On vehicles manufactured before 2001, remove the activated carbon canister.
Loosen the nuts securing the front wheels and drive shafts to the hubs.
Drain the engine oil and coolant.
On vehicles produced since 2001, remove the expansion tank.
Remove the accessory drive belts.
Label and disconnect the engine vacuum and coolant hoses, electrical connectors, ground wires, and fuel lines.
Release the clamps and disconnect the wiring harnesses from the engine. Also disconnect the wires from the powertrain control module (PCM) inside the vehicle and pull the wires out of the vehicle's interior and into the engine compartment.
Remove the power steering pump mounting bolts, move it to the side and secure it to the body with soft wire.
Remove the radiator fan, fan shroud and radiator. This operation is not mandatory, however, it will prevent them from being damaged when removing the engine. If the radiator remains installed in the vehicle, disconnect the transmission oil cooler lines from the radiator.
On models with air conditioning, remove the air conditioning compressor mounting bolts. Move the air conditioning compressor along with the wires and tubes attached to it to the side and secure it to the body with soft wire.
Remove the exhaust pipe.
Remove the selector cable retaining nut and disconnect it from the gear selector lever on the front of the transmission.
Remove the clamp and slide the cable housing off the bracket on the transmission.
Disconnect all electrical connectors from the transmission.
Remove the front drive shafts and propeller shaft.
Remove the two bolts securing the steering gear to the front cross member and the bolts securing the hinges to the lower wishbones.
Attach the hoist chain to the engine and tighten it so that the weight of the engine and gearbox is supported by the hoist.
Make sure that nothing other than the mounts connects the engine and gearbox to the vehicle.
Unscrew the bolts securing the left and right powertrain supports.
Unscrew the bolts and remove the longitudinal and cross beams.
Slowly lower the engine and gearbox. Disconnect the hoist chain from the engine.
Remove the starter.
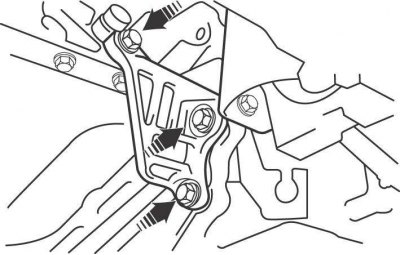
Figure 9.29. Location of stiffener plate mounting bolts
On models prior to 2001, remove the bolts and stiffener plate (figure 9.29).
On 2001 and later models, remove the plug covering the torque converter access hole, then use paint to mark the position of the torque converter and drive plate.
Remove the torque converter mounting bolts. To access each subsequent bolt, rotate the engine crankshaft in the direction of its operating rotation using the central crankshaft pulley mounting bolt.
Remove the gearbox mounting bolts from the engine, making sure to mark the location of the bolts as they are of different lengths.
Move the transmission away from the engine and check that the torque converter is separated from the drive plate. Use clamps to secure the torque converter, lower and remove the gearbox.
Installation
Installation is carried out in the reverse order of removal, taking into account the following.
Align the marks on the torque converter and the drive plate made before removal.
Fill the transmission with transmission fluid.
Adjust the selector cable and throttle control cable (on models before 2001).