
Company Honda Company Ford Company Skoda Company Kia Company Mazda Company Mercedes Company Renault
English Русский
Български
Беларускі
Український
Српски
Hrvatski
Română
Polski
Slovenský
Magyar
Bookmark Articles Sitemap Contacts
ToyotaMan.ru


Camry Corolla Corona Carina Land Cruiser Highlander 4Runner RAV4 Others
RAV 4 XA20 (2000-2005) RAV 4 XA10 (1994-2000)

Checking the selector lever and ignition lock system [Toyota RAV4 XA10]

  • Main
  • RAV4
  • XA10 (1994-2000)
  • Transmission
  • Automatic gearbox
  • Checking the selector lever and ignition lock system
0
Contents: Checking the key lock solenoid in…↓ Testing the Shift Lock Solenoid on…↓ Checking the selector lever position…↓ Control unit of the blocking system ↓
Warning! Vehicles are equipped with safety systems (SRS), including airbags and seat belt tensioners. Before working near the impact sensors, instrument panel and steering column, first disconnect the negative and then the positive terminals from the battery and wait about two minutes. This will prevent unauthorized deployment of airbags and seat belt tensioners, which could cause injury.
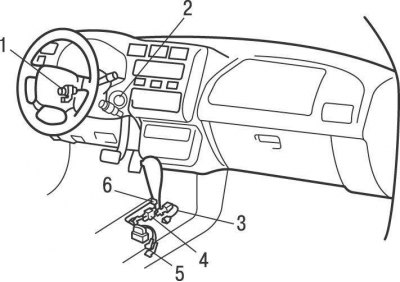


Figure 9.25. Selector lever and ignition lock system on 1996 and 1997 models: 1 – key lock solenoid in the ignition switch; 2 – brake light switch; 3 – selector lever lock solenoid; 4 – selector lever position control switch; 5 – control unit of the locking system; 6 – button
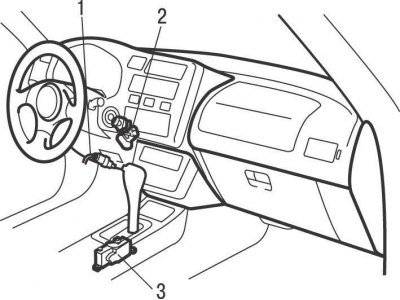


Figure 9.26. Selector lever and ignition lock system on models from 1998 to 2001: 1 – brake light switch; 2 – key lock solenoid in the ignition switch; 3 – control unit of the locking system
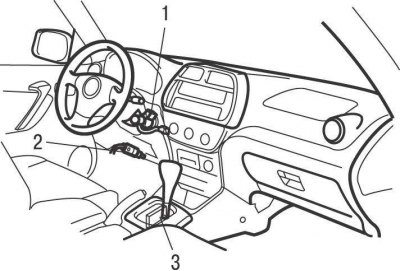


Figure 9.27. Selector lever and ignition lock system on models from 2001: 1 – key lock solenoid in the ignition switch; 2 – brake light switch; 3 – control unit of the locking system


The selector lever and ignition lock system prevents the selector lever from being moved from the "P" and "N" positions unless the brake pedal is depressed (figures 9.25, 9.26, 9.27). It is also impossible to remove the key from the ignition switch if the selector lever is not returned to its original position.

Checking the key lock solenoid in the ignition switch


Remove the steering column cover.

Disconnect the electrical connector from the key interlock solenoid in the ignition switch.

Using an ohmmeter, measure the resistance of the solenoid winding, which should be within 12.5–16.5 ohms.

Using additional wires, briefly apply battery voltage to the solenoid coil contacts; it should make a clicking sound. Do not apply voltage for a long time, as the solenoid may be damaged.

If any of the tests fail, replace the solenoid.

Testing the Shift Lock Solenoid on 1996 and 1997 Model Years


Remove the center console.

Disconnect the electrical connector from the selector lever lock solenoid.


Using an ohmmeter, measure the resistance of the solenoid winding, which should be within 26–33 ohms.

Using additional wires, briefly apply battery voltage to the solenoid coil contacts; it should make a clicking sound. Do not apply voltage for a long time, as the solenoid may be damaged

If any of the tests fail, replace the solenoid.

Checking the selector lever position control switch on 1996 and 1997 models
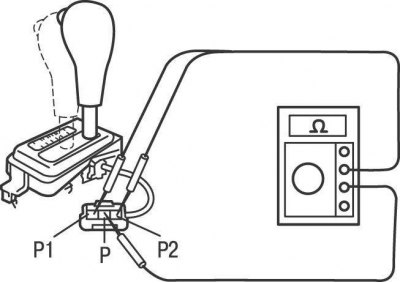


Figure 9.28. Connecting the ohmmeter probes when checking the selector lever position switch: P1, P, P2 – switch contacts


Disconnect the electrical connector from the switch and use an ohmmeter to measure the resistance between the contacts in each selector lever position (Fig. 9.28). The switch states are listed in Table 9.4.
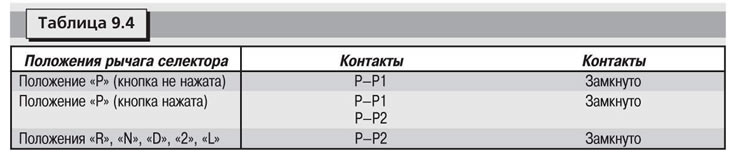


If the resistance between the contacts does not meet the requirements, replace the switch.


Control unit of the blocking system


If the above components are working properly and the locking system is not working properly, the locking system control unit is likely faulty and needs to be replaced. However, before replacing the unit, check the electrical circuits between the components of the locking system for open circuits and short circuits.
This article is available at: russian, bulgarian, belarusian, ukrainian, serbian, croatian, romanian, polish, slovak, hungarian
The article material has been checked: Kolokoltsev Grigory
Share information:
◀ Previous
RAV 4 XA10: Automatic gearbox
Next ▶

Replacing and adjusting the starter interlock switch (PNP)
Replacing and adjusting the selector cable
Checking, adjusting and replacing the throttle control cable
Replacing the sealing cuffs
Automatic transmission diagnostics
Removal and installation an automatic transmission with one drive axle
Removal and installation an automatic transmission on all-wheel drive…
Similar articles on other Toyota models

➥ Selector and ignition key lock system Toyota Duet (1998-2004)
➥ Checking and replacing the ignition lock cylinder Toyota Camry XV30 (2001-2006)
➥ Checking the ignition system (1ZZ-FE / 3ZZ-FE) Toyota Corolla Verso 3 (2004-2009)
➥ Checking the anti-lock braking system (ABS) Toyota Corona T190 (1992-1997)
➥ Checking the selector lock Toyota Carina T190 (1992-1996)
➥ Checking the ignition system Toyota Cruiser 60/80 (1980-1997, petrol)
Link in different formats to this article
Comments and feedback from visitors
No comments yet


Add two numbers 12 + 47


RAV 4 XA20 (2000-2005) 
  • General information
  • Introduction to manual
  • User manual
  • Daily care
  • Maintenance (petrol)
  • Maintenance (diesel)
  • Troubleshooting
  • Power unit
  • Gasoline engines (before 2000)
  • Petrol engines (since 2001)
  • Diesel engines
  • Engine overhaul
  • Cooling and heating
  • Fuel system (petrol)
  • Fuel system (diesel)
  • Engine electrical equipment
  • Control system (petrol)
  • Control system (diesel)
  • Transmission
  • Manual gearbox
  • Automatic gearbox
  • Clutch and drive shafts
  • Chassis, running gear
  • Brake system
  • Front suspension
  • Rear suspension
  • Steering system
  • Body and interior
  • Exterior (external elements)
  • Interior (internal elements)
  • Doors, locks and windows
  • Electrical equipment
  • Equipment and devices
  • Electrical circuits
RAV 4 XA10 (1994-2000) 
  • General information
  • User manual
  • Maintenance
  • Power unit
  • Petrol engine 3S-FE
  • Petrol engine 1AZ-FE
  • Engine overhaul
  • Cooling and air conditioning
  • Fuel and exhaust system
  • Ignition system
  • Toxicity reduction system
  • Transmission
  • Clutch
  • Mechanical gearbox
  • Automatic gearbox
  • Cardan and drive shafts
  • Chassis, running gear
  • Brake system
  • Car suspension
  • Steering
  • Body and interior
  • Exterior (external elements)
  • Interior (internal elements)
  • Doors, locks and windows
  • Electrical equipment
  • Equipment and devices
  • Power devices
  • Electrical circuits
ToyotaMan.ru © 2018–2026 • Mobile version • Interesting about Toyota • Administration • Sitemap: EN BG BY UA RS HR RO PL SK HU • Search system • Bookmark
Camry Vista-V40 • Camry XV10 • Camry XV20 • Camry XV30 • Corolla Verso-AR10 • Corolla E80 • Corona T190 • Carina T170 • Carina T190 • Land Cruiser J70 (diesel) • Land Cruiser J60 (petrol) • Land Cruiser J100 • Highlander XU20 (petrol) • 4Runner N120 • RAV4 XA10 • RAV4 XA20 • Duet M100 • Dyna Y50 •
We require cookies to enable some interactive features. Is that ok with you?