
Removing
Chock the front wheels to prevent the vehicle from moving. Raise the rear of the car and place it on stands. Release the parking brake lever and place the shift lever in neutral.
Drain the oil from the differential case.
Use paint or a marker to apply alignment marks to the flange of the differential and the flange of the inner CV joint of the drive shaft.
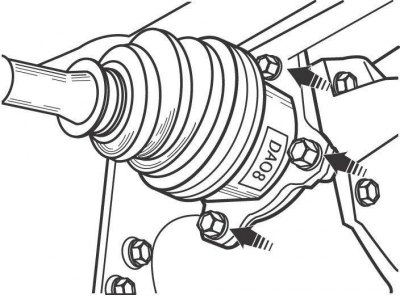
Pic. 10.4. Arrangement of nuts for fastening the inner CV joint of the rear drive shaft to the differential flange
Remove 4 nuts, separate the inner CV joints of the drive shafts from the differential flanges and secure them to the body with soft wire (see fig. 10.4)
Attention! Do not let the shafts hang on the outer CV joints.
Use paint or a marker to apply alignment marks to the flange of the main reverse gear and the propeller shaft flange. This is necessary to reset the shaft to its original position in order to maintain the balance of the shaft.
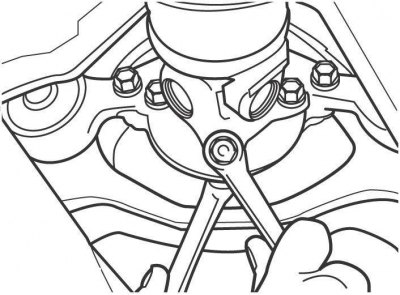
Pic. 10.10. Removing the bolts securing the rear universal joint of the propeller shaft to the flange of the main reverse gear
Turn out nuts and bolts of fastening of the rear universal joint of the cardan shaft to the flange of the main reverse gear (see fig. 10.10). To access the nuts and bolts, rotate the cardan shaft. Use a soft wire to secure the back of the driveshaft, do not let it hang on the support bearing.
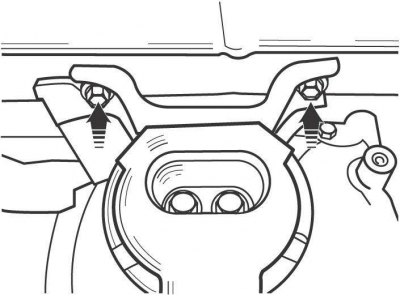
Pic. 10.17. The location of the bolts of the upper mounting of the bracket in the rear of the differential
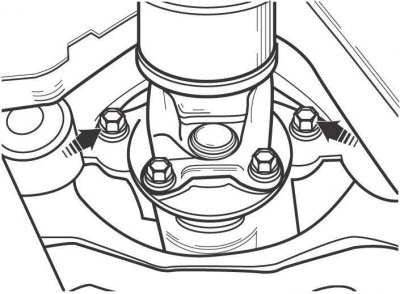
Pic. 10.18. Arrangement of bolts of fastening of a forward part of differential
Support the differential with a transmission jack and remove the two top mounting bracket bolts at the rear of the differential (pic. 10.17). Remove the two bolts securing the front of the differential (pic. 10.18). Slowly lower and remove the differential from under the vehicle.
Installation
Install in the reverse order of removal.
After installation, add oil to the differential case.