
Removing
Remove the cardan shaft.
Use paint or a marker to apply alignment marks to the flanges of the universal joint and propeller shaft.
Remove 6 bolts and separate the two halves of the driveshaft.
Using a hammer and chisel, loosen the locking part of the universal joint nut.
Fix the rear flange of the front part of the driveshaft in a soft-jawed vise, unscrew and remove the nut with the plate washer.
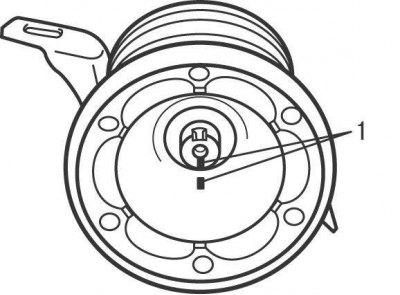
Pic. 10.14. Label Location (1) alignment on the flange and the front of the cardan shaft
Mark with paint or marker 1 (pic. 10.14) alignment on the flange and the front of the cardan shaft.
Using a two-jaw puller, remove the connecting flange from the cardan shaft.
Remove the washer and thrust bearing from the propeller shaft.
Check the condition of the support bearing. It should rotate easily, smoothly and without jamming.
Installation
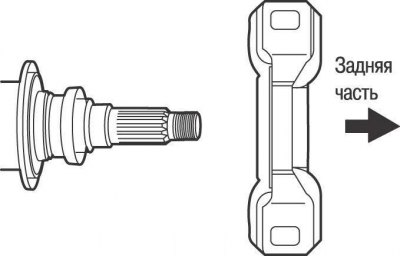
Pic. 10.15. Installation position of the thrust bearing on the front of the cardan shaft
Install the thrust bearing and washer on the front of the driveshaft (pic. 10.15).
Install the flange on the propeller shaft, aligning the marks made before removal, and secure it with a new nut and washer. Clamp the driveshaft in a soft-jawed vise and tighten the support bearing nut. Lock the nut with a hammer and chisel.
Connect the front and rear parts of the propeller shaft, matching the marks made before removal, and secure with bolts, finger-tight at this stage.
Lubricate the sealing lips of the gearbox seal. Insert the front part of the driveshaft into the transmission and screw, but do not tighten, the bolts securing the driveshaft support bearing bracket to the bottom of the vehicle.
Connect the propeller shaft rear universal joint with the main reverse gear flange, aligning the marks made before removal, and tighten the nuts and bolts to 74 Nm.
While the assistant presses the brake pedal, tighten the bolts securing the two parts of the driveshaft.
Adjust the position of the propeller shaft support bearing.