
Removing
Remove the hub cap or wheel trim. On production models before 2001, remove the cotter pin and unscrew the lock nut securing the drive shaft to the rear wheel hub. On models since 2001, bend the collar of the nut, which is bent into the groove of the drive shaft.
Socket wrench with large shoulder (with extension) loosen the nut securing the drive shaft to the rear wheel hub.
Chock the front wheels to prevent the vehicle from moving. Loosen the rear wheel nuts, then raise the rear of the vehicle and place it on jack stands. Remove the wheel.
On vehicles with ABS, remove the wheel speed sensor.
Loosen the nut securing the drive shaft to the rear wheel hub.
Use paint or a marker to apply alignment marks to the flange of the differential and the flange of the inner CV joint of the drive shaft.
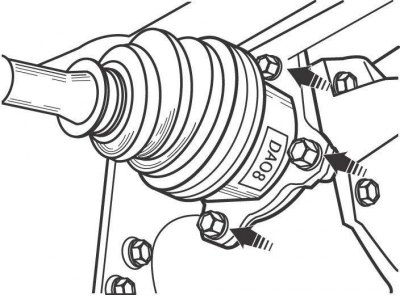
Pic. 10.4. Arrangement of nuts for fastening the inner CV joint of the rear drive shaft to the differential flange
Remove 4 nuts and separate driveshaft inner CV joint from differential flange (pic. 10.4).
Installation
Install in the reverse order of removal, taking into account the following.
Screw on a new nut securing the drive shaft to the hub and pre-tighten the nut.
Install the wheel and secure it with nuts. Lower the car.
With the car standing on wheels, tighten the nut securing the drive shaft to the hub to 216 Nm, then screw on the lock nut and secure it with a cotter pin from loosening.