
Removing
Apply the parking brake and chock the rear wheels.
Loosen the front wheel nuts. Raise the front of the car and place it on stands. Remove the front wheels.
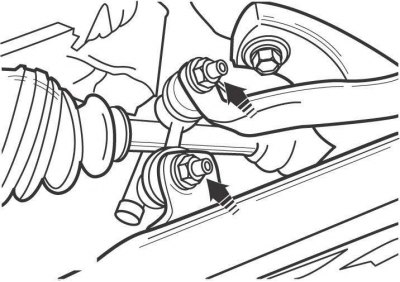
Pic. 12.8. The location of the anti-roll bar nuts on models up to 2001
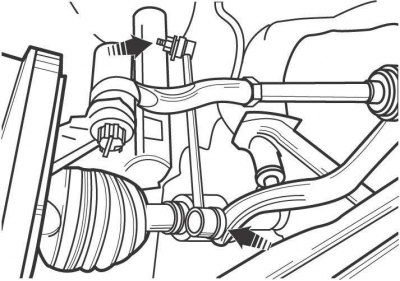
Pic. 12.9. The location of the anti-roll bar nuts on models from 2001
Disconnect the stabilizer bar from the stabilizer links (pic. 12.8, 12.9). When unscrewing the nuts securing the ball joints of the stabilizer link, hold the spherical joint trunnion from turning with a hex wrench.
On models manufactured before 2001, when removing the anti-roll bar, unscrew the upper nut securing the stabilizer link, and when removing the lower front suspension arm, the lower nut.
Turn out bolts of fastening of clips with plugs fastening the stabilizer bar.
Remove the anti-roll bar from the vehicle.
Remove the support bushings from the stabilizer and check their condition.
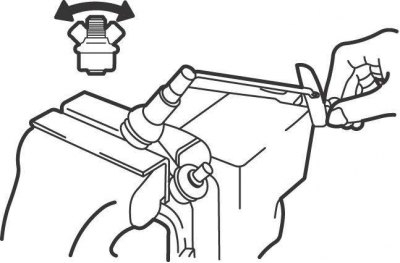
Pic. 12.10. Check of a condition of a spherical hinge of drafts of the stabilizer
Check up a condition of spherical hinges of drafts of the stabilizer. To do this, remove them from the car and secure in a vise (pic. 12.10). Tilt the pin of the ball joint to the stop to one side and the other, then screw the nut onto the pin. Using a torque wrench, turn the ball joint trunnion (one revolution in 2–4 s), and on the fifth turn, measure the cranking torque, which must be at least 0.04 Nm. Otherwise, replace the stabilizer link.
Use a wire brush to clean the areas of the stabilizer where the bushings are to be installed.
Installation
Lubricate the inside and outside of the bearing bushings with cooking oil to facilitate installation. Do not use engine oils or brake fluid as a lubricant. Install the support bushings on the stabilizer, while the cuts of the bushings should be directed towards the rear of the car.
Further installation is carried out in the reverse order of removal.