
Disassembly
Remove the front suspension strut from the vehicle and secure in a vice with soft jaws. To avoid damaging the stand, do not overtighten the vise.
Using the special tool, compress the spring so that it moves away from the top of the rack. When using a special device for compressing springs, grasp the coils of the spring securely, compress the spring from opposite sides.
Attention! The spring has a very high compression force, so use only a reliable tool. Never use wire to tighten the spring.
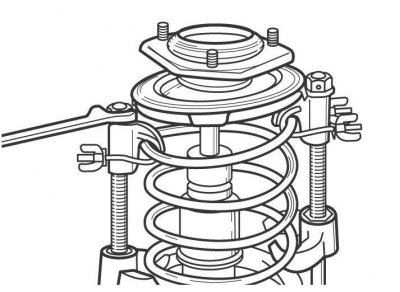
Pic. 12.3. Unscrewing the central nut of the shock absorber rod
Loosen the center nut on the shock absorber (pic. 12.3).
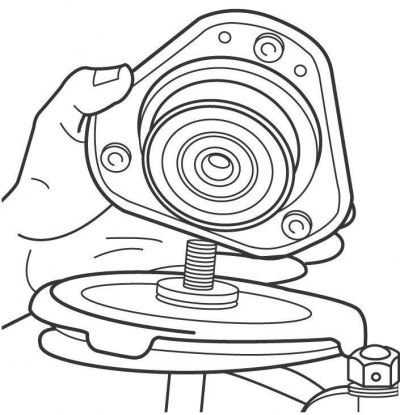
Pic. 12.4. Removing the upper support of the rack with the bearing fixed in it
Remove the upper support of the rack with the bearing fixed in it (pic. 12.4). Check the condition of the bearing: it should rotate easily and smoothly, without jamming. Otherwise, replace the upper rack support. Also check the rubber element of the upper strut support for delaminations and cracks.
Remove the spring seat and bellows from the damper rod. Check the condition of the rubber spring seat for delamination and hardening, and replace if necessary.
Remove spring with spring compressor and place in a safe place.
Remove the buffer from the shock absorber rod.
Check the condition of the lower rubber seat of the spring for delamination and hardening, and replace if necessary.
Assembly
When installing, use springs with the same technical characteristics on the same axle of the car (with the same color coding).
Inspect the body and shock absorber rod. There should be no mechanical damage on the body, and traces of corrosion on the stem. Set the shock absorber to a vertical position and check its operation by moving the rod through the full stroke and up and down by 50–100 mm. In all cases, the shock absorber rod should move smoothly, with perceptible resistance. If the shock absorber rod moves jerkily or there is mechanical damage, replace the shock absorber.
The rod of a gas-filled shock absorber can spontaneously extend out of the shock absorber. The absence of spontaneous extension of the rod from the shock absorber does not indicate a malfunction of the shock absorber. In this case, the gas-filled shock absorber continues to work as a hydraulic shock absorber. The shock absorber performs its functions even in the absence of excess gas pressure, but additional noise may appear when the piston moves.
Check for shock absorber fluid leaks. A small oil leakage is allowed while maintaining the normal performance of the shock absorber. It is normal if the fluid leak from the damper only extends to the lower spring seat. With a slight leakage of fluid from the shock absorber, the sealing ring of the shock absorber rod is lubricated, which increases its service life.
If there are severe fluid leaks, replace the shock absorber.
Fix the shock absorber in a vice with soft jaws.
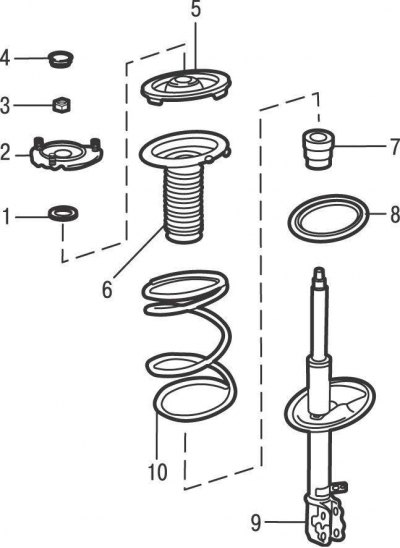
Pic. 12.5. Details of the front suspension strut: 1 - seal; 2 - the upper support of the rack with a bearing fixed in it; 3 - nut; 4 - plug; 5 – the top nest of a spring; 6 - corrugated protective cover; 7 - buffer; 8 - lower spring seat; 9 – front suspension strut; 10 - spring
Extend the shock absorber rod to its full length and install a rubber buffer on it (pic. 12.5).

Pic. 12.6. The location of the recess for installing the lower coil of the spring
Install the coil spring so that its lower end is located in the recess at the bottom of the spring seat (pic. 12.6).
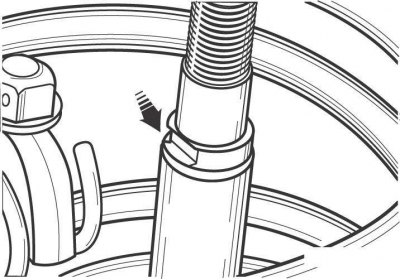
Pic. 12.7. The location of the flats on the shock absorber rod for fixing the upper spring seat
Install the upper spring seat so that it is clearly seated on the damper rod flats (pic. 12.7).
Install the protective cover and the upper support on the shock absorber rod and secure with the nut, tightening it to the torque specified in the technical data.
Install the front strut on the car.