
Warning! Brake pads generate brake dust, which contains asbestos, which is harmful to health, so do not use compressed air or inhale the dust when cleaning brake pads.
Attention! To clean the brake mechanisms, use only a special brake cleaner.
Removing
Remove the hub cap or wheel trim. On models before 2001, remove the cotter pin and unscrew the locknut securing the drive shaft to the front wheel hub. On models since 2001, bend the collar of the nut that is bent into the groove of the drive shaft.
Socket wrench with large shoulder (with extension) loosen the nut securing the wheel drive shaft to the hub.
Loosen the front wheel nuts, then raise the front of the vehicle and place it on jack stands. Remove the wheel.
Remove the caliper without disconnecting the brake hose from it. Using a soft wire, hang the caliper from the A-pillar. Remove the brake disc from the hub.
If you have ABS, remove the front wheel speed sensor.
Mark the relative position of the lower part of the rack and the steering knuckle so that the camber is not disturbed during installation. Also note the position of the bolt heads due to the fact that special adjusting bolts were installed on parts of the cars. Loosen, but do not remove, the nuts securing the bottom of the strut to the steering knuckle.
Disconnect the tie rod from the steering knuckle.
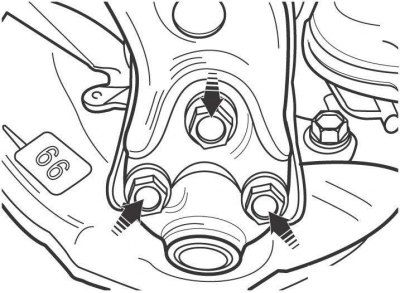
Pic. 12.11. Arrangement of a bolt and nuts of fastening of the spherical hinge to the lower arm of a forward suspension bracket
Remove the bolt and two nuts securing the ball joint to the lower arm of the front suspension (see fig. 12.11). Use a pry bar to separate the ball joint from the lower front suspension arm and remove from the vehicle.
Unscrew the nut securing the drive shaft to the front wheel hub and remove the shaft from the front wheel hub. If the shaft cannot be removed manually from the hub, knock it out with a mallet. Hang the outer end of the shaft to the body with a soft wire, do not let it hang freely, as this may damage the inner CV joint of the shaft.
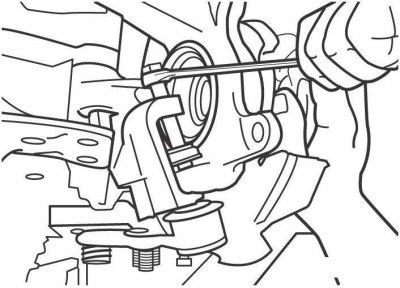
Pic. 12.15. Using a puller to force the ball joint pin out of the steering knuckle
Remove the cotter pin from the ball joint pin and unscrew the nut securing the ball joint to the steering knuckle. Pull the ball joint pin out of the steering knuckle with a puller (pic. 12.15). If the steering knuckle is removed to replace the hub bearing and the ball joint is in good condition, it can be left on the steering knuckle.
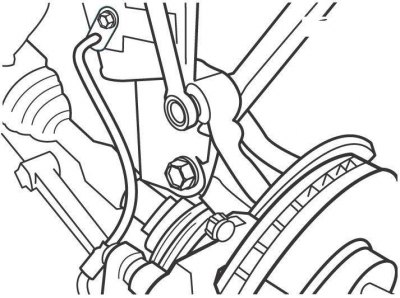
Pic. 12.1. Unscrewing the nuts securing the lower part of the front suspension strut to the steering knuckle
Turn out two nuts and knock out two bolts of fastening of the lower part of a rack to a rotary fist with a hammer and a drift (see fig. 12.1).
Separate the steering knuckle from the front suspension strut.
Note. Removing the hub and replacing the bearing requires special equipment and tools, as well as skill, so it is recommended that this work be done at a service station. The only thing that can be done at home is to first remove the steering knuckle with the hub.
Installation
If the ball joint was removed from the steering knuckle, install it and secure with a nut, tightening it to the torque specified in the technical data and fix it with a cotter pin.
While moving the steering knuckle towards the vehicle, install the wheel drive shaft into the front wheel hub.
Connect the lower part of the rack to the steering knuckle, insert two bolts and screw the nuts onto them, without completely tightening them.
Install the lower arm onto the ball joint and secure it with the bolt and nuts, but do not completely tighten them.
Attach the tie rod to the steering knuckle.
Aligning the previously marked marks, tighten the nuts securing the lower part of the strut to the steering knuckle and the bolt and nuts securing the ball joint to the lower arm.
Install the brake disc and caliper.
Screw the nut securing the wheel drive shaft to the hub. On models from 2001, use a new nut. Pre-tighten the nut.
Install the wheel and secure it with nuts. Lower the car.
With the vehicle on wheels, finally tighten the shaft-to-hub nut to 216 Nm. On models up to 2001, screw on the locknut and secure it with a cotter pin from loosening. On models from 2001, use a hammer and punch to drive the collar of the nut into the groove of the drive shaft.
Check and, if necessary, adjust the angles of the front wheels.