
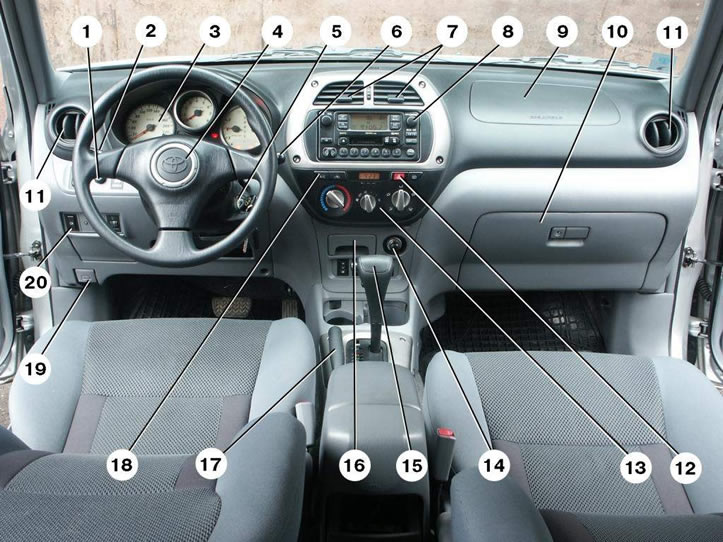
Pic. 1.1. Controls, instruments and equipment on vehicles manufactured since 2001: 1 - instrument backlight control; 2 - stalk switch low / high beam headlights; 3 – a combination of devices; 4 - driver's airbag / sound signal; 5 - ignition lock; 6 - stalk switch cleaners and washer glass; 7 - central ventilation grilles; 8 - car radio; 9 - passenger airbag; 10 - glove box; 11 - side ventilation grilles; 12 - emergency light switch; 13 - heating and ventilation control panel; 14 - cigarette lighter; 15 - selector lever; 16 - ashtray; 17 – parking brake lever; 18 - button for turning on the air conditioner; 19 – hood opening handle; 20 – the switch of back fog lamps
The main controls of the car and a combination of devices are resulted on fig. 1.1. and 1.2.
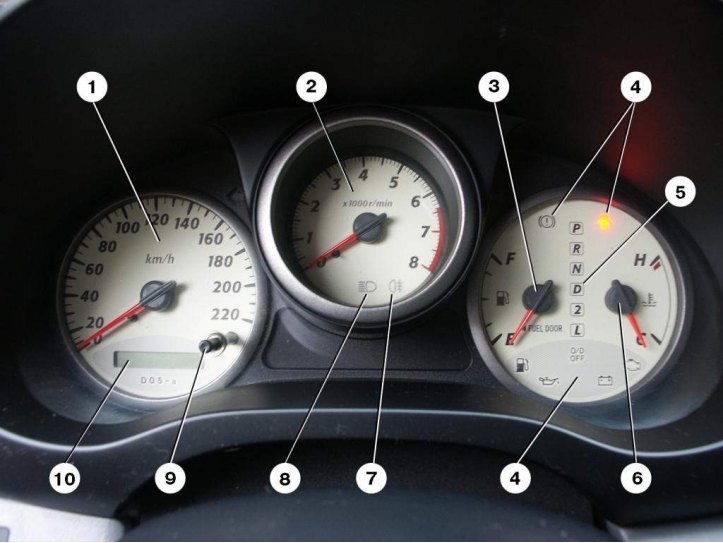
Pic. 1.2. Instrument cluster: 1 - speedometer; 2 - tachometer; 3 – fuel gauge; 4 - maintenance indicators and other light indicators; 5 - indicator of the mode of operation of the automatic transmission; 6 - coolant temperature gauge; 7 – a control lamp of inclusion of forward antifog headlights; 8 – a control lamp of inclusion of a high beam of headlights; 9 - button to reset the daily run odometer; 10 - total mileage odometer and two daily run odometers
The instrument cluster includes the following elements:
1 - The speedometer shows the instantaneous speed of the car.
2 - Tachometer.
In no case should the tachometer needle enter the red zone of the scale.
Upshifting at the right time saves fuel and reduces engine and transmission noise.
It is necessary to switch to a lower gear as late as possible, shortly before the moment when jerks appear in the engine.
During the break-in period, avoid running the engine at high engine speeds.
3 - Fuel gauge.
The pointer works when the ignition is on. The vehicle's fuel tank capacity is approximately 58 liters.
4 - Maintenance indicators and other warning lights:
When the parking brake is applied and the ignition is on, the lamp is on. It should go out when the parking brake is released.
The lamp burns constantly at falling of level of a brake liquid. In this case, stop the vehicle, check and, if necessary, top up the brake fluid level. Check the tightness of all brake drive units and their connections;
The lamp lights up when the ignition is turned on, after starting the engine it goes out. The generator is driven by a durable V-belt.
If the lamp comes on while driving, stop, turn off the engine and check the condition of the V-belt.
If the belt tension is loose or broken, you cannot continue driving - the engine cooling pump is also not activated. Replace belt if necessary.
If the lamp is on, and the alternator drive belt is in good condition, you can continue driving to the nearest service company, for which, to reduce battery discharge, turn off all secondary consumers of electricity;
Attention! If the lamp lights up despite the fact that the engine oil level is normal, you cannot continue driving. In this case, the engine is not allowed to work even at idle - qualified assistance is needed.
If this lamp lights up while driving, stop, turn off the engine and check the oil level, if necessary, bring it to normal.
The automatic control system with the ignition on and while driving constantly monitors the performance of certain functions and the state of individual elements of the car.
This lamp in the instrument cluster lets you know about malfunctions and the need for repairs or maintenance.
Refuel the vehicle when this lamp comes on.
Even if one door is not closed, the lamp will be on and turn off after all doors are closed.
5 - Index of the automatic transmission mode.
Indicates which gear the automatic transmission is in when the vehicle is moving, or in what position it is in when the vehicle is stationary.
6 - Coolant temperature gauge.
The pointer works when the ignition is on.
If the arrow is in the lower blue area of the scale, avoid increasing the engine speed and engine load.
Attention! If the arrow is in the upper zone of the scale - the coolant temperature is too high - stop the car, turn off the engine and determine the cause of the increase in coolant temperature.
When the car is moving under normal conditions, the arrow should be in the middle zone of the scale.
With a heavy load on the engine and a high outside temperature, it is possible from time to time that the pointer is in the red upper area of the scale;
The lamp burns at the included main beam of headlights and at giving of a light signal.
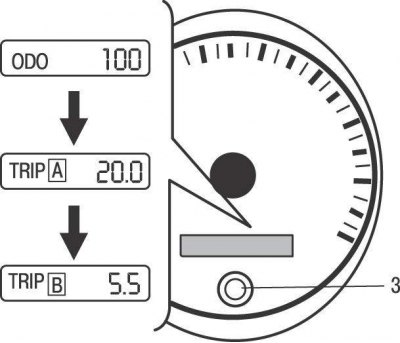
Pic. 1.3. Using the trip meter
9 - Button to reset the odometer daily mileage (pic. 1.3).
The trip odometer reset button is used to reset the readings to zero, as well as to switch the display from one odometer to another. To switch the display from one odometer to another, quickly press and release the button. Each time the button is pressed, the display switches from odometer A to odometer B and back. To reset odometer A to zero, call up odometer A, then press and hold the reset button until the reading resets to zero. In the same way, the odometer B is reset.
10 - Total mileage odometer and two daily mileage odometers.
The total mileage odometer shows the total mileage of the vehicle.
The two daily odometers show two different distances traveled independently of each other since each odometer was last reset to zero. You can use one odometer to calculate fuel consumption and another to measure daily mileage. When the power is turned off, all data from both odometers is lost.