



Checking the brakes

Warning! Brake pad dust contains asbestos, which is harmful to health; try not to inhale it. Wear a respirator when repairing and servicing brakes. Never clean brakes with compressed air. Do not use petroleum-based solvents to clean the brake system; special fluids are intended for this purpose.
Note: Detailed illustrations are provided in chapter 9.
1. In addition to the mandatory checks according to the maintenance schedule, the brakes should be inspected when the wheels are removed and if a malfunction is suspected. Possible malfunctions in the braking system can be judged by the following signs: the car pulls to the side when braking; squealing or other unusual noises when braking; excessive brake pedal travel; pedal pulsation (if this is not a consequence of normal ABS operation); brake fluid leaks, usually visible on the inside of tires and wheels.
2. Disc brake friction linings have built-in wear indicators. which make a high-pitched squealing or squeaking sound when the pad needs to be replaced. If you hear these sounds, you need to replace the pads immediately, otherwise expensive repairs (replacement) of the brake discs will not be long in coming.
3. Loosen the wheel nuts.
4. Raise the vehicle and support it securely on safety stands.
5. Remove the wheels (see section "Changing a wheel" at the beginning or your car's owner's manual).
Disc brakes
6. Inside each caliper there are two pads - outer and inner. The condition of the inner pads can be assessed through the inspection window in the caliper, while the outer ones are better visible from the outside of the caliper (see Figure 14.6).
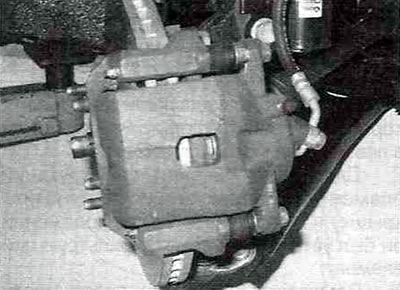
Figure 14.6. The disc brake caliper has a viewing window for checking the thickness of the friction lining of the inner pad.
7. When inspecting the pads, visually determine the thickness of their linings. If the thickness of the friction lining of at least one pad is less than specified in the Specifications (at the beginning of this chapter), all brake pads on one axle must be replaced.
Note: Please note that the pad is riveted or pressed into the metal backing plate of the brake pad and the thickness of the metal is not taken into account when measuring it.
8. If measuring the thickness of the pads is difficult or you have doubts about the condition of the pads, then remove the caliper and then the pads for further inspection (see chapter 9).
9. While the pads are removed from the caliper, clean them with a special liquid and measure the thickness of the friction linings.
10. Use a micrometer to measure the thickness of the brake disc. If the thickness of the disc is less than the minimum thickness specified in Specifications, then it needs to be replaced (see chapter 9). If the disk thickness is acceptable for further use, check its condition. The brake discs should not have any nicks, cracks, uneven or excessive wear, or signs of overheating (discoloration). If such defects are detected, the disc/hub must be replaced (see chapter 9).
11. Before installing the wheels, make sure there are no brake fluid leaks at the joints of the hoses with the caliper. There should be no cracking or abrasion of the hoses or pinching of the tubes; if any are found, the relevant parts must be replaced immediately.
12. Check the tightness of the clamps and the condition of the fittings. Make sure that hoses and lines do not come into contact with sharp edges, moving parts or the exhaust system. If you notice any of the above defects, please correct it immediately (see chapter 9).
Rear drum brakes
13. In order to visually check the thickness of the friction linings on the drum brake pads without disassembling them, remove the rubber plug on the brake shield and, using a flashlight, check the condition of the pads through the inspection window (see figure 14.13).
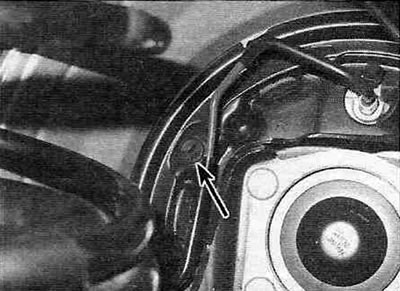
Figure 14.13. Remove the rubber plug on the support plate and inspect the pads through the inspection window.
For a more thorough check, please follow the procedures below.
14. Remove the brake drum (see chapter 9).
15. Check the thickness of the brake pad friction linings (see figure 14.15).
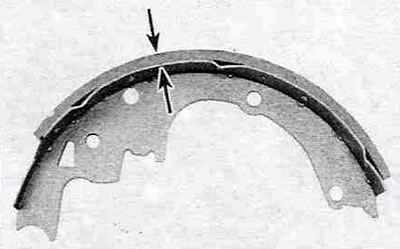
Figure 14.15. If the friction lining is glued to the surface of the brake shoe, its thickness is measured as shown in the figure. If the lining is riveted, the thickness is measured from the outer surface to the head of the rivet.
If the thickness of at least one lining is less than 1.6 mm, all pads on one axle must be replaced (set). Also subject to replacement are oily, spilled with brake fluid, cracked or burnt pads (see "Replacing brake pads").
16. Make sure that all mechanism springs are properly engaged and in good working order.
17. Check for brake fluid leaks. Carefully pry off the dust boots of the working brake cylinder with a screwdriver (see figure 14.17), make sure there are no leaks.
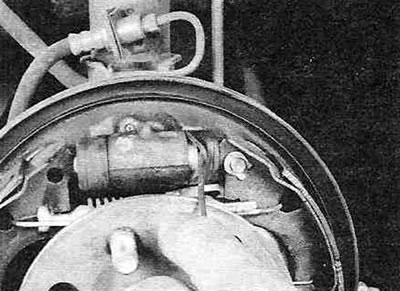
Figure 14.17. Using a small screwdriver, carefully pry up the boot to ensure there are no leaks.
Leaking cylinders are worn out and need to be replaced (see chapter 9). Check the condition of the hoses and the absence of leaks. Wipe the inside of the brake drum with a clean cloth dampened with denatured alcohol or brake cleaner, then wipe dry. Try to avoid breathing asbestos dust.
18. Check for cracks, deep grooves and rust on the inner working surface of the brake drum. If minor defects cannot be removed with sandpaper, the drum should be taken to a workshop for resurfacing.
19. Repeat this procedure with the other brake drum. If no damage is found, install the brake drums.
20. Install the wheels and tighten the nuts.
21. Lower the car.
22. Tighten the nuts to the specified torque Specifications moment.
Vacuum brake booster
23. Take the driver's seat and perform the following checks.
24. Fully depress the brake pedal and start the engine – the pedal should go to the floor slightly.
25. With the engine running, press the brake pedal several times - the pedal travel should not change.
26. Press the brake pedal, turn off the engine and wait for half a minute - the pedal should not change its position.
27. Start the engine again, let it run for about a minute and turn it off. Press the pedal all the way down several times - with each subsequent press the pedal should stop higher and higher.
28. If the pedal operation differs from that described above, the brake booster is faulty. The amplifier cannot be repaired. Replacing the amplifier is described in chapter 9.
Parking brake
30. Slowly tighten the handbrake handle until it stops and count the number of clicks by ear. The brake is considered to be properly adjusted if the number of clicks heard matches the number specified in Specifications. If it differs in a greater or lesser direction, this means that it is time to adjust the handbrake (see chapter 9).
31. You can also check the handbrake in another way: park the car on a steep slope, fully tighten the handbrake and move the transmission control lever (selector) to neutral position (do not leave the vehicle during this procedure!). If the car starts to roll, the handbrake needs to be adjusted (see chapter 9).