



Checking, adjusting and replacing the accessory drive belt

Examination
1. The drive belts for the alternator, power steering pump and air conditioning compressor are located on the right side of the engine. Good condition and correct adjustment of the alternator drive belt play a major role in engine performance. During operation, drive belts are subject to high loads, which leads to their stretching and destruction, so the condition of drive belts must be checked periodically.
2. All diesel engine models use two drive belts: one transmits torque from the crankshaft to the generator, the other to the air conditioning compressor and power steering pump.
3. Without starting the engine, open the hood and locate the drive belt(s). Using a flashlight, inspect the condition of each belt along its entire length. To do this, you need to turn the engine crankshaft, holding the pulley mounting bolt with a head and a ratchet. When unrolling the belt between the pulleys, check its back side as well. The check should be done not only visually, but also by running your fingers over each area. Make sure there are no various types of delamination or cracks. Cracks usually start on the inside and work their way outward. Also, check for any abrasions—they're usually shiny (see figure 9.3).
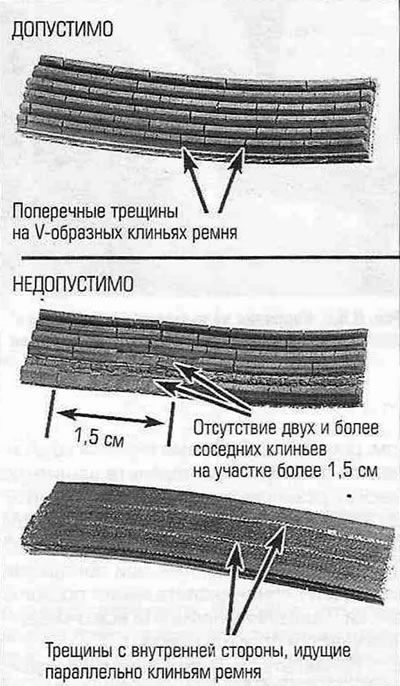
Figure 9.3. Signs of wear on a poly V-belt - if present, the belt must be replaced.
At the same time, check the condition of the pulleys: there should be no cracks, bending or rust. If any of the above damages are present, the pulley must be replaced (see paragraphs 7, 8, 9).
4. The tension of the generator drive belt is adjusted by an automatic tensioner, the tension of the power steering pump/air conditioning compressor drive belt is adjusted mechanically. Toyota technicians measure belt tension in pounds of force (lbf) using a specialized dynamometer. Dynamometer testers from Nippondenso and Borroughs are available from dealers. Tester (dynamometer) it is attached to the short arm of the drive belt, and when the belt is tensioned, the reading is read from the instrument scale (see figure 9.4).
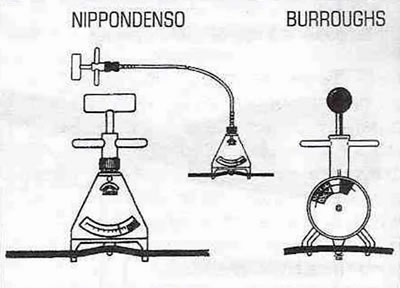
Figure 9.4. Installing Nippondenso and Burroughs devices on a drive belt when measuring its tension.
This method is considered the most accurate, and purchasing such a tester is highly recommended. When adjusting belt tension, follow the manufacturer's instructions and Specifications. The tension values for new belts are slightly higher than for those that have already been used.
Note: A belt is considered "new" if it has not been in use under load for more than five minutes. The remaining belts are considered "used".
5. If you do not have the opportunity to measure the tension of the drive belts with the devices mentioned above, use the following rule: press hard with your thumb on the middle of the belt between the two pulleys. The belt is considered to be properly tensioned if you have managed to deflect it by approximately 6 mm when the distance between pulleys is 30 cm or less, and by approximately 12 mm when the distance between pulleys is more than 30 cm.
Adjustment
6. To adjust the tension of the power steering pump/air conditioning compressor drive belt, first loosen the locking bolt in the center of the tension roller, then turn the adjusting bolt, which is located on the outside of the tension roller bracket (see figure 9.6,a,b). Once adjustment is complete, tighten the lock bolt.
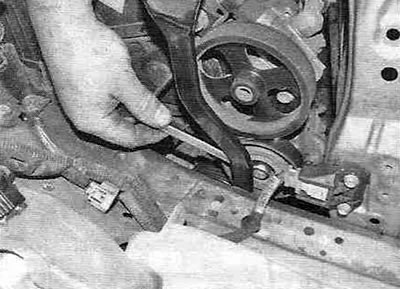
Figure 9.6,a. Loosen the locking bolt in the center of the tension roller...
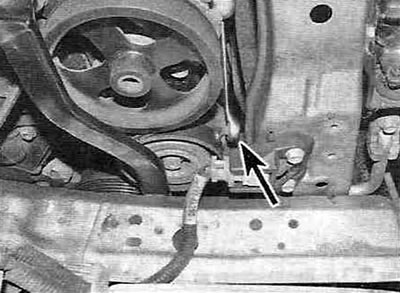
Figure 9.6, b...then, by turning the adjusting bolt, set the required tension of the drive belt.
Replacing the drive belt
7. The procedure for replacing the power steering pump/air conditioning compressor drive belt is identical to the adjustment procedure. Once the belt tension has been released sufficiently, remove it from the pulleys (see Figure 9.7).
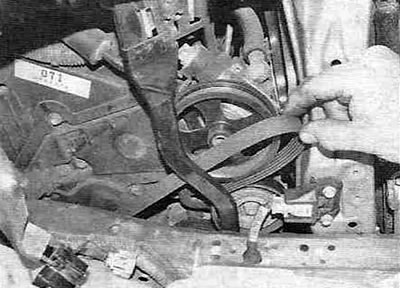
Figure 9.7. Removing the power steering pump/compressor, air conditioning drive belt.
Install a new drive belt and adjust its tension as described above.
8. When replacing the alternator drive belt, rotate the tensioner clockwise and, having loosened the tension, remove the belt from the pulleys (see Figure 9.8).
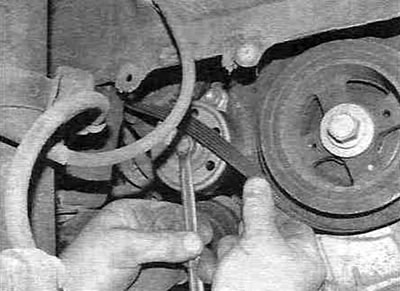
Figure 9.8. Turn the automatic tensioner clockwise to remove the alternator drive belt.
Slowly release the tensioner. Install the new belt by rotating the tensioner and then slowly release it.
9. Make sure the belt is centered (all of its wedges were placed in the corresponding grooves of the pulleys) (see figure 9.9).
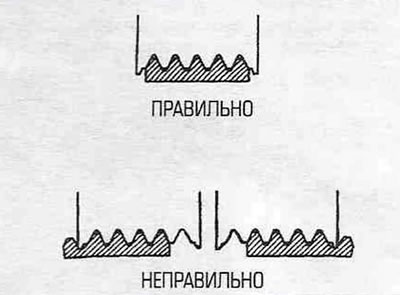
Figure 9.9. After installing the poly V-belt, check its centering - there should be no displacement in one direction or another.
Replacing the automatic tensioner
Caution! Before performing this procedure, disconnect the negative (-) battery cable.
10. If the tensioner does not provide proper tension of the drive belt, jams, or the bearing and/or pulley are worn, it must be replaced. Remove the drive belt (see Section 13 and Figure 9.13 of Chapter 1A), then remove the mounting bolt and nut (see Figure 9.16 Chapter 1A).
11. Installation of a new tensioner is carried out in the reverse order to that described in paragraph. 10 order. Tighten the nuts and bolts to the torques specified in Specifications in this chapter.
12. Install the drive belt (see "Adjustment").