
Attention! The dust generated by the brake system is harmful to your health. Never blow it out with compressed air or inhale it. When working on brakes, a suitable filter mask must be used. Under no circumstances should you use non-petroleum based solvents to clean your brakes. Use only brake cleaner!
Note. For illustrative materials on the brake system, refer to chapter 9.
1. In addition to the prescribed intervals, the brakes should be inspected each time a wheel is removed or whenever a malfunction is suspected.
2. Any of the following signs may indicate the possibility of a malfunction of the brake system: the car pulls to the side when you press the brake pedal; brakes squeal or squeal when braking; the brake pedal travel is too large; the pedal vibrates; there is a brake fluid leak, usually on the inside of the wheel.
3. Loosen the wheel nuts.
4. Raise the vehicle and place secure supports under it.
Attention! If the vehicle is equipped with electronically controlled air suspension, turn off the suspension height control switch.
5. Remove the wheels (see if necessary. «Lifting, placing the car on supports and towing» or refer to the owner's manual supplied with the vehicle).
Disc brakes
6. Each caliper has two pads (external and internal). The pads become visible after removing the wheels. The vehicles covered in this manual have disc brakes front and rear, with drum-type parking brake mechanisms located inside the rear discs.
7. Check pad thickness by looking at each end of the caliper and through the viewing window in the caliper body (pic. 12.7, a, b). If the thickness of the friction material is less than the value specified in «Technical Data» at the beginning of this chapter, replace the brake pads.
Note. Be aware that friction linings are riveted or glued to a metal backing plate that is not included in this dimension.
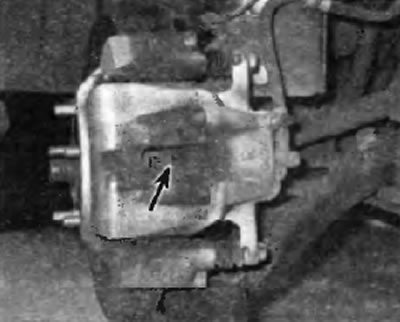
Pic. 12.7, a. Each caliper has a viewing hole through which you can inspect the friction lining of the inner brake pad
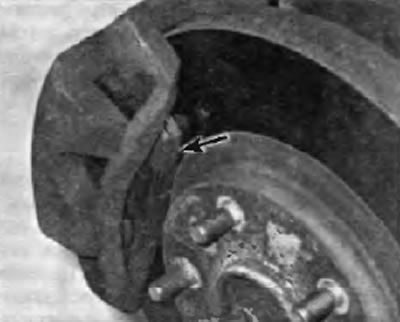
Pic. 12.7.6. The outer shoe is easier to roll towards the edge of the sup court
8. If it is difficult to determine the exact thickness of the remaining friction material in the above way or you are in doubt about the condition of the pads, remove the caliper (s), then remove the pads from the caliper for further inspection (refer to chapter 9).
9. After removing the pads from the caliper, clean them with brake cleaner and measure their thickness again with a ruler or caliper.
10. Measure the thickness of the disc with a micrometer to make sure it is still usable. If any disc is less than the prescribed minimum thickness, replace that disc (refer to chapter 9). Even if the disc's oatmeal allows you to continue using it, check its condition. Inspect for nicks, dents, and burn marks. If these defects are present, remove the disc and regrind it (see chapter 9).
11. Before installing the wheels, check all brake pipes and hoses for damage, wear, deformation, cracks, corrosion, leaks, bending and twisting, especially in the vicinity of rubber hoses and calipers. Check tightness of clamps and connections for leaks. Make sure all hoses and lines are clear of sharp edges, moving parts and the exhaust system. If any of the above conditions are present, make any necessary repairs, correct wiring, or replace lines and/or fittings as necessary (see chapter 9).
Checking the vacuum brake booster
12. Sit in the driver's seat and perform the following sequence of checks.
13. Fully depress the brake pedal and start the engine. When starting the engine, the pedal should move slightly down.
14. With the engine running, depress the brake pedal several times. The pedal travel should not change.
15. Depress the brake pedal, stop the engine and keep the pedal depressed for approximately 30 seconds - the pedal should neither go down nor up.
16. Start the engine again, let it run for a few minutes and turn it off. Then, firmly depress the brake pedal several times. The pedal travel should decrease with each press.
17. If the brakes do not work as described, the brake booster is faulty. For a description of the replacement procedure, see chapter 9.
Parking brake
18. One method of checking the parking brake is to park the vehicle on a slope with the parking brake applied and the transmission in neutral (do not leave the vehicle while performing this test). If the parking brake cannot keep the vehicle from rolling, it needs attention (see chapter 9).