
Company Honda Company Ford Company Skoda Company Kia Company Mazda Company Mercedes Company Renault
English Русский
Български
Беларускі
Український
Српски
Hrvatski
Română
Polski
Slovenský
Magyar
Bookmark Articles Sitemap Contacts
ToyotaMan.ru


Camry Corolla Corona Carina Land Cruiser Highlander 4Runner RAV4 Others
RAV 4 XA20 (2000-2005) RAV 4 XA10 (1994-2000)

Brake Hoses and Tubes — Inspection and Replacement [Toyota RAV4 XA20]

  • Main
  • RAV4
  • XA20 (2000-2005)
  • Chassis, running gear
  • Brake system
  • Brake Hoses and Tubes — Inspection and Replacement
0
Contents: Brake hoses and pipes ↓ Replacement ↓

Brake hoses and pipes


Examination


Approximately once every six months, and also at every convenient opportunity, especially if the car is raised and the safety supports are installed, the condition of the brake hoses connecting the metal brake pipes to the front and rear wheel brake mechanisms should be checked. There should be no cracks, delamination, abrasions, swelling or other mechanical damage. These components are vital to the braking system and must be checked thoroughly and completely. Flashlight (portable lamp) and a telescopic mirror will be very useful for inspection. If the hoses even look suspicious, replace them immediately.

Replacement


Front brake hose


2. Loosen the wheel nuts, lift the vehicle and place it on safety supports. Remove the wheel.

3. Use a socket wrench to loosen the fitting nut and disconnect the hose from the tube (see figure 9.3).
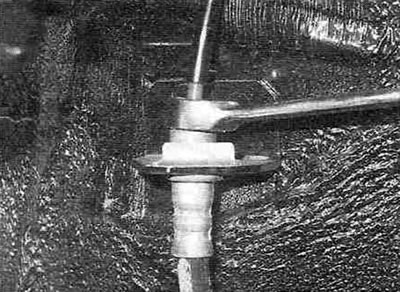


Figure 9.3. Loosen the fitting nut with a socket wrench to avoid rounding the edges.


Be careful not to bend the bracket or tube. If the bracket begins to bend when you loosen the nut, hold the mating part of the fitting with another wrench. If the fitting is corroded, pour some liquid wrench on it and let it soak for about ten minutes, then try again. Using brute force can easily bend the tube, which will then also have to be replaced.

4. Use pliers to remove the U-shaped retainer from the female threaded fitting (see figure 9.4), then pull the hose through the bracket.
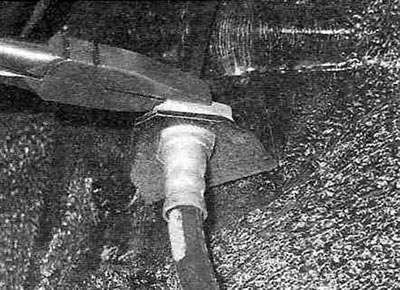


Figure 9.4. Use pliers to tighten the U-shaped clamp.


5. Remove the banjo fitting bolt from the caliper, then separate the hose from the caliper. Please note that there are two copper sealing washers on both sides of the fitting, these will need to be replaced when installing a new hose.

6. Unscrew the hose mount on the front pillar.

7. Install the front brake hose in the reverse order of its removal. Make sure the hose between the caliper and the bracket on the front strut is not kinked. Tighten the banjo fitting bolt to the specified torque Specifications of this chapter, and also securely tighten the hose/brake pipe union nut.

8. Bleed the caliper (see paragraph 10).

9. Install the wheel and tighten the lug nuts, lower the vehicle and tighten the lug nuts to the torque specified in the Specifications Chapter 1A or 1B.

Rear brake hose


10. The rear brake hose serves as a flexible connection between two rigid metal tubes located on the body and the trailing arm of the suspension. Both ends of the hose are connected to the tubes with threaded fittings, the fittings are secured with U-shaped clamps. Refer to points 2, 3 and 4. After finishing the work, do not forget to bleed the wheel cylinder (see paragraph 10).

Metal brake pipes


11. When replacing tubes, ensure that the new tube has the same configuration as the one being replaced. Copper tubes cannot withstand the natural vibrations of a vehicle - purchase metal tubes from a dealer.

12. As a last resort, you can purchase a ready-made tube of the required length with flared ends and installed fittings. It is best to bend the pipes "on site" using a pipe bender so as not to pinch them.

13. When installing the tube, make sure that it is securely fastened with all brackets and does not touch moving or hot components. Tighten tube fittings securely: using brute force can easily strip threads; it is enough to ensure the tightness of the connection.

14. After installation, check the fluid level in the reserve tank. Bleed the brake system (see paragraph 10). Before starting normal operation of the vehicle, carefully check the operation of the braking system on a deserted road.
This article is available at: russian, bulgarian, belarusian, ukrainian, serbian, croatian, romanian, polish, slovak, hungarian
The article material has been checked: Kondratyeva Ulyana
Share information:
◀ Previous
RAV 4 XA20: Brake system
Next ▶

Master Cylinder — Removal, Installation, and Replacement of…
Working (wheel) drum brake cylinder-removal and installation
Drum brake shoes — removal and installation
Brake disc — inspection, removal and installation
Disc brake caliper — removal and installation
Bleeding the hydraulic brake system
Brake booster — inspection, removal and installation
Parking brake adjustment
Parking brake cables — removal and installation
Brake pedal — checking and adjusting
Similar articles on other Toyota models

➥ Brake hydraulic hoses and tubes Toyota Camry XV20 (1996-2001)
➥ Brake hoses tubes Toyota Dyna Y50/Y60 (1984-1995)
➥ Visual inspection of brake lines and hoses Toyota Corolla E80 (1983-1990)
➥ Checking the condition of hoses and tubes Toyota Cruiser 60/80 (1980-1997, petrol)
➥ Brake Hoses and Pipes — Inspection and Replacement Toyota Highlander 1 (2000-2007, petrol)
➥ Hydraulic Hoses and Tubes — Checking and Replacing Toyota 4Runner N120 (1989-1995)
Link in different formats to this article
Comments and feedback from visitors
No comments yet


Add two numbers 44 + 41


RAV 4 XA20 (2000-2005) 
  • General information
  • Introduction to manual
  • User manual
  • Daily care
  • Maintenance (petrol)
  • Maintenance (diesel)
  • Troubleshooting
  • Power unit
  • Gasoline engines (before 2000)
  • Petrol engines (since 2001)
  • Diesel engines
  • Engine overhaul
  • Cooling and heating
  • Fuel system (petrol)
  • Fuel system (diesel)
  • Engine electrical equipment
  • Control system (petrol)
  • Control system (diesel)
  • Transmission
  • Manual gearbox
  • Automatic gearbox
  • Clutch and drive shafts
  • Chassis, running gear
  • Brake system
  • Front suspension
  • Rear suspension
  • Steering system
  • Body and interior
  • Exterior (external elements)
  • Interior (internal elements)
  • Doors, locks and windows
  • Electrical equipment
  • Equipment and devices
  • Electrical circuits
RAV 4 XA10 (1994-2000) 
  • General information
  • User manual
  • Maintenance
  • Power unit
  • Petrol engine 3S-FE
  • Petrol engine 1AZ-FE
  • Engine overhaul
  • Cooling and air conditioning
  • Fuel and exhaust system
  • Ignition system
  • Toxicity reduction system
  • Transmission
  • Clutch
  • Mechanical gearbox
  • Automatic gearbox
  • Cardan and drive shafts
  • Chassis, running gear
  • Brake system
  • Car suspension
  • Steering
  • Body and interior
  • Exterior (external elements)
  • Interior (internal elements)
  • Doors, locks and windows
  • Electrical equipment
  • Equipment and devices
  • Power devices
  • Electrical circuits
ToyotaMan.ru © 2018–2026 • Mobile version • Interesting about Toyota • Administration • Sitemap: EN BG BY UA RS HR RO PL SK HU • Search system • Bookmark
Camry Vista-V40 • Camry XV10 • Camry XV20 • Camry XV30 • Corolla Verso-AR10 • Corolla E80 • Corona T190 • Carina T170 • Carina T190 • Land Cruiser J70 (diesel) • Land Cruiser J60 (petrol) • Land Cruiser J100 • Highlander XU20 (petrol) • 4Runner N120 • RAV4 XA10 • RAV4 XA20 • Duet M100 • Dyna Y50 •
We require cookies to enable some interactive features. Is that ok with you?