



Removal and installation
1. Disconnect the ground cable from the negative battery terminal.
2. Remove the decorative frame of the central panel (see chapter 11).
3. On models prior to 2000, remove the glove compartment door and lower center panel trim (see also Chapter 11), then pull the control knobs off and remove the heater/air conditioner control panel faceplate.
4. On models produced since 2001, remove the radio (see chapter 12), then remove the lower left trim panel from the front of the center console.
5. Release the heater flap control cables from the clips and disconnect their ends from the levers on the heater/air conditioner unit housing (see Figure 9.5).
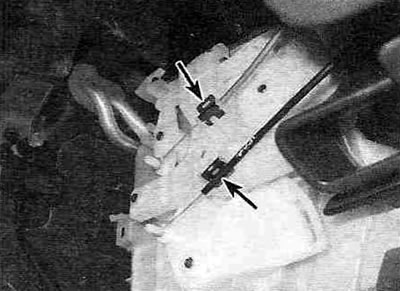
Figure 9.5. Release the control cables from the clamps (shown by arrows) on the heater/air conditioner unit body, then disconnect the cable ends from the levers - the model shown is from 2001 onwards; for models produced before 2000, three control cables must be disconnected.
6. Loosen the mounting screws on the front panel of the heater/air conditioner control unit (see figure 9.6,a,b).
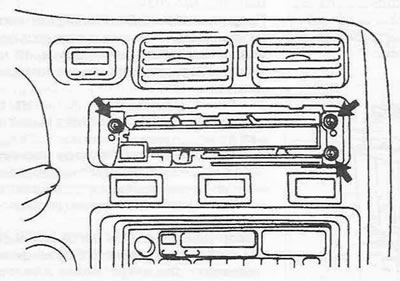
Figure 9.6,a. Heater/air conditioner unit mounting screws - pre-2000 models.
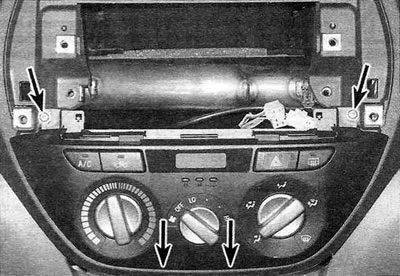
Figure 9.6,b. Heater/air conditioner unit mounting screws - 2001 and later models (the lower arrows indicate the locations of the mounting latches - be careful not to break them when removing the unit).
7. Remove the control unit from the instrument cluster along with the cables.
8. Installation of the heater/air conditioner control unit is carried out in the reverse order of its removal.
9. Start the engine and check the operation of the heater (and air conditioning, if there is one).
See the source on the internet resource: ToyotaMan.ru
Adjusting the throttle control cables for models produced before 2000
10. To adjust the air flow flap control cable, set the control lever to the RECIRC position and then, hooking the end of the cable, secure its casing.
11. To adjust the mixing flap control cable (temperatures) air, set the control lever on the panel to the COOL position, hook the end of the cable and fix its sheath, applying a little force (pulling the cable from the engine shield).
12. To adjust the mode selection cable, set the mode selection lever to the DEF position, hook the cable end and secure its casing.
Models produced since 2001
13. To adjust the mixing flap control cable (temperaturesI) air, set the control lever on the panel to the MAX COOL position, hook the cable end and secure its sheath.
14. To adjust the mode selection cable, position the mode selection lever so that it points towards the rear of the vehicle, hook the end of the cable and secure its sheath by applying a little force (pulling the cable from the engine shield) on the outer part of the cable.