



Contents: Examination ↓ Replacement ↓
Caution: Allow the engine to cool completely before starting the procedure. Avoid contact of coolant with your skin or painted vehicle parts. Rinse off any spilled liquid immediately with plenty of water. Antifreeze is toxic, do not swallow it. Never leave the liquid in an open container: children and animals, attracted by the sweet smell of antifreeze, can be poisoned. Antifreeze is also flammable, so do not store it near an open flame. For information on the civilized method of disposing of antifreeze, please contact your local authorities. There should be special containers for this in the garage. Do not pour antifreeze on the ground or down the drain.
Examination
1. Failure of the water pump can lead to serious engine (and automatic transmission) malfunction due to overheating.
2. Start the engine and warm it up to normal operating temperature. Clamp the upper radiator hose. If you feel a jolt when you release the hose, the water pump is working properly.
Caution! Keep your hands away from the fan blades.
3. Water pumps are equipped with a drainage or ventilation hole. If the pump seal is damaged, coolant will drip from this hole: the pump "cries" (see Figure 6.3).
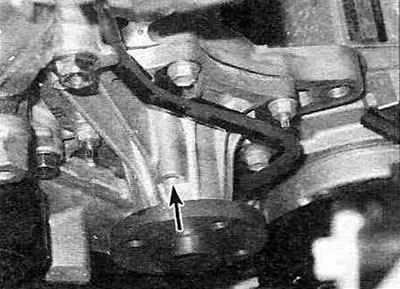
Figure 6.3. Water pump drain hole location - shown is for a 2001 and later gasoline model.
In most cases, it is enough to shine a flashlight on yourself to find this hole on the pump, which is located at the bottom. A little moisture is still acceptable, but obvious leaks require immediate repair.
4. If the pump shaft bearings are worn, noise will be heard when the engine is running. If the engine is stopped, the pump shaft will swing, indicating that the pump needs to be replaced (see figure 6.4).
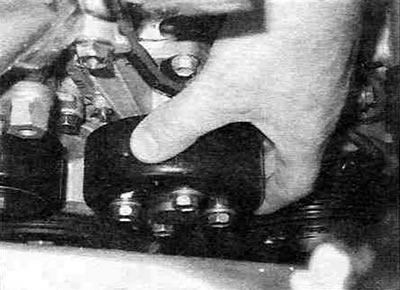
Figure 6.4. Rock the water pump pulley back and forth - the presence of noticeable play indicates the need to replace it.
The whistling sound of a loose drive belt is often mistaken for the sound of worn pump bearings. Spray all drive belts with a special belt tensioner spray (belt dressing), to eliminate the drive belt from the list of possible causes of water pump failures (only for models produced since 2001, since the water pumps on models produced before 2000 and models with diesel engines are driven by the timing belt).
Replacement
5. Disconnect the ground wire from the negative battery terminal and drain the coolant from the cooling system.
Models with gasoline engines before 2000
6. Remove the timing belt and tension rollers No. 1 and 2 (see Chapter 2A).
7. Remove the generator adjusting bar (see Figure 6.7).
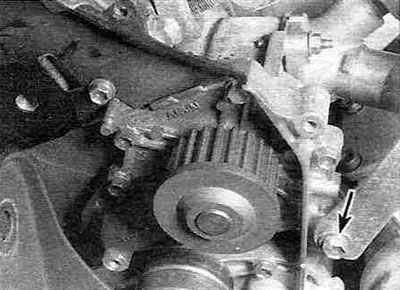
Figure 6.7. Remove the generator adjusting bar (shown by the arrow).
On models with an oil cooler, remove the A/C compressor and move it aside without disconnecting the lines (see paragraph 13). Disconnect the lower radiator hose.
8. Remove the water pump mounting bolts, noting the location of the bolts of different lengths and the sequence of removal. Remove the water pump and its gasket. If necessary, tap the pump lightly with a soft-faced hammer to loosen it.
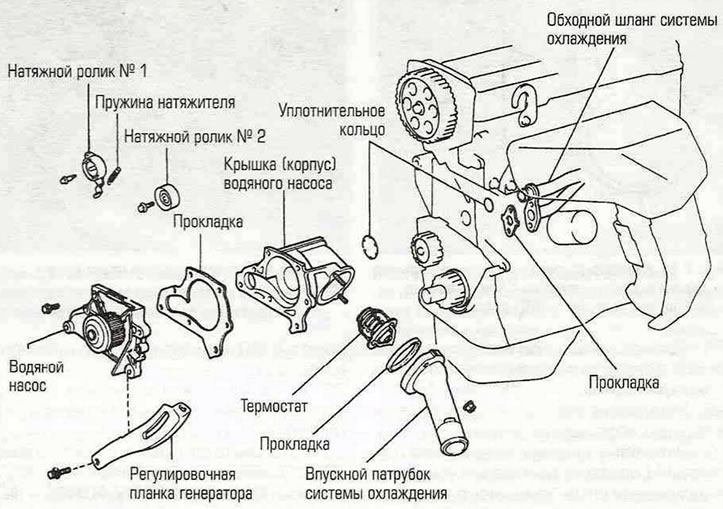
Figure 6.8. Water pump components - gasoline engine models produced before 2000.
9. It is not necessary to remove the cover (housing) of the water pump, however, if you want to perform the entire procedure, this must be done to replace the gaskets and O-rings.
10. Remove the bypass hose of the cooling system from the fitting, then, having unscrewed the two fastening nuts, disconnect the heater line (see Figure 6.10) and remove the water pump housing.
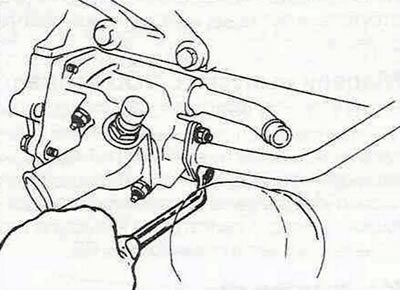
Figure 6.10. Disconnect the cooling system bypass hose - the heater line is secured with two nuts.
11. Carefully remove any remaining gaskets, O-rings and sealant from the sealing surfaces.
12. Be sure to replace the sealing ring between the water pump cover (housing) and the cylinder block, as well as the gasket between the heater line flanges and the water pump housing.
13. Place a new gasket and install the water pump. Install the mounting bolts and tighten them to the torque specified in the Specifications (see figure 6.13,a,b).
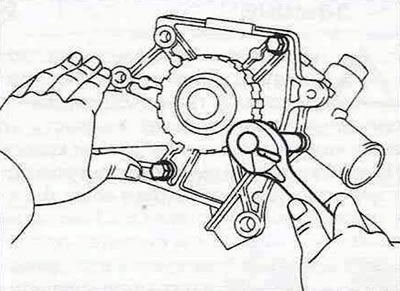
Figure 6.13,a. Install these bolts first...
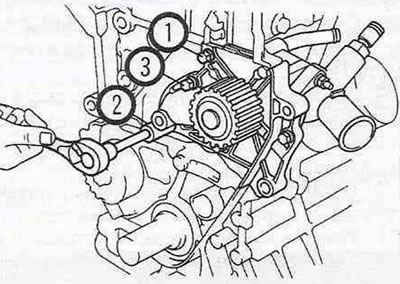
Figure 6.13,b....then tighten them in the order shown.
14. Install the remaining components in the reverse order of removal.
15. Fill the cooling system (see Chapter 1A), start the engine and make sure it is working properly and there are no leaks.
Models with gasoline engines produced since 2001
16. Loosen the water pump pulley mounting bolts (see Figure 6.16) and remove the drive belt (see chapter 1A or 1B).
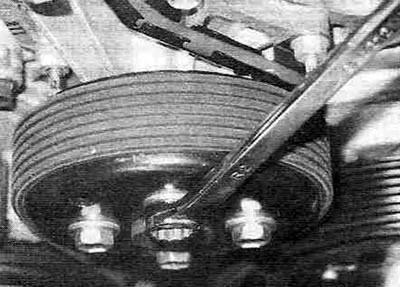
Figure 6.16. Loosen the water pump pulley mounting bolts, holding it from turning using the drive belt tensioner.
17. Release the wiring harness from the holder on the water pump housing.
18. Loosen the water pump mounting bolts and carefully push it out of the housing on the cylinder block (see figure 6.18,a,b).
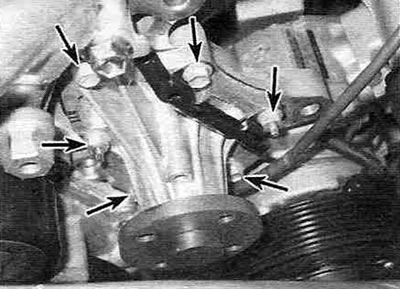
Figure 6.18,a. Water pump mounting bolts - shown is a model with a gasoline engine produced since 2001.
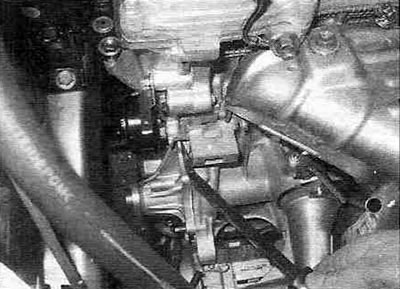
Figure 6.18, b. Carefully press the water pump out of the housing on the cylinder block, resting it against the protrusion on the top of the block.
19. Carefully remove all traces of old sealant from the sealing surfaces.
20. Apply a 2.5-3.0 mm wide bead of RTV sealant to the outside of the water pump mating flange groove (see Figure 6.20).
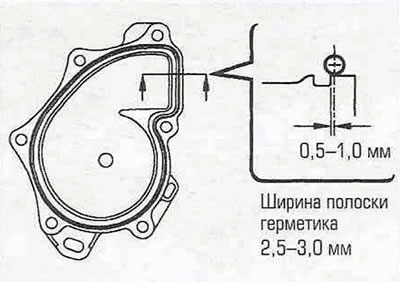
Figure 6.20. Water pump cover sealant application diagram - models with gasoline engines produced since 2001.
21. Install the water pump and tighten the bolts and nuts to the torque specified in the Specifications.
22. Install the remaining components in the reverse order of removal.
23. Fill the cooling system (see Chapter 1A), start the engine and make sure it is working properly and there are no leaks.
Models with diesel engines
Note: Toyota recommends replacing the fuel inlet line when replacing the water pump.
24. Remove the timing belt, crankshaft sprocket, tension roller No. 1 and fuel injection pump pulley (see chapter 2B).
25. Loosen the mounting bolts and remove the fuel injection pump casing, and also remove the insulation.
26. Disconnect the fuel inlet line and the fuel lines of the injectors (see chapter 4B).
27. Remove the intake manifold (see chapter 2B).
28. Unscrew the fuel injection pump mounting nuts from the studs on the water pump housing and remove the fuel injection pump.
29. Gradually loosen the water pump mounting bolts and then remove the pump from the cylinder block. Remove the gasket and discard it (see figure 6.29,a,b).
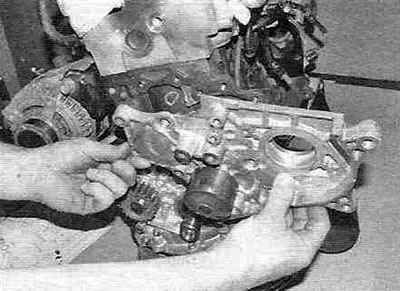
Figure 6.29,a. Remove the water pump and its housing...
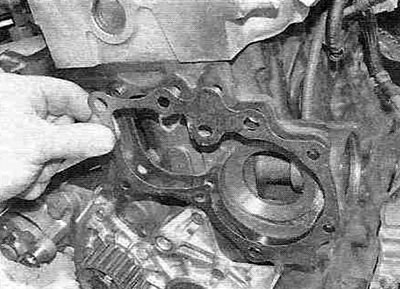
Figure 6.29,b....and remove the gasket.
30. Carefully remove all traces of old gaskets from the sealing surfaces.
31. Install a new gasket, install the water pump, screw in the mounting bolts and tighten them to the torque specified in the Specifications in this chapter. After you have installed the fuel pump, install the injection pump onto the water pump housing studs.
32. Tighten the fuel injection pump mounting nuts to the specified torque (see chapter 4B).
33. Install the intake manifold (chapter 2B) and fuel lines (chapter 4B), then install the insulation and the fuel injection pump casing and tighten the mounting bolts.
34. Install the crankshaft sprocket, fuel injection pump pulley and timing belt (see chapter 2B).
35. Fill the cooling system (see Chapter 1B), start the engine and make sure it is working properly and there are no leaks.