



Caution! The air conditioner refrigerant circuit is under high pressure. If there is a need to open the system (disconnecting any fittings or tubes), contact a specialized workshop or dealership service center: the refrigerant removal from the system must be performed by a specialist. Always wear safety glasses when disconnecting refrigerant pipes.
1. Remove the refrigerant from the system in a specialized workshop.
2. Disconnect the negative battery ground cable. Raise the front of the vehicle and place safety stands, then work underneath the vehicle to remove the lower skid plate on the right side of the vehicle.
3. Remove the air conditioning compressor drive belt (see chapter 1A or 1B).
4. Disconnect the wiring connector and refrigerant lines (see figure 13.4, a, b).
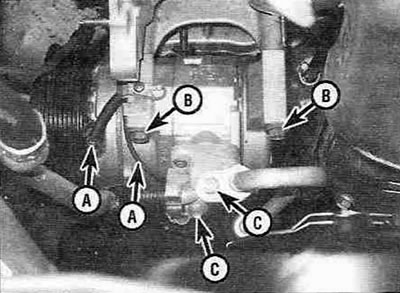
Figure 13.4,a. Compressor mounting parts (for clarity, the generator and thermostat housing have been removed):
A - Electrical connector;
B - Upper mounting bolts;
C - Refrigerant pipelines.
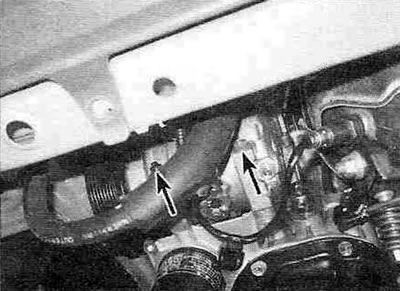
Figure 13.4.6. Lower air conditioning compressor mounting bolts (shown by arrows).
The original can be read on the website (www.ToyotaMAN.ru)
5. Loosen the mounting bolts and, lowering them down, remove the compressor from the vehicle.
Note: On diesel engine models, the compressor is secured with two bolts and a stud.
6. Before installing a new or repaired compressor, pour the preservative oil from it into a measuring cup and add the same amount of refrigerant lubricant to the compressor. Follow the instructions included with your new compressor.
7. The compressor is installed in the reverse order of its removal. Replace all seals with new ones (using only those specifically designed for air conditioning systems) and lubricate them with refrigerant grease.
Note: On diesel engine models, the mounting brackets must be installed with the oil seals facing the cylinder block.
8. Take the vehicle to the specialized workshop where the air conditioning system was discharged to have it recharged and checked for leaks.