



Air conditioning system
Caution! The air conditioner refrigerant circuit is under high pressure. If there is a need to open the system (disconnecting any fittings or tubes), contact a specialized workshop or dealership service center: the refrigerant removal from the system must be performed by a specialist. Always wear safety glasses when disconnecting refrigerant pipes.
Warning. All models discussed in this manual use the modern, environmentally friendly refrigerant R-134a. This refrigerant (and corresponding refrigerant lubricants) is incompatible with R-12 refrigerant, so they cannot be mixed, otherwise failure of air conditioning system components is inevitable.
1. The following checks should be performed regularly to ensure that the air conditioner operates reliably and properly.
- a) Check the condition of the air conditioning compressor drive belt. A worn belt must be replaced (see chapter 1A or 1B).
- b) Monitor the tension of the drive belt (see chapter 1A or 1B).
- c) Check the condition of the system hoses. Swollen, frayed or cracked hoses should be replaced.
- d) Clean the condenser honeycombs with a soft brush and compressed air to remove stuck insects, leaves and dirt.
- d) Have your air conditioner charged regularly at a specialist workshop.
- e) Clean the drain tube in the evaporator body regularly (see Figure 11.1).
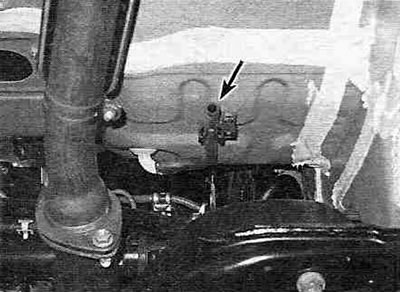
Figure 11.1. Check (and clean it) drainage tube (shown by the arrow) evaporator on the engine shield - view from below the engine.
2. It is good practice to run the system for about ten minutes once a month, including in winter. Long periods of inactivity will cause the seals to harden, which will eventually lead to the failure of the air conditioner. Please note that the Defrost function activates the compressor.
3. If the compressor does not operate normally, perform step (e) in paragraph 1.
4. Due to the complexity of the system and the need for specialized equipment to service the air conditioner, this manual does not cover in-depth troubleshooting and repair procedures. However, basic checks and procedures for replacing components are provided.
5. The most common reason for poor air conditioning performance is a lack of refrigerant in the system. If you notice a noticeable drop in air conditioner performance, the following tests will help determine the amount of refrigerant charge in the system.
Caution! The recharging procedure must be performed in accordance with the manufacturer's instructions and should not replace regular air conditioner maintenance procedures.
Examination
6. Warm up the engine to normal operating temperature.
7. Set the control panel knob to the maximum cold position, turning on the maximum fan speed. Open the car doors to prevent the system from turning off after the interior has cooled down.
8. After the system has reached operating temperature, feel the two lines running from the evaporator through the firewall.
9. Pipeline (smaller diameter), going from the condenser outlet to the evaporator inlet must be cold, and the pipeline (larger diameter), coming from the evaporator outlet to the compressor should be slightly colder. If the evaporator outlet hose is significantly warmer than the inlet hose, the system needs charging.
Place the thermometer on the center of the front panel deflector (see Figure 11.9) and move the regulators to the maximum position - the temperature of the outgoing air should be significantly lower than the ambient air temperature.
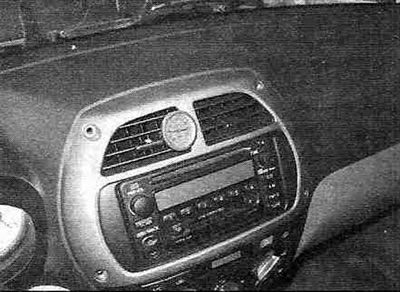
Figure 11.9. Place the thermometer on the central part of the front panel deflector while the air conditioner is running.
10. If the air is not cooling as much as before, the system may need charging.
11. If the air conditioner is on and warm air is coming out of the deflector, check the compressor clutch.
12. Have an assistant turn on the air conditioner while you watch the front of the compressor: when the compressor turns on, the clutch should make an audible click and its center should rotate.
13. If the clutch does not engage, check the corresponding fuses in the interior fuse panel.
14. If the fuses are OK, refer to the electrical connection diagrams at the end chapter 12 and check the clutch circuit and the pressure sensor circuit (pressure transducer) compressor.
15. If no break is found in the clutch and pressure sensor circuits, the compressor clutch may be faulty.
16. If you have verified that the compressor clutch is working properly and the electrical circuits are intact, and the system is fully charged with refrigerant, but the air conditioner is not working efficiently, you should contact a dealership or a specialized workshop to check the engine control module (ECM) and related electrical circuits.
17. Further checking and testing of the air conditioning system is beyond the capabilities of the car enthusiast and should be entrusted to a specialist.
Heaters
18. Wet carpeting, steam or the smell of antifreeze coming out of the vents when the heater is running indicate a leaky heater core. Take it off (see paragraph 10) and install a new one (most specialized workshops do not repair heating radiators).
19. If, when the heater is running at full blast, slightly warm air comes out of the deflectors, the following may be the reasons:
- The thermostat is stuck open, the engine is unable to warm up properly, and barely warm liquid enters the heater radiator. Replace the thermostat (see paragraph 3).
- The system is clogged, which prevents the normal flow of fluid through the radiator. Feel the hoses on the engine shield: both should be hot. If one hose is noticeably colder than the other, something is blocking the flow of coolant through the radiator. Disconnect the hoses from the fittings and flush the radiator with a garden hose. If the radiator is clean and there is still no circulation, disconnect both hoses and flush them out with a garden hose.
- If the radiator is so clogged that it cannot be flushed, replacing the radiator will solve the problem (see paragraph 10).
Eliminating bad odors from your air conditioner
20. A bad smell when the air conditioner is running may be caused by fungus that has settled on the evaporator radiator. Warmth and humidity are an ideal environment for the development of microorganisms.
21. On most cars, the evaporator is not easy to reach; a dealership auto repair shop will not solve this problem quickly and cheaply: you need to open the evaporator housing and disinfect it with an expensive (modern and efficient) preparation and flush the radiator to get rid of the fungus. You could do this at home, but household disinfectants won't be able to combat the fungus.
22. Auto parts stores sell a variety of disinfectant liquids in aerosol containers, but don't buy the cheap ones: their effectiveness is likely to match the price. The procedure begins by starting the system in recirculation mode (RECIRC) for ten minutes, with the fan running at maximum speed. Turn on the maximum heat setting to dry out the system; disconnect the compressor by disconnecting the wiring connector from it.
23. When purchasing disinfectant liquid, make sure that it comes with a hose of sufficient length. Remove the cabin ventilation filter (see chapter 1A or 1B). Direct the hose into the air intake housing to the left, directly under the recirculation flap (see Figure 11.23).
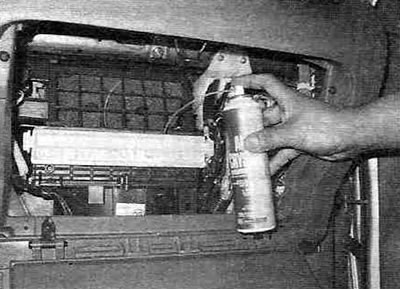
Figure 11.23. After removing the glove compartment door and the cabin ventilation filter, spray the disinfectant liquid deep into the filter opening.
Turn on the air conditioner, set the fan speed to maximum and spray the product according to the manufacturer's instructions. Try to cover the entire surface of the evaporator by directing the hose up, down and to the sides. Follow the instructions regarding the duration of sprays and pauses between them.
24. After cleaning the evaporator, the best way to prevent further fungal attacks is to clean the air conditioner drain pipe (see Figure 11.1).