
Company Honda Company Ford Company Skoda Company Kia Company Mazda Company Mercedes Company Renault
English Русский
Български
Беларускі
Український
Српски
Hrvatski
Română
Polski
Slovenský
Magyar
Bookmark Articles Sitemap Contacts
ToyotaMan.ru


Camry Corolla Corona Carina Land Cruiser Highlander 4Runner RAV4 Others
4Runner N120 (1989-1995)

Cleaning and checking the cylinder head [Toyota 4Runner N120]

  • Main
  • 4Runner
  • N120 (1989-1995)
  • Power unit
  • Engine overhaul
  • Cleaning and checking the cylinder head
0
Contents: Cleaning ↓ Examination ↓

Valve wear check locations
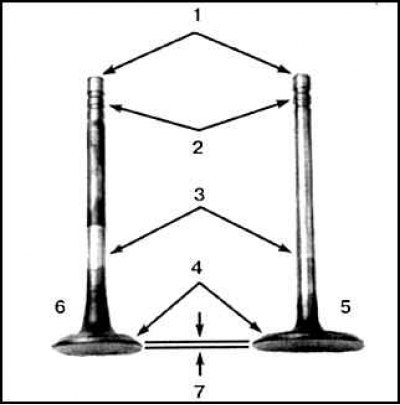


1. End face; 2. Grooves for crackers; 3. Rod; 4. Chamfer; 5. Inlet valve; 6. Belt; 7. Exhaust valve


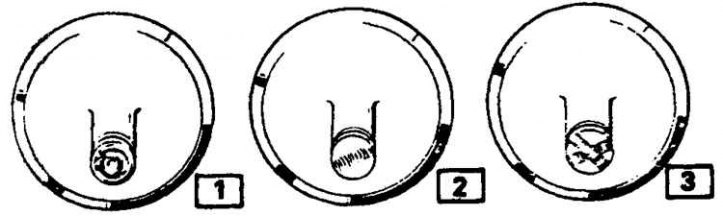
Typical wear of the valve end


Cleaning


1. Remove all gasket residue from the head split surfaces, being careful not to damage the surfaces. Remove carbon deposits from combustion chambers, valve heads and scale from cooling passages. Clean and flush all threaded holes.

2. Wash all valve train parts with solvent, being careful not to damage them.

Examination


Head


1. Carefully inspect the head for cracks and signs of coolant penetration. If cracks are found, replace the head.
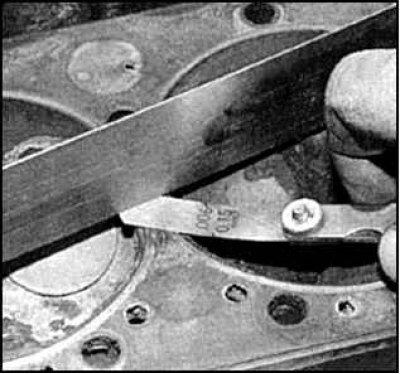


2. Check the deformation of the split surface of the head. If the deviation from the plane exceeds the norm, the head should be re-ground.


3. Check the condition of the valve seats. In the presence of pitting (pits), cracks, traces of burnout, you will need to repair the head in a car service station.
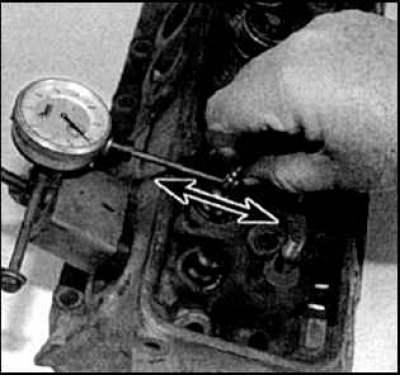


4. Check the valve play in the transverse direction (arrow). If half of the total play on the indicator exceeds the norm, then the bushing should be replaced (performed in a car service).

Valves


5. Inspect the valves carefully (cm. rice. Valve wear check points), check the valve faces for cracks, traces of uneven wear, metal loss and burnout. Check the necks and rods for cracks, as well as rod bending by turning the valve in the guide bushing.

6. Check the wear on the ends of the rods (see fig. Characteristic wear of the valve end). The presence of any of the above defects indicates the need for valve repair.
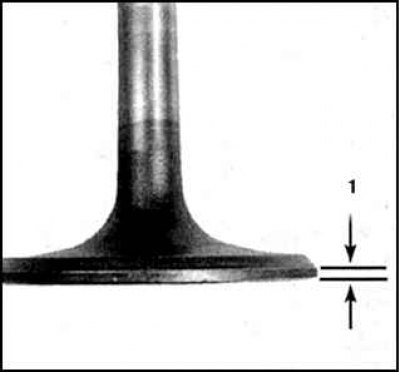


7. Measure the width of the edge band (1) of each valve and compare it with the standard value. If this distance is less than the standard, replace the valve.


Valve Mechanism Parts
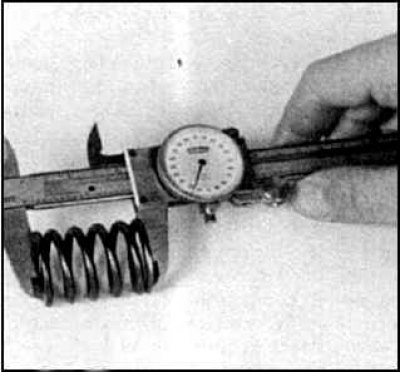


8. Measure the length of the spring in a free state. Replace springs with shrinkage. Before installing springs on a repaired engine, they must be tested under load on a special stand in a car service center.
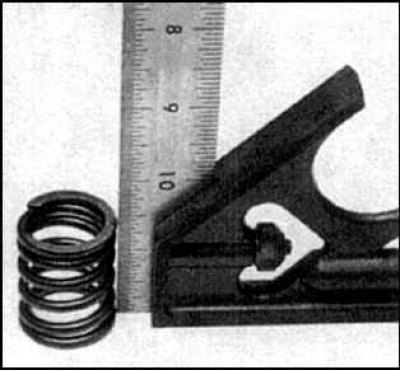


9. Check the verticality of the springs. If a spring deviation from the vertical is detected, the spring should be replaced.

10. Check for visible signs of wear and cracks on the spring plates and crackers. Replace parts with any defects.

11. If the inspection reveals that the wear of the parts does not exceed the norm, then assemble the cylinder head, installing the parts in their original places. Cylinder head repairs of any complexity should be performed at a car service center.
This article is available at: russian, bulgarian, belarusian, ukrainian, serbian, croatian, romanian, polish, slovak, hungarian
The article material has been checked: Gribkov Vladimir
Share information:
◀ Previous
4Runner N120: Engine overhaul
Next ▶

Disassembling the cylinder head
Dismantling and installing the engine
Methods and safety precautions for engine dismantling
Dismantling the power unit — preparatory activities
Checking the compression in the engine cylinders
Cylinder head assembly
Valves — Checking and Repairing
Connecting rod and piston group — dismantling
Removal the crankshaft
Checking the condition of the crankshaft
Similar articles on other Toyota models

➥ Checking, cleaning and repairing cylinder head parts Toyota Camry Vista V40 (1994-1998)
➥ Checking, cleaning and repairing cylinder head parts Toyota Corona T190 (1992-1997)
➥ Checking, cleaning and repairing cylinder head parts Toyota Carina T190 (1992-1996)
➥ Checking, cleaning and repairing cylinder head parts Toyota Duet (1998-2004)
➥ Cleaning and checking the cylinder block Toyota Cruiser 60/80 (1980-1997, petrol)
➥ Cylinder head — cleaning and inspection Toyota RAV 4 XA20 (2000-2005)
Link in different formats to this article
Comments and feedback from visitors
No comments yet


Add two numbers 30 + 10


4Runner N120 (1989-1995) 
  • General information
  • User manual
  • Maintenance
  • Power unit
  • 4-cylinder engines
  • 6-cylinder engines
  • Engine overhaul
  • Cooling and heating
  • Fuel system
  • Transmission
  • Mechanical gearbox
  • Automatic gearbox
  • Transfer case
  • Clutch
  • Transmission line
  • Chassis, running gear
  • Brake system
  • Car suspension
  • Steering
  • Body and interior
  • Exterior (external elements)
  • Interior (internal elements)
  • Doors, locks and windows
  • Electrical equipment
  • Equipment and devices
  • Ignition system
  • Power devices
  • Electrical circuits
ToyotaMan.ru © 2018–2026 • Mobile version • Interesting about Toyota • Administration • Sitemap: EN BG BY UA RS HR RO PL SK HU • Search system • Bookmark
Camry Vista-V40 • Camry XV10 • Camry XV20 • Camry XV30 • Corolla Verso-AR10 • Corolla E80 • Corona T190 • Carina T170 • Carina T190 • Land Cruiser J70 (diesel) • Land Cruiser J60 (petrol) • Land Cruiser J100 • Highlander XU20 (petrol) • 4Runner N120 • RAV4 XA10 • RAV4 XA20 • Duet M100 • Dyna Y50 •
We require cookies to enable some interactive features. Is that ok with you?