



Share information:
Car doors, windows and locks Toyota Corona 9 (T190)
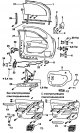
Front doors — design description
Front door (CORONA, CALDINA) Front door (CORONA PREMIO) Front door (CORONA EXIV): 1 - glass seal, 2 - front lower frame of glass guide, 3 - outside mirror, 4 - cover, 5 - door travel limiter, 6 - door hinge, 7 - lock...
Front door (CORONA, CALDINA) Front door (CORONA PREMIO) Front door (CORONA EXIV): 1 - glass seal, 2 - front lower frame of glass guide, 3 - outside mirror, 4 - cover, 5 - door travel limiter, 6 - door hinge, 7 - lock...

Rear doors — design description
Back door (CORONA EXIV) Back door (CORONA PREMIO) Back door (CORONA, CALDINA): 1 - side rear glass (CORONA CORONA PREMIO, CALDINA), 2 - seal (CORONA, CORONA PREMIO, CALDINA), 3 - rear guide, 4, 29 - door glass (CORONA...
Back door (CORONA EXIV) Back door (CORONA PREMIO) Back door (CORONA, CALDINA): 1 - side rear glass (CORONA CORONA PREMIO, CALDINA), 2 - seal (CORONA, CORONA PREMIO, CALDINA), 3 - rear guide, 4, 29 - door glass (CORONA...

Front door adjustment
1. Adjusting the door in longitudinal and vertical directions. Loosen the bolts securing the door hinges to the body, then adjust the door. Tightening torque 27-29 Nm. 2. Adjusting the door in transverse and vertical...
1. Adjusting the door in longitudinal and vertical directions. Loosen the bolts securing the door hinges to the body, then adjust the door. Tightening torque 27-29 Nm. 2. Adjusting the door in transverse and vertical...

Rear door adjustment
1. Adjusting the door in longitudinal and vertical directions. a) Remove the lower trim of the central pillar (if necessary). b) Loosen the bolts securing the door hinges to the body, then adjust the door. c) Install...
1. Adjusting the door in longitudinal and vertical directions. a) Remove the lower trim of the central pillar (if necessary). b) Loosen the bolts securing the door hinges to the body, then adjust the door. c) Install...

Adjustment of glass doors CORONA, CALDINA
Adjust the glass so that distances "A" and "B" are equal. Note: Replace the centering bolt with a standard bolt and washer. Front door Back door
Adjust the glass so that distances "A" and "B" are equal. Note: Replace the centering bolt with a standard bolt and washer. Front door Back door

Disassembly and assembly of side doors
1. (Models without electric windows) Installing the window lift handle. Close the door glass completely, install the washer and window lift handle with the retaining ring as shown in the figure. 2. When removing and...
1. (Models without electric windows) Installing the window lift handle. Close the door glass completely, install the washer and window lift handle with the retaining ring as shown in the figure. 2. When removing and...
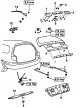
Tailgate adjustment (CALDINA)
Tailgate (CALDINA): 1, 4 - rear combination lamp, 2 - outer trim, 3 - lock cylinder, 5 - outer handle, 6 - lower trim, 7 - shock absorber strut, 8 - tailgate trim, 9 - lock bracket, 10 - rear trim, 11 - lock, 12 -...
Tailgate (CALDINA): 1, 4 - rear combination lamp, 2 - outer trim, 3 - lock cylinder, 5 - outer handle, 6 - lower trim, 7 - shock absorber strut, 8 - tailgate trim, 9 - lock bracket, 10 - rear trim, 11 - lock, 12 -...

Trunk (CORONA, EXIV, PREMIO) — design description
Trunk (CORONA EXIV) Trunk (CORONA PREMIO) Trunk (CORONA): 1 - trunk lid, 2 - rear combination light, 3 - number plate light, 4 - lock cylinder, 5 - lock, 6 - trunk lid trim, 7 - hinge, 8 - left torsion bar, 9 - right...
Trunk (CORONA EXIV) Trunk (CORONA PREMIO) Trunk (CORONA): 1 - trunk lid, 2 - rear combination light, 3 - number plate light, 4 - lock cylinder, 5 - lock, 6 - trunk lid trim, 7 - hinge, 8 - left torsion bar, 9 - right...

Adjusting the trunk lid (CORONA, EXIV, PREMIO)
1. Adjustment of the lid in longitudinal and transverse directions. a) Remove the rear seat cushion. b) Remove the side panels of the rear seat back. c) Remove the rear pillar trim. d) Remove the trim bracket. d) Remove...
1. Adjustment of the lid in longitudinal and transverse directions. a) Remove the rear seat cushion. b) Remove the side panels of the rear seat back. c) Remove the rear pillar trim. d) Remove the trim bracket. d) Remove...

Removal and installation the trunk torsion bar
Removal the torsion bar 1. Remove the following parts: c) Trunk floor mat. b) Rear trunk trim. c) Side trims of the trunk. 2. Remove the torsion bar. a) Remove the torsion bar from the center bracket. b) Install the...
Removal the torsion bar 1. Remove the following parts: c) Trunk floor mat. b) Rear trunk trim. c) Side trims of the trunk. 2. Remove the torsion bar. a) Remove the torsion bar from the center bracket. b) Install the...

Removal the windshield
Windshield: 1 - sun visor, 2 - holders, 3 - interior mirror, 4 - windshield, 5 - seal, 6 - stopper, 7 - upper molding, 8 - upper trim of the front pillar, 9 - wiper arm, 10 - lower molding, 11 - ventilation grille 1....
Windshield: 1 - sun visor, 2 - holders, 3 - interior mirror, 4 - windshield, 5 - seal, 6 - stopper, 7 - upper molding, 8 - upper trim of the front pillar, 9 - wiper arm, 10 - lower molding, 11 - ventilation grille 1....

Windshield installation
1. Align and clean the contact surface of the body a) Use a knife to level the layer of glue remaining on the body, be careful not to damage the paintwork of the body. b) Clean the cut surface with a piece of cloth...
1. Align and clean the contact surface of the body a) Use a knife to level the layer of glue remaining on the body, be careful not to damage the paintwork of the body. b) Clean the cut surface with a piece of cloth...
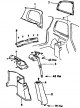
Tailgate glass and rear glass
Side rear window (CALDINA): 1 - side rear window trim, 2 - side rear window, 3 - rear seat belt, 4 - seat belt guide, 5 - rear seat back side panel, 6 - rear pillar trim, 7 - side trim, 8 - rear trim Rear glass and...
Side rear window (CALDINA): 1 - side rear window trim, 2 - side rear window, 3 - rear seat belt, 4 - seat belt guide, 5 - rear seat back side panel, 6 - rear pillar trim, 7 - side trim, 8 - rear trim Rear glass and...
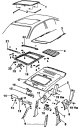
Roof hatch — design description
Luke: 1 - Sunroof, 2 - Side trim, 3 - Control cable, 4 - Trim panel, 5 - Rear seat back side panel, 6 - Pillar trim, 7 - Upper B-pillar trim, 8 - Lower B-pillar trim, 9 - A-pillar trim, 10 - Interior light, 11 - Handle,...
Luke: 1 - Sunroof, 2 - Side trim, 3 - Control cable, 4 - Trim panel, 5 - Rear seat back side panel, 6 - Pillar trim, 7 - Upper B-pillar trim, 8 - Lower B-pillar trim, 9 - A-pillar trim, 10 - Interior light, 11 - Handle,...

Adjusting the hatch
1. Remove the side panels. Note: After adjustment, install the side pads. 2. Adjusting the hatch in the longitudinal and vertical directions. Loosen the mounting bolts and adjust the position of the hatch. 3. Make sure...
1. Remove the side panels. Note: After adjustment, install the side pads. 2. Adjusting the hatch in the longitudinal and vertical directions. Loosen the mounting bolts and adjust the position of the hatch. 3. Make sure...
This section is available on: russian, bulgarian, belarusian, ukrainian, serbian, croatian, romanian, polish, slovak, hungarian
Similar sections for other Toyota models
➥ Doors, locks and windows Toyota RAV 4 XA20 (2000-2005)
➥ Doors, locks and windows Toyota Highlander 1 (2000-2007, petrol)
➥ Doors, locks and windows Toyota Camry XV10 (1991-1996)
➥ Doors, locks and windows Toyota 4Runner N120 (1989-1995)
➥ Doors, locks and windows Toyota Cruiser 60/80 (1980-1997, petrol)
Link in different formats to this article
TEXTHTMLBB Code
- General information
- User manual
- Maintenance
- Power unit
- Engines 3S-FE/GE and 4S-FE
- Engines 4A-FE and 7A-FE
- Engines 5E-FE
- Diesel engines 2C and 2C-T
- Engine overhaul
- Cooling system
- Lubrication system
- Fuel injection (petrol)
- Control system (petrol)
- Fuel system (diesel)
- Turbo diesel
- Ignition system
- Engine electrical equipment
- Transmission
- Clutch
- Mechanical gearbox
- Automatic gearbox
- Drive shafts and cardan
- Chassis, running gear
- Front suspension
- Rear suspension
- Steering
- Brake system
- Body and interior
- Body and interior elements
- Doors, windows and locks
- Heating and air conditioning
- Electrical equipment
- Equipment and devices
- Lighting and signaling
- Electrical circuits