



Share information:
Car fuel injection system Toyota Corona 9 (T190)

Description of the fuel injection system
The fuel injection system consists of three main subsystems: fuel supply, air supply and electronic control. Fuel system Fuel at a constant pressure difference (284 kPa) is supplied by the fuel pump through the filter...
The fuel injection system consists of three main subsystems: fuel supply, air supply and electronic control. Fuel system Fuel at a constant pressure difference (284 kPa) is supplied by the fuel pump through the filter...
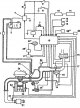
Fuel injection system diagram
Fuel injection system diagram (4A-FE): 1 - fuel filter; 2 - Fuel Tank; 3 - fuel pump; 4 - fuel pump switch relay; 5 - main relay of the fuel injection system; 6 - battery; 7 - "CHECK" control lamp; 8 - diagnostic...
Fuel injection system diagram (4A-FE): 1 - fuel filter; 2 - Fuel Tank; 3 - fuel pump; 4 - fuel pump switch relay; 5 - main relay of the fuel injection system; 6 - battery; 7 - "CHECK" control lamp; 8 - diagnostic...

Location of injection system components on a vehicle
Location of fuses and fuse links on the car (model with 4A-FE engine): 1 - junction block #1 (fuse block "IGN" and "GAUGE"), 2 - junction block #2 (fuse block "AM" and "ALT" and fuse "EFI"), 3 - main fuse link assembly...
Location of fuses and fuse links on the car (model with 4A-FE engine): 1 - junction block #1 (fuse block "IGN" and "GAUGE"), 2 - junction block #2 (fuse block "AM" and "ALT" and fuse "EFI"), 3 - main fuse link assembly...

Precautions when servicing electrical equipment
1. Check that the engine settings are correct (see chapter " Maintenance and general check and adjustment procedures "). 2. Precautions when connecting devices. a) Use the battery as a power source for the stroboscope,...
1. Check that the engine settings are correct (see chapter " Maintenance and general check and adjustment procedures "). 2. Precautions when connecting devices. a) Use the battery as a power source for the stroboscope,...
Precautions when working with the air supply system
1. Removing the dipstick, oil filler cap, hoses, etc. from the engine may cause engine adjustments to be out of adjustment. 2. Disconnection, loosening of fasteners or cracking of air supply system components (between...
1. Removing the dipstick, oil filler cap, hoses, etc. from the engine may cause engine adjustments to be out of adjustment. 2. Disconnection, loosening of fasteners or cracking of air supply system components (between...
Precautions when using mobile radio communication in a vehicle
The electronic unit is designed in such a way as to exclude the influence of external electromagnetic interference. However, if the vehicle is equipped with a CB radio, etc. (even if the output power is only 10 W), then...
The electronic unit is designed in such a way as to exclude the influence of external electromagnetic interference. However, if the vehicle is equipped with a CB radio, etc. (even if the output power is only 10 W), then...

Precautions when working with the electronic control system
1. Before disconnecting the electrical connectors of the electronic control unit, it is necessary to disconnect the electrical power either by using the ignition key or by removing the terminals from the battery. Note:...
1. Before disconnecting the electrical connectors of the electronic control unit, it is necessary to disconnect the electrical power either by using the ignition key or by removing the terminals from the battery. Note:...

Precautions when working with the fuel system
1. When the high-pressure fuel line is disconnected, a large amount of fuel will spill out. Therefore, the following steps must be taken. a) Disconnect the fuel pump connector. b) Start the engine. After the engine...
1. When the high-pressure fuel line is disconnected, a large amount of fuel will spill out. Therefore, the following steps must be taken. a) Disconnect the fuel pump connector. b) Start the engine. After the engine...

Fuel injection diagnostic system
Description The electronic control unit has a built-in self-diagnostic system, which continuously monitors the engine condition using sensor signals. If a malfunction is detected, this system identifies it and informs...
Description The electronic control unit has a built-in self-diagnostic system, which continuously monitors the engine condition using sensor signals. If a malfunction is detected, this system identifies it and informs...

Diagnostic codes for the electronic control unit
Diagnostic codes for the electronic control unit (3S-FE, 3S-GE, 4A-FE, 4S-FE, 5E-FE and 7A-FE) Notes: (1) The "ON" (ON) symbol in the diagnostic mode column indicates that the "CHECK" warning light illuminates when a...
Diagnostic codes for the electronic control unit (3S-FE, 3S-GE, 4A-FE, 4S-FE, 5E-FE and 7A-FE) Notes: (1) The "ON" (ON) symbol in the diagnostic mode column indicates that the "CHECK" warning light illuminates when a...

Diagnosing faults using a road test
The use of the road test has the following objectives: a) Play (imitate) driving modes in which this diagnostic code is detected. b) Ensure that the repair work has been completed to the fullest extent, making sure that...
The use of the road test has the following objectives: a) Play (imitate) driving modes in which this diagnostic code is detected. b) Ensure that the repair work has been completed to the fullest extent, making sure that...

Electronic Fuel Injection Control Test Procedure
Prerequisites: a) Disconnect the connectors from the electronic control unit. b) Remove the clips as shown in the figure, which will allow easy connection of the tester probes. Note: Be careful with elements "A" and "B"...
Prerequisites: a) Disconnect the connectors from the electronic control unit. b) Remove the clips as shown in the figure, which will allow easy connection of the tester probes. Note: Be careful with elements "A" and "B"...
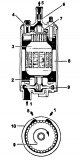
Fuel pump — check
Fuel pump (parts and units): 1 - input, 2 and 7 - bearings, 3 - electric motor anchor, 4 - pressure reducing valve, 5 - output, 6 - check valve, 8 - magnet, 9 - rotor (impeller), 10 - pump body Checking on the engine 1....
Fuel pump (parts and units): 1 - input, 2 and 7 - bearings, 3 - electric motor anchor, 4 - pressure reducing valve, 5 - output, 6 - check valve, 8 - magnet, 9 - rotor (impeller), 10 - pump body Checking on the engine 1....

Removal the fuel pump
Parts to be removed when dismantling the pump: 1 - pump bracket assembly, 2 - pump service hatch cover, 3 - rear seat cushion, 4 - pump and fuel level indicator sensor connector, 5 - fuel drain pipe (tightening torque...
Parts to be removed when dismantling the pump: 1 - pump bracket assembly, 2 - pump service hatch cover, 3 - rear seat cushion, 4 - pump and fuel level indicator sensor connector, 5 - fuel drain pipe (tightening torque...

Disassembly and assembly of the fuel pump
Parts for disassembling and assembling the fuel pump: 1 - connector mount, 2 - connector, 3 - gasket, 4 - wiring, 5 - fuel level sensor, 6 - fuel pump mount bracket, 7 - fuel hose, 8 - fuel pump, 9 - fuel pump filter,...
Parts for disassembling and assembling the fuel pump: 1 - connector mount, 2 - connector, 3 - gasket, 4 - wiring, 5 - fuel level sensor, 6 - fuel pump mount bracket, 7 - fuel hose, 8 - fuel pump, 9 - fuel pump filter,...

Installing a fuel pump
1. Install the fuel pump and fuel level sensor assembly. a) Install a new gasket on the fuel pump bracket. b) Install the fuel pump and fuel level sensor assembly and tighten the eight bolts. c) Connect the following...
1. Install the fuel pump and fuel level sensor assembly. a) Install a new gasket on the fuel pump bracket. b) Install the fuel pump and fuel level sensor assembly and tighten the eight bolts. c) Connect the following...

Fuel pressure regulator
Placement of the regulator on the engine and regulator connection elements (4A-FE, 5E-FE, 7A-FE): 1 - fuel pressure regulator, 2 - fuel return hose, 3 - regulator mounting bolt (M3 = 9.3 Nm), 4 - vacuum hose, 5 - O-ring...
Placement of the regulator on the engine and regulator connection elements (4A-FE, 5E-FE, 7A-FE): 1 - fuel pressure regulator, 2 - fuel return hose, 3 - regulator mounting bolt (M3 = 9.3 Nm), 4 - vacuum hose, 5 - O-ring...

Checking fuel injectors on the engine
1. Check the functionality of the injectors by ear. a) With the engine running or when turning it over with the starter, use a phonendoscope to check by ear (by the sound of injected fuel) in the performance of the...
1. Check the functionality of the injectors by ear. a) With the engine running or when turning it over with the starter, use a phonendoscope to check by ear (by the sound of injected fuel) in the performance of the...

Removal fuel injectors
Removal injectors (4A-FE, 7A-FE) 1. Disconnect the (-) cable from the negative battery terminal. Note: For removal and installation details, see above in the section " Petrol engines 4A-FE, 7A-FE ". 2. Drain the...
Removal injectors (4A-FE, 7A-FE) 1. Disconnect the (-) cable from the negative battery terminal. Note: For removal and installation details, see above in the section " Petrol engines 4A-FE, 7A-FE ". 2. Drain the...

Checking fuel injectors
1 Inspect the injectors, use a match to check if there is dirt on the inlet mesh, if there is, blow it out with air. 2. Check the quality of fuel injection by the injectors Note: Avoid sparking during testing. Keep a...
1 Inspect the injectors, use a match to check if there is dirt on the inlet mesh, if there is, blow it out with air. 2. Check the quality of fuel injection by the injectors Note: Avoid sparking during testing. Keep a...

Installing fuel injectors
1. Install the injectors and fuel manifold. a) Install a new sealing sleeve on the injector (if you filmed). b) Apply a thin layer of fuel (lithol) to the new O-ring and install it on the injector. c) Rotate the...
1. Install the injectors and fuel manifold. a) Install a new sealing sleeve on the injector (if you filmed). b) Apply a thin layer of fuel (lithol) to the new O-ring and install it on the injector. c) Rotate the...

Cold start injector thermal time relay (3S-GE)
Wiring diagram for the cold start injector time relay: 1 - cold start injector, 2 - to ignition switch (terminal "ST1"), 3 - to fuel pump switch relay (terminal "STA"), 4 - cold start injector thermal time relay, 5 - to...
Wiring diagram for the cold start injector time relay: 1 - cold start injector, 2 - to ignition switch (terminal "ST1"), 3 - to fuel pump switch relay (terminal "STA"), 4 - cold start injector thermal time relay, 5 - to...

Checking the throttle body on a car
1. Check the throttle body. a) Check the smooth operation of the damper drive. 3S-FE, 3S-GE, 4S-FE 4A-FE, 7A-FE 5E-FE 6) Check for vacuum in the channels with the engine running by placing your finger on them while the...
1. Check the throttle body. a) Check the smooth operation of the damper drive. 3S-FE, 3S-GE, 4S-FE 4A-FE, 7A-FE 5E-FE 6) Check for vacuum in the channels with the engine running by placing your finger on them while the...

Removal the throttle body
Parts for removal and installation: 1 - Throttle actuator cable, 2 - Vacuum hose, 3 - Automatic transmission control cable, 4 - Gasket, 5 - Throttle position sensor connector, 6 - Idle speed control valve connector, 7 -...
Parts for removal and installation: 1 - Throttle actuator cable, 2 - Vacuum hose, 3 - Automatic transmission control cable, 4 - Gasket, 5 - Throttle position sensor connector, 6 - Idle speed control valve connector, 7 -...

Checking the removed throttle body
1. Clean dirty throttle body parts using a soft brush and carburetor cleaner. Use compressed air to blow out all passages and holes. Note: Do not clean the throttle position sensor to avoid damaging it. 2. Check the...
1. Clean dirty throttle body parts using a soft brush and carburetor cleaner. Use compressed air to blow out all passages and holes. Note: Do not clean the throttle position sensor to avoid damaging it. 2. Check the...

Installing the throttle body
1. Install the throttle body. a) (3S-FE, 4S-FE, 5E-FE) Connect the following hoses (see above): Coolant Bypass Hoses (1); Air hose (2); (5E-FE) Air hose from air supply control valve (3). b) Install the new gasket on...
1. Install the throttle body. a) (3S-FE, 4S-FE, 5E-FE) Connect the following hoses (see above): Coolant Bypass Hoses (1); Air hose (2); (5E-FE) Air hose from air supply control valve (3). b) Install the new gasket on...

Valve of the idle speed control system
Note: On 5E-FE engines, the function of the idle speed control valve is performed by the auxiliary air supply valve. Placement on engine: 1 - throttle body, 2 - idle speed control valve Checking on the engine 1. Check...
Note: On 5E-FE engines, the function of the idle speed control valve is performed by the auxiliary air supply valve. Placement on engine: 1 - throttle body, 2 - idle speed control valve Checking on the engine 1. Check...

Additional air supply valve
Removal and installation the valve Checking on the engine 1. Disconnect the air cleaner hose from the throttle body. 2. Check the operation of the valve by measuring the rotation speed when the valve inlet to the...
Removal and installation the valve Checking on the engine 1. Disconnect the air cleaner hose from the throttle body. 2. Check the operation of the valve by measuring the rotation speed when the valve inlet to the...
This section is available on: russian, bulgarian, belarusian, ukrainian, serbian, croatian, romanian, polish, slovak, hungarian
Similar sections for other Toyota models
➥ Fuel injection system Toyota Duet (1998-2004)
➥ Fuel system (injector) Toyota Carina T170 (1988-1992)
➥ Fuel system (injector) Toyota Cruiser 60/80 (1980-1997, petrol)
➥ Fuel injection (petrol) Toyota Camry Vista V40 (1994-1998)
➥ Fuel supply (injector) Toyota Corolla E80 (1983-1990)
Link in different formats to this article
TEXTHTMLBB Code
- General information
- User manual
- Maintenance
- Power unit
- Engines 3S-FE/GE and 4S-FE
- Engines 4A-FE and 7A-FE
- Engines 5E-FE
- Diesel engines 2C and 2C-T
- Engine overhaul
- Cooling system
- Lubrication system
- Fuel injection (petrol)
- Control system (petrol)
- Fuel system (diesel)
- Turbo diesel
- Ignition system
- Engine electrical equipment
- Transmission
- Clutch
- Mechanical gearbox
- Automatic gearbox
- Drive shafts and cardan
- Chassis, running gear
- Front suspension
- Rear suspension
- Steering
- Brake system
- Body and interior
- Body and interior elements
- Doors, windows and locks
- Heating and air conditioning
- Electrical equipment
- Equipment and devices
- Lighting and signaling
- Electrical circuits