



Share information:
Drive shafts and cardan car Toyota Corona 9 (T190)

Removal the propeller shaft
Cardan shaft: 1 - boot, 2 - front propeller shaft, 3 - plate washer, 4 - plate washer, 5 - central support bearing, 6 - rear flange of propeller shaft, 7 - washer, 8 - rear propeller shaft Caution: When installing the...
Cardan shaft: 1 - boot, 2 - front propeller shaft, 3 - plate washer, 4 - plate washer, 5 - central support bearing, 6 - rear flange of propeller shaft, 7 - washer, 8 - rear propeller shaft Caution: When installing the...

Checking the cardan shaft
1. Check the runout of the cardan shaft. If the runout is greater than the maximum, replace the cardan shaft. The maximum runout is 0.8 mm. 2. Check the front propeller shaft runout. a) Check the runout of the rear...
1. Check the runout of the cardan shaft. If the runout is greater than the maximum, replace the cardan shaft. The maximum runout is 0.8 mm. 2. Check the front propeller shaft runout. a) Check the runout of the rear...

Disassembling the cardan shaft
1. Remove the center support bearing from the front propeller shaft. a) Using a hammer and chisel, loosen the locked portion of the nut. b) Clamp the front flange of the shaft in a vice, unscrew the nut and remove the...
1. Remove the center support bearing from the front propeller shaft. a) Using a hammer and chisel, loosen the locked portion of the nut. b) Clamp the front flange of the shaft in a vice, unscrew the nut and remove the...

Assembly of the cardan shaft
1. Install the center support bearing. a) Install the center support bearing on the front propeller shaft as shown in the figure. b) Install the plate washer onto the front propeller shaft. c) Align the timing marks on...
1. Install the center support bearing. a) Install the center support bearing on the front propeller shaft as shown in the figure. b) Install the plate washer onto the front propeller shaft. c) Align the timing marks on...

Installing the cardan shaft
1. Install the front propeller shaft. a) Remove the plug from the gearbox b) Connect the front flange of the propeller shaft to the gearbox. 2. Install the center support bearing and temporarily tighten the mounting...
1. Install the front propeller shaft. a) Remove the plug from the gearbox b) Connect the front flange of the propeller shaft to the gearbox. 2. Install the center support bearing and temporarily tighten the mounting...
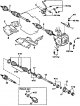
Front Drive Shaft — Design Description
Front drive shaft (for models with 3S-FE and 4S-FE engines): I - lower engine protection (left side), 2 - lower engine protection (right side), 3 - drive shaft (right), 4 - central bearing bracket, 5 - drive shaft...
Front drive shaft (for models with 3S-FE and 4S-FE engines): I - lower engine protection (left side), 2 - lower engine protection (right side), 3 - drive shaft (right), 4 - central bearing bracket, 5 - drive shaft...

Removal the drive shaft
Caution: The hub bearing may be damaged if the weight of the vehicle acts on it, such as when moving the vehicle with the drive shaft removed. Therefore, if it is necessary to move the vehicle with the drive shaft...
Caution: The hub bearing may be damaged if the weight of the vehicle acts on it, such as when moving the vehicle with the drive shaft removed. Therefore, if it is necessary to move the vehicle with the drive shaft...

Disassembling the drive shaft
1. Check the drive shaft. a) Check that there is no play in the outer joint. b) Check that the inner joint slides smoothly in the direction of axial pressure. c) Check for any noticeable radial clearance in the inner...
1. Check the drive shaft. a) Check that there is no play in the outer joint. b) Check that the inner joint slides smoothly in the direction of axial pressure. c) Check for any noticeable radial clearance in the inner...

Front Drive Shaft Assembly
1. (3S-GE, 3S-FE and 4S-FE) (For right drive shaft) Assemble the center drive shaft. a) Install the pin into the bearing holder. b) Using the special tool and a press, install the new bearing into the bearing holder. c)...
1. (3S-GE, 3S-FE and 4S-FE) (For right drive shaft) Assemble the center drive shaft. a) Install the pin into the bearing holder. b) Using the special tool and a press, install the new bearing into the bearing holder. c)...

Installing the front drive shaft
1. Install the left drive shaft. a) Using the special tool, install a new snap ring. b) Apply transmission oil to the splines of the inner joint. c) Using a brass rod and hammer, install the drive shaft until it is...
1. Install the left drive shaft. a) Using the special tool, install a new snap ring. b) Apply transmission oil to the splines of the inner joint. c) Using a brass rod and hammer, install the drive shaft until it is...

Removal the rear drive shaft
Installation is carried out in the reverse order of removal. Attention: The hub bearing can be damaged if the weight of the vehicle acts on it, such as when moving the vehicle with the drive shaft removed. Therefore, if...
Installation is carried out in the reverse order of removal. Attention: The hub bearing can be damaged if the weight of the vehicle acts on it, such as when moving the vehicle with the drive shaft removed. Therefore, if...

Replacing the front rear drive shaft seal
Replacing the oil seal: 1, 4 - oil deflector, 2 - connecting flange, 3 - oil seal, 5 - filler plug, 6, 7 - gasket, 8 - drain plug, 9 - bearing spacer sleeve, 10 - front bearing. 1. Drain the oil from the differential...
Replacing the oil seal: 1, 4 - oil deflector, 2 - connecting flange, 3 - oil seal, 5 - filler plug, 6, 7 - gasket, 8 - drain plug, 9 - bearing spacer sleeve, 10 - front bearing. 1. Drain the oil from the differential...

Removal the rear differential
Removal and installation the differential: 1, 8 - rear drive shaft, 2, 5 - gasket, 3 - differential, 4 - drain plug, 6 - filler plug, 7 - propeller shaft Differential: 1, 5 - washer, 2, 6 - output shaft side bearing, 3...
Removal and installation the differential: 1, 8 - rear drive shaft, 2, 5 - gasket, 3 - differential, 4 - drain plug, 6 - filler plug, 7 - propeller shaft Differential: 1, 5 - washer, 2, 6 - output shaft side bearing, 3...
This section is available on: russian, bulgarian, belarusian, ukrainian, serbian, croatian, romanian, polish, slovak, hungarian
Similar sections for other Toyota models
➥ Drive shafts and cardan Toyota Duet (1998-2004)
➥ Drive shafts and axles Toyota Cruiser 60/80 (1980-1997, petrol)
➥ Drive shafts Toyota Carina T170 (1988-1992)
➥ Drive shafts and cardan Toyota Highlander 1 (2000-2007, petrol)
Link in different formats to this article
TEXTHTMLBB Code
- General information
- User manual
- Maintenance
- Power unit
- Engines 3S-FE/GE and 4S-FE
- Engines 4A-FE and 7A-FE
- Engines 5E-FE
- Diesel engines 2C and 2C-T
- Engine overhaul
- Cooling system
- Lubrication system
- Fuel injection (petrol)
- Control system (petrol)
- Fuel system (diesel)
- Turbo diesel
- Ignition system
- Engine electrical equipment
- Transmission
- Clutch
- Mechanical gearbox
- Automatic gearbox
- Drive shafts and cardan
- Chassis, running gear
- Front suspension
- Rear suspension
- Steering
- Brake system
- Body and interior
- Body and interior elements
- Doors, windows and locks
- Heating and air conditioning
- Electrical equipment
- Equipment and devices
- Lighting and signaling
- Electrical circuits