



Share information:
Car rear suspension Toyota Corona 9 (T190)

Adjusting the rear wheel alignment angles
1. Check the toe-in value. Toe-in during checking: If the toe-in does not meet the specified conditions, make adjustments by changing the length of the lower suspension arms No.2. Note: on some models, the rear wheel...
1. Check the toe-in value. Toe-in during checking: If the toe-in does not meet the specified conditions, make adjustments by changing the length of the lower suspension arms No.2. Note: on some models, the rear wheel...

Rear suspension — design description
Note: for Station Wagon models, use the assembly drawings "Rear Suspension (Station Wagon)" or "Rear Leaf Spring Suspension". adjustment of the rear wheel alignment on models with the "Rear suspension (Station wagon)"...
Note: for Station Wagon models, use the assembly drawings "Rear Suspension (Station Wagon)" or "Rear Leaf Spring Suspension". adjustment of the rear wheel alignment on models with the "Rear suspension (Station wagon)"...

Rear wheel hub — design description
Rear wheel hub: 1 - caliper assembly, 2 - ring seal, 3 - rear wheel hub with bearing, 4 - brake drum, 5 - brake disc, 6 - rear axle hub, 7 - hub bolt, 8 - bearing Rear wheel hub: 1 - bearing, 2 - hub, 3 - brake disc, 4...
Rear wheel hub: 1 - caliper assembly, 2 - ring seal, 3 - rear wheel hub with bearing, 4 - brake drum, 5 - brake disc, 6 - rear axle hub, 7 - hub bolt, 8 - bearing Rear wheel hub: 1 - bearing, 2 - hub, 3 - brake disc, 4...

Removal the rear hub
1. Jack up the car, remove the rear wheel. 2. (For models with disc brakes) Remove the caliper assembly and brake disc. a) Unscrew the two caliper mounting bolts. b) Hang the support on the wire. c) Remove the brake...
1. Jack up the car, remove the rear wheel. 2. (For models with disc brakes) Remove the caliper assembly and brake disc. a) Unscrew the two caliper mounting bolts. b) Hang the support on the wire. c) Remove the brake...

Disassembling the rear wheel hub
Caution: If the model is with ABS, do not disassemble the rear wheel hub and bearing. 1. Loosen the lock nut a) Using a hammer and chisel, loosen the nut. b) Unscrew the lock nut. 2. Remove the bearing. a) Using a...
Caution: If the model is with ABS, do not disassemble the rear wheel hub and bearing. 1. Loosen the lock nut a) Using a hammer and chisel, loosen the nut. b) Unscrew the lock nut. 2. Remove the bearing. a) Using a...

Assembling the rear wheel hub
Install the bearing. a) Using a special tool and a press, install the new bearing onto the hub. b) Install and tighten the new lock nut. Tightening torque 123 Nm. c) Lock the nut.
Install the bearing. a) Using a special tool and a press, install the new bearing onto the hub. b) Install and tighten the new lock nut. Tightening torque 123 Nm. c) Lock the nut.

Installing the rear wheel hub
1. Install the rear wheel hub. a) Install a new O-ring. Note: Apply grease to the O-ring. b) Install the rear wheel hub and tighten the four bolts. Tightening torque 80 Nm. 2. (For models with disc brakes) Install the...
1. Install the rear wheel hub. a) Install a new O-ring. Note: Apply grease to the O-ring. b) Install the rear wheel hub and tighten the four bolts. Tightening torque 80 Nm. 2. (For models with disc brakes) Install the...

Replacing the rear hub bolt
1. Jack up the car, remove the rear wheel. 2. Remove the brake disc or brake drum. 3. Using the special tool, remove the hub bolt. 4. Install the hub bolt a) Install the washer and nut onto the hub bolt as shown in the...
1. Jack up the car, remove the rear wheel. 2. Remove the brake disc or brake drum. 3. Using the special tool, remove the hub bolt. 4. Install the hub bolt a) Install the washer and nut onto the hub bolt as shown in the...

Rear Wheel Hub Fist — Design Description
Rear wheel hub knuckle: 1 - rear wheel hub knuckle, 2 - caliper assembly, 3 - ring seal, 4 - rear wheel hub, 5 - brake disc, 5 - brake drum, 7 - brake mechanism assembly
Rear wheel hub knuckle: 1 - rear wheel hub knuckle, 2 - caliper assembly, 3 - ring seal, 4 - rear wheel hub, 5 - brake disc, 5 - brake drum, 7 - brake mechanism assembly

Removal the rear wheel hub knuckle
1. Remove the rear wheel hub. 2. (For models with drum brakes) Remove the brake hose from the strut. 3. Remove the brake shield from the knuckle. Hang the brake shield on the wire. 4. (For cars with ASS) Remove the...
1. Remove the rear wheel hub. 2. (For models with drum brakes) Remove the brake hose from the strut. 3. Remove the brake shield from the knuckle. Hang the brake shield on the wire. 4. (For cars with ASS) Remove the...

Installing the rear wheel hub knuckle
1. Install the fist. a) Install the knuckle and temporarily install the three bolts and nuts. b) Connect the trailing arm to the knuckle. c) Temporarily install the bolt and nut. d) Tighten the two nuts. Tightening...
1. Install the fist. a) Install the knuckle and temporarily install the three bolts and nuts. b) Connect the trailing arm to the knuckle. c) Temporarily install the bolt and nut. d) Tighten the two nuts. Tightening...

Rear suspension strut — design description
Rear suspension strut (Models up to 96.): 1 - bushing, 2 - upper support of the rack, 3 - compression stroke limiter, 4 - spring, 5 - lower vibration isolator, 6 - rear suspension rack, 7 - rear seat cushion, 8 - rear...
Rear suspension strut (Models up to 96.): 1 - bushing, 2 - upper support of the rack, 3 - compression stroke limiter, 4 - spring, 5 - lower vibration isolator, 6 - rear suspension rack, 7 - rear seat cushion, 8 - rear...

Removal the rear suspension strut
1. Remove the rear seat and shelf. 2. Jack up the car and remove the rear wheel. 3. Remove the speed sensor (ABS) cable and brake hose from the rack. 4. Disconnect the anti-roll bar from the rear suspension strut. 5....
1. Remove the rear seat and shelf. 2. Jack up the car and remove the rear wheel. 3. Remove the speed sensor (ABS) cable and brake hose from the rack. 4. Disconnect the anti-roll bar from the rear suspension strut. 5....

Installing the rear suspension strut
1. Install the lower vibration isolator on the stand. 2. Install the spring compression stroke limiter onto the piston rod. 3. Install the spring. a) Using the special tool, compress the spring. b) Install the spring on...
1. Install the lower vibration isolator on the stand. 2. Install the spring compression stroke limiter onto the piston rod. 3. Install the spring. a) Using the special tool, compress the spring. b) Install the spring on...
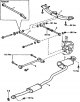
Lower and trailing arms of suspension — description of design
Lower arms and trailing arm: 1 - rear beam, 2 - lower suspension arm No.2, 3 - muffler, 4 - central muffler pipe, 5 - gasket, 6 - trailing arm, 7 - lower suspension arm N91
Lower arms and trailing arm: 1 - rear beam, 2 - lower suspension arm No.2, 3 - muffler, 4 - central muffler pipe, 5 - gasket, 6 - trailing arm, 7 - lower suspension arm N91

Removal the lower and trailing arms of the suspension
1. Jack up the car and remove the rear wheel. 2. Remove the trailing arm. a) Unscrew the two bolts and nuts. b) Remove the trailing arm. 3. (For vehicles with LSPV) Disconnect the rear axle load-sensitive brake force...
1. Jack up the car and remove the rear wheel. 2. Remove the trailing arm. a) Unscrew the two bolts and nuts. b) Remove the trailing arm. 3. (For vehicles with LSPV) Disconnect the rear axle load-sensitive brake force...

Disassembly and assembly of the lower control arm No. 2
Disassembly a) Loosen the two lock nuts. b) Rotate the adjusting tube to disassemble the lower suspension arm Ne2. c) Unscrew the lock nuts from the levers. Assembly a) Install the locknuts on the levers. b) Rotate the...
Disassembly a) Loosen the two lock nuts. b) Rotate the adjusting tube to disassemble the lower suspension arm Ne2. c) Unscrew the lock nuts from the levers. Assembly a) Install the locknuts on the levers. b) Rotate the...

Installing lower and trailing arms
1. Install the N91 lower control arm with washer and two bolts. Note: Orient the lever with the paint mark towards the rear. 2. Install the rear beam a) Raise the rear beam b) Install the lower rear beam mounts and...
1. Install the N91 lower control arm with washer and two bolts. Note: Orient the lever with the paint mark towards the rear. 2. Install the rear beam a) Raise the rear beam b) Install the lower rear beam mounts and...

Transverse stability stabilizer
Anti-roll bar: 1, 2 - anti-roll bar strut, 3, 5 - anti-roll bar bracket, 4, 6 - bushing Checking the anti-roll bar 1. Check the rotation moment of the stabilizer bar ball joint. a) Before installing the nut, rock the...
Anti-roll bar: 1, 2 - anti-roll bar strut, 3, 5 - anti-roll bar bracket, 4, 6 - bushing Checking the anti-roll bar 1. Check the rotation moment of the stabilizer bar ball joint. a) Before installing the nut, rock the...

Rear Wheel Hub and Knuckle (4WD Models)
Rear wheel hub and knuckle: 1, 4 - oil seal, 2 - rear wheel knuckle, 3 - bearing, 5 - retaining ring, 6 - brake shield, 7 - rear wheel hub Removing the hub and knuckle Installation is carried out in the reverse order of...
Rear wheel hub and knuckle: 1, 4 - oil seal, 2 - rear wheel knuckle, 3 - bearing, 5 - retaining ring, 6 - brake shield, 7 - rear wheel hub Removing the hub and knuckle Installation is carried out in the reverse order of...

Rear suspension of 4WD models — design description
Rear leaf spring suspension: 1 - shock absorber, 2 - U-bolt, 3 - bracket. 4 - upper gasket, 5 - spring, 6 - bushing, 7 - compression stroke buffer, 8 - earring, 9 - earring plate, 10 - lower gasket, 11 - lining Rear...
Rear leaf spring suspension: 1 - shock absorber, 2 - U-bolt, 3 - bracket. 4 - upper gasket, 5 - spring, 6 - bushing, 7 - compression stroke buffer, 8 - earring, 9 - earring plate, 10 - lower gasket, 11 - lining Rear...
This section is available on: russian, bulgarian, belarusian, ukrainian, serbian, croatian, romanian, polish, slovak, hungarian
Similar sections for other Toyota models
➥ Rear suspension Toyota Carina T170 (1988-1992)
➥ Rear suspension Toyota Camry Vista V40 (1994-1998)
➥ Rear suspension Toyota Corolla E80 (1983-1990)
➥ Rear suspension Toyota RAV 4 XA20 (2000-2005)
Link in different formats to this article
TEXTHTMLBB Code
- General information
- User manual
- Maintenance
- Power unit
- Engines 3S-FE/GE and 4S-FE
- Engines 4A-FE and 7A-FE
- Engines 5E-FE
- Diesel engines 2C and 2C-T
- Engine overhaul
- Cooling system
- Lubrication system
- Fuel injection (petrol)
- Control system (petrol)
- Fuel system (diesel)
- Turbo diesel
- Ignition system
- Engine electrical equipment
- Transmission
- Clutch
- Mechanical gearbox
- Automatic gearbox
- Drive shafts and cardan
- Chassis, running gear
- Front suspension
- Rear suspension
- Steering
- Brake system
- Body and interior
- Body and interior elements
- Doors, windows and locks
- Heating and air conditioning
- Electrical equipment
- Equipment and devices
- Lighting and signaling
- Electrical circuits