
Attention! Be sure to replace all pads on the same vehicle axle, even if only one pad is worn. If the brake pads will be reinstalled, mark them before removal.
Warning! Brake pads generate brake dust, which contains asbestos, which is harmful to health, so do not use compressed air or inhale the dust when cleaning brake pads.
Attention! To clean the brake mechanisms, use only a special brake cleaner.
Remove the brake reservoir cap.
Apply the parking brake and chock the rear wheels.
Loosen the front wheel nuts. Raise the front of the car and place it on stands. Remove the front wheel.
Check the brake disc for cracks, especially around the wheel bolt holes, and for excessive wear or mechanical damage. If you need to replace at least one of the disks, replace both disks on the axle.
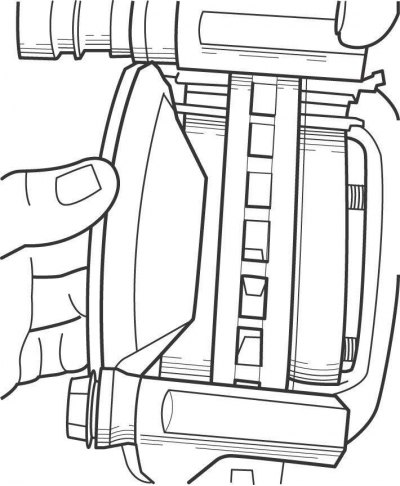
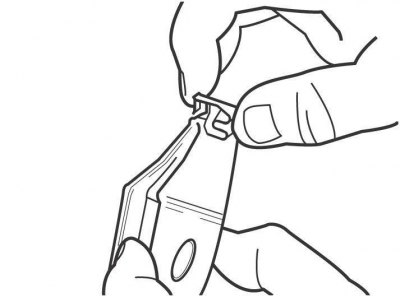
Pic. 11.13. Using a Clamp to Press the Piston into the Caliper
Using a clamp, press the piston into the caliper (pic. 11.13). When the piston is sunk, the brake fluid is forced out of the brake cylinder into the compensation reservoir, so constantly monitor the fluid level in the reservoir, and if necessary, pump out the excess from the reservoir.
Clean the brake disc using a special fluid.
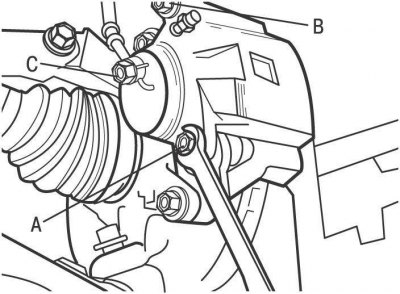
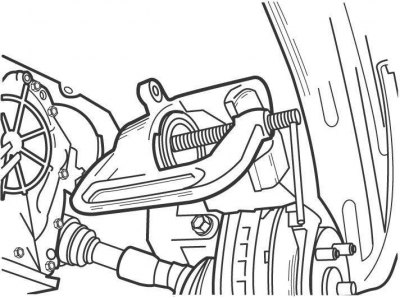
Pic. 11.14. Removing the lower bolt of the front brake caliper: A - bottom bolt; B - top bolt; C - hollow bolt of fastening of a brake hose
Unscrew the lower caliper mounting bolt, while holding the guide pin from turning with the second wrench, and lift the caliper up by turning it around the upper guide pin. Tie the caliper to the A-pillar with a soft wire (pic. 11.14). Do not remove the upper caliper mounting bolt and the hollow brake hose mounting bolt.
Remove from the caliper bracket the outer noise absorbing pad holding the pad and outer brake shoe.
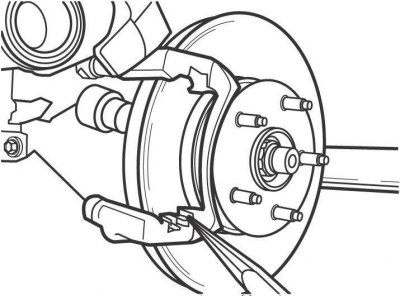
Pic. 11.15. Removing the inner brake pad
Remove from the caliper bracket the inner noise-absorbing pad holding the gasket and the inner brake shoe (pic. 11.15).
Retaining pads can be reused if they are resilient, not deformed, and free of cracks, wear, or corrosion.
If the pads are serviceable, clean them with a wire brush and rags.
Pic. 11.16. Removing the brake pad guide
Remove the four brake shoe guides, check their condition and reinstall (pic. 11.16).
Pic. 11.17. Installing the brake pad wear indicator
If present, remove the wear indicator from the old brake pad and install on the new one (pic. 11.17). If the indicator is worn or bent, replace it.
Do not depress the brake pedal with the brake pads removed.
Apply special disc brake grease to both sides of the inner noise absorbing pad. Install the inner brake pad with wear indicator, the retaining shim and the inner noise damping pad.
Install the outer brake shoe, retaining shim, and outer noise absorbing shim.
Remove the lower guide pin from the caliper bracket and check its condition. To remove the upper guide pin from the caliper, move the caliper away from the bracket. Apply a thin coat of high temperature grease to the guide pins and install them into the caliper bracket.
Pic. 11.18. Using a clamp to press the piston into the caliper before installing the brake pads
Install the caliper in place and screw in the lower caliper mounting bolt. If the caliper is not installed on new pads, press the piston into the caliper with a clamp (pic. 11.18).
Replace the brake pads on the second front wheel in the same way.
Install the wheels and lower the vehicle to the ground.
Press the brake pedal several times to bring the brake pads into position.