
Company Honda Company Ford Company Skoda Company Kia Company Mazda Company Mercedes Company Renault
English Русский
Български
Беларускі
Український
Српски
Hrvatski
Română
Polski
Slovenský
Magyar
Bookmark Articles Sitemap Contacts
ToyotaMan.ru


Camry Corolla Corona Carina Land Cruiser Highlander 4Runner RAV4 Others
RAV 4 XA20 (2000-2005) RAV 4 XA10 (1994-2000)

Replacing the brake master cylinder [Toyota RAV4 XA10]

  • Main
  • RAV4
  • XA10 (1994-2000)
  • Chassis, running gear
  • Brake system
  • Replacing the brake master cylinder
0
Contents: Removal ↓ Installation ↓

Removal


On pre-2001 models, remove the air cleaner cover and fuse/relay box on the left side of the engine compartment.
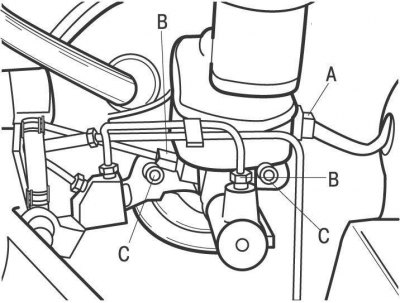


Figure 11.35. Master brake cylinder: A – electrical connector; B – brake pipe connection points; C – nuts


Disconnect the electrical connector from the brake fluid level sensor (figure 11.35).

Remove the cap from the brake system expansion tank and, using a syringe, pump out the brake fluid.

Label the brake lines that go to the master cylinder. Place a clean rag under the master cylinder to collect any leaking brake fluid.

Loosen the connecting nuts securing the brake pipes and move the pipes away from the master cylinder. Close the ends of the tubes with suitable stoppers.

Warning: Brake fluid used in the hydraulic brake system is toxic, so if it comes into contact with your skin, immediately flush the affected area with plenty of water. Brake fluid dissolves paint and plastic, so if the fluid gets on your car's paintwork, rinse it with plenty of water.


(The original version is published on the website: ToyotaMan.ru)

Remove the two nuts and the master cylinder from the brake booster along with the gasket. Check the condition of the sealing ring at the end of the master cylinder and replace it if necessary.


Installation
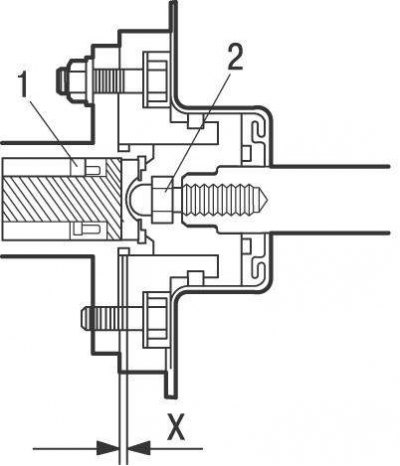


Figure 11.41. Clearance between the pusher (2) of the brake booster and the piston (1) of the brake master cylinder: X = 0 mm


Before installing a new brake master cylinder, check the clearance between the vacuum booster pushrod and the brake master cylinder piston (see Figure 11.41). Adjust the push rod length if necessary.

Before installing the master cylinder, fill it with brake fluid and bleed any air by securing the master cylinder in a vice and sealing the outlet holes of the master cylinder with threaded plugs.

Fill the reservoir with clean brake fluid.

Unscrew one plug and, by moving the piston in the master brake cylinder, squeeze the air out of it.

Before releasing the piston, screw the threaded plug back into place.

Repeat the bleeding operation until only clean brake fluid without air bubbles comes out of the hole. Repeat the master cylinder bleeding operation on the second outlet.

Install the master cylinder with a new gasket onto the brake booster studs and secure with nuts, tightening them by hand at this stage.

Remove the threaded plugs from the master brake cylinder and install the brake pipes in their place.


Finally tighten the brake master cylinder mounting nuts.

Pour brake fluid into the brake system expansion tank.

Connect the electrical connector to the brake fluid level sensor.
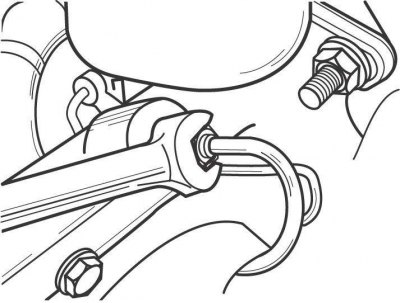


Figure 11.36. Bleeding air from the master cylinder


Bleed any air that entered the brake master cylinder when installing the brake lines. Press the brake pedal sharply, loosen the nut securing the brake pipe to the master brake cylinder by half a turn while keeping the pedal depressed (figure 11.36). While continuing to press the pedal, force out the fluid and air from the system. Once the pedal reaches its extreme forward position and the fluid stops leaking, tighten the brake pipe mounting nut. Repeat these operations until air stops leaking from the master cylinder.
This article is available at: russian, bulgarian, belarusian, ukrainian, serbian, croatian, romanian, polish, slovak, hungarian
The article material has been checked: Kolokoltsev Grigory
Share information:
◀ Previous
RAV 4 XA10: Brake system
Next ▶

Replacing the wheel brake cylinder
Replacing rear brake pads
Checking and replacing brake discs — removal, inspection and installation
Replacing the front brake caliper
Replacing the front brake pads
Replacing the brake fluid reservoir sealing rings
Replacing brake pipes and hoses
Bleeding the hydraulic brake system
Checking and replacing the brake booster
Adjusting the parking brake
Similar articles on other Toyota models

➥ Brake Master Cylinder — Removal and Installation Toyota Camry XV20 (1996-2001)
➥ Replacing the clutch master cylinder assembly (C251 / E358) Toyota Corolla Verso 3 (2004-2009)
➥ Installing the master brake cylinder Toyota Corona T190 (1992-1997)
➥ Master brake cylinder — device Toyota Carina T190 (1992-1996)
➥ Brake Master Cylinder — Removal, Disassembly and… Toyota Cruiser 60/80 (1980-1997, petrol)
➥ Brake Master Cylinder — Removal and Installation Toyota 4Runner N120 (1989-1995)
Link in different formats to this article
Comments and feedback from visitors
No comments yet


Add two numbers 19 + 11


RAV 4 XA20 (2000-2005) 
  • General information
  • Introduction to manual
  • User manual
  • Daily care
  • Maintenance (petrol)
  • Maintenance (diesel)
  • Troubleshooting
  • Power unit
  • Gasoline engines (before 2000)
  • Petrol engines (since 2001)
  • Diesel engines
  • Engine overhaul
  • Cooling and heating
  • Fuel system (petrol)
  • Fuel system (diesel)
  • Engine electrical equipment
  • Control system (petrol)
  • Control system (diesel)
  • Transmission
  • Manual gearbox
  • Automatic gearbox
  • Clutch and drive shafts
  • Chassis, running gear
  • Brake system
  • Front suspension
  • Rear suspension
  • Steering system
  • Body and interior
  • Exterior (external elements)
  • Interior (internal elements)
  • Doors, locks and windows
  • Electrical equipment
  • Equipment and devices
  • Electrical circuits
RAV 4 XA10 (1994-2000) 
  • General information
  • User manual
  • Maintenance
  • Power unit
  • Petrol engine 3S-FE
  • Petrol engine 1AZ-FE
  • Engine overhaul
  • Cooling and air conditioning
  • Fuel and exhaust system
  • Ignition system
  • Toxicity reduction system
  • Transmission
  • Clutch
  • Mechanical gearbox
  • Automatic gearbox
  • Cardan and drive shafts
  • Chassis, running gear
  • Brake system
  • Car suspension
  • Steering
  • Body and interior
  • Exterior (external elements)
  • Interior (internal elements)
  • Doors, locks and windows
  • Electrical equipment
  • Equipment and devices
  • Power devices
  • Electrical circuits
ToyotaMan.ru © 2018–2026 • Mobile version • Interesting about Toyota • Administration • Sitemap: EN BG BY UA RS HR RO PL SK HU • Search system • Bookmark
Camry Vista-V40 • Camry XV10 • Camry XV20 • Camry XV30 • Corolla Verso-AR10 • Corolla E80 • Corona T190 • Carina T170 • Carina T190 • Land Cruiser J70 (diesel) • Land Cruiser J60 (petrol) • Land Cruiser J100 • Highlander XU20 (petrol) • 4Runner N120 • RAV4 XA10 • RAV4 XA20 • Duet M100 • Dyna Y50 •
We require cookies to enable some interactive features. Is that ok with you?