
Attention! Be sure to replace all pads on the same vehicle axle, even if only one pad is worn. If the brake pads will be reinstalled, mark them before removing them.
Warning! Brake pads generate dust that contains asbestos, which is harmful to health, so do not use compressed air or inhale the dust when cleaning brake pads.
Attention! To clean the brake mechanisms, use only a special brake cleaner.
Whenever you replace the brake pads, replace the return and lower return springs as they are constantly exposed to heat and cooling during the operation of the brakes, as a result of which they can lose their elasticity and not fully retract the brake pads from the brake drum.
In order not to confuse the parts of the left and right rear brake mechanisms, replace the brake pads first on one side, then on the other.

Pic. 11.23. Drum rear brake parts: 1 - protective cover; 2 - piston; 3 - cuff; 4 - bleed valve; 5 - working brake cylinder; 6 - spring; 7 - cuff; 8 - piston; 9 - protective cover; 10 - adjusting bar; 11 - rear brake shoe; 12 – parking brake lever; 13 - C-shaped clamp; 14 - E-shaped retaining ring; 15 - automatic adjustment lever; 16 - spring of the automatic adjustment lever; 17 - spring fixing pads; 18 – brake shoe fixing elements; 19 - lower coupling spring; 20 - return spring; 21 - front brake shoe
The device of the back drum brake mechanism is shown in fig. 11.23.
Block the front wheels with chocks.
Loosen rear wheel nuts. Raise the rear of the car and place it on stands.
Release the parking brake lever.
Remove the rear wheel.
Mark the relative position of the brake drum and hub with a marker or paint so that the balance is not disturbed when installing the brake drum.
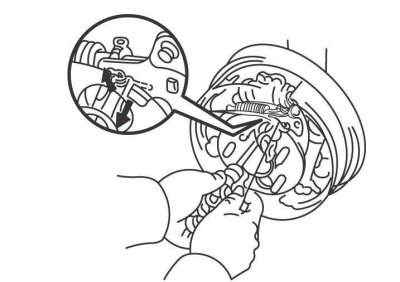
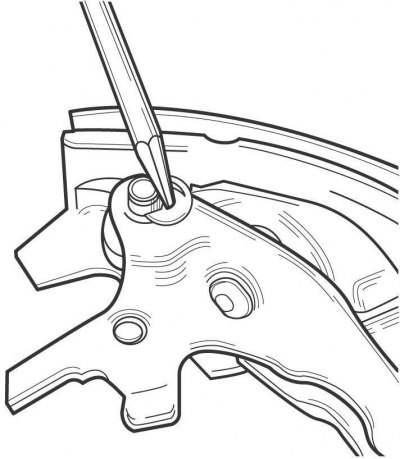
Pic. 11.24. Reducing the length of the adjusting bar to remove the brake pads from the brake drum
On the reverse side of the protective casing of the rear brake, remove the plug and through the opened hole with a screwdriver and a hook, rotate the gear wheel of the adjusting bar to reduce the length of the adjusting bar, as a result of which the brake shoes will move away from the brake drum (pic. 11.24). Remove the brake drum.
Clean the brake pads with a special fluid and dry them.

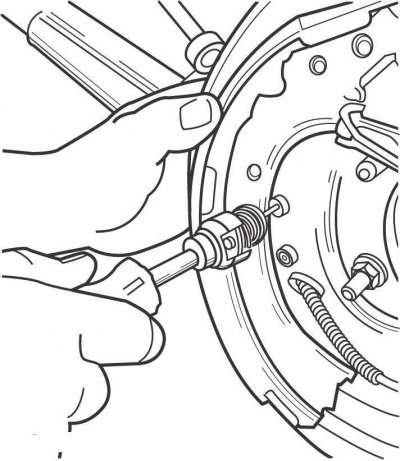
Pic. 11.25. Removing the return spring from the front brake pad
Use a screwdriver blade to remove the return spring from the front brake shoe (pic. 11.25).
Pic. 11.26. Removal of a plate of a spring of fixing of a forward brake pad
Remove the front brake pad fixing spring plate by pushing the plate and turning it 90° (pic. 11.26).
Remove the front brake shoe and disconnect the lower return spring from it.
Remove the rear brake pad fixing spring plate by pushing the plate and turning it 90°.
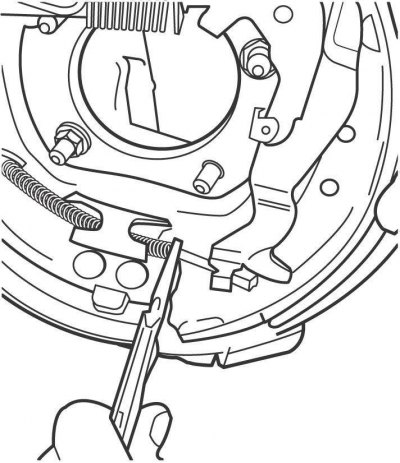
Pic. 11.27. Disconnecting the parking brake cable from the lever on the rear brake shoe
Disconnect the handbrake cable from the lever on the rear brake shoe (pic. 11.27).
Remove the rear brake shoe along with the adjusting bar.

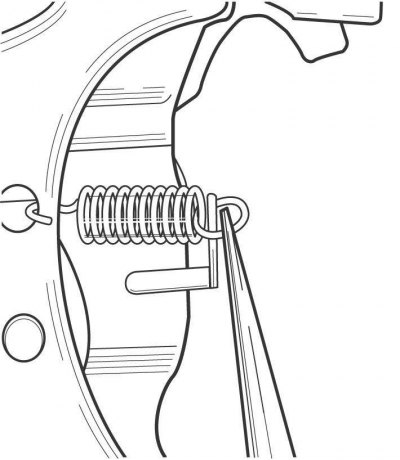
Pic. 11.28. Removing the return spring from the rear brake pad
Disconnect the return spring from the rear brake shoe and remove it and the adjusting bar (pic. 11.28).
Pic. 11.29. Disconnecting the auto adjust lever spring from the rear brake shoe
Disconnect the auto adjust lever spring from the rear brake shoe (pic. 11.29).
Remove the adjusting bar from the rear brake shoe.
Pic. 11.30. Removing the C-clamp securing the auto adjust lever to the rear brake shoe
Remove the C-clip and separate the auto adjust lever from the rear brake shoe (pic. 11.30).

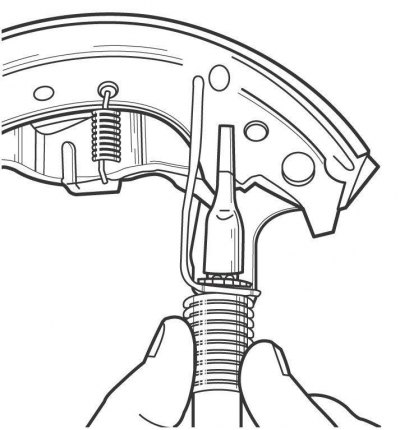
Pic. 11.31. Removing the retaining ring securing the parking brake lever to the rear brake shoe
Remove the circlip and separate the parking brake lever from the rear brake shoe (pic. 11.31).
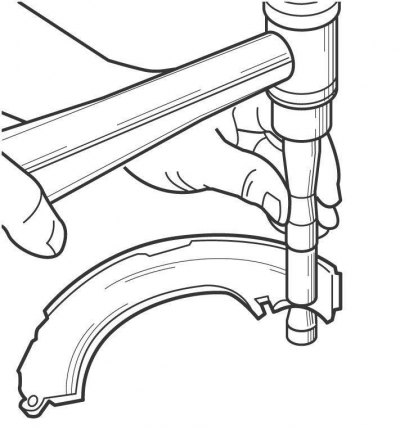
Pic. 11.32. Knocking a pin out of an old rear brake pad
Knock out the pin from the old rear brake pad and install it on the new pad (pic. 11.32).
Install the parking brake lever onto the rear brake shoe pin and secure it with a new E-ring.
Install the auto adjust lever onto the rear brake shoe pin and secure it with a new C-ring.
Install the auto adjust lever spring.
Pic. 11.33. Installing the adjusting bar on the rear brake shoe
Install the adjusting bar on the rear brake shoe, then hook the return spring into the hole in the shoe (pic. 11.33).
Apply a thin coat of high temperature grease to the rear brake guard where it contacts the brake pads.
Install the handbrake cable to the handbrake lever.
Install the rear brake shoe in place, pass the pin through the shoe, install the spring and secure the spring with the plate by pushing the plate and turning it 90°.
Install the lower return spring on the shoes, then install the front brake shoe in place, pass the pin through the shoe, install the spring and secure the spring with the plate by pushing the plate and turning it 90°.
Attach the upper return spring to the front brake shoe.
Be careful to clean the inside of the brake drum of brake dust and dirt. Clean the outer surface of the brake drum and check for obvious signs of wear or damage, cracks around the wheel bolt holes. Replace drum if necessary. Measure the inner diameter of the brake drum. The value of the maximum permissible inner diameter of the brake drum is marked on the inner flange of the drum.
Install the brake drum onto the rear wheel hub. With a screwdriver inserted through the hole on the reverse side of the rear brake guard, rotate the adjusting bar gear until the brake shoes brake the brake drum, then reverse the gear until the brake drum rotates freely. Close the hole in the rear brake guard with a plug.
Install the wheel and secure it with nuts.
Lower the car.
Apply the parking brake lever several times to adjust the position of the rear brake pads.