



Contents: Checking gaps ↓ Adjusting clearances ↓
Note: Recommended frequency: every 100,000 km or 48 months.
Note: When checking and adjusting valve clearances on vehicles manufactured before 1998, a special tool for pressing the valve lifters is required.
Checking gaps
Disconnect the ground cable from the battery.
Remove the spark plug leads or ignition coils from the spark plugs and move them away from the cylinder head cover.
Use a jet of compressed air to clean the area around the spark plugs to prevent dirt from getting into the engine cylinder after removing the spark plugs. Remove the spark plugs.
Remove the cylinder head cover.
By turning the engine crankshaft in the direction of its working rotation using the pulley mounting bolt, set the piston of the first cylinder to the top dead center (TDC) at the end of the compression stroke.
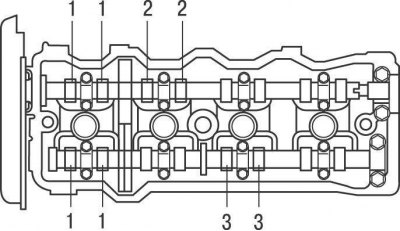
Figure 2.48. Measuring the clearances of the exhaust valves in cylinders 1 and 3 and the clearances of the intake valves in cylinders 4 and 2 when setting the piston of the 1st cylinder to TDC
Use a feeler gauge to measure the clearance of the exhaust valves in cylinders 1 and 3 and the clearance of the intake valves in cylinders 4 and 2 (figure 2.48, 2.49). Record the measurement results.
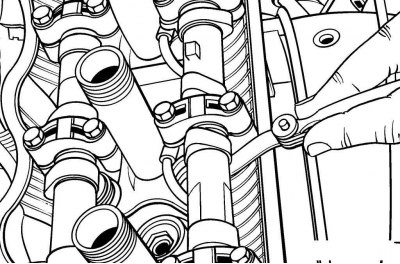
Figure 2.49. Using a feeler gauge to measure valve clearances
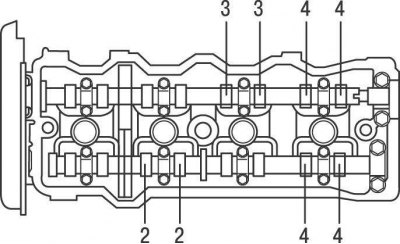
Figure 2.50. Measuring the clearances of the exhaust valves in cylinders 2 and 4 and the clearances of the intake valves in cylinders 1 and 3 when the piston of the 4th cylinder is set to TDC
Turn the crankshaft one revolution (the piston of the fourth cylinder is at TDC at the end of the compression stroke) and measure the clearances on the remaining valves (figure 2.50). Record the measurement results.
Adjusting clearances
Note: On vehicles produced before 2001, adjusting shims are used to adjust valve clearances, while on vehicles produced since 2001, tappets of different thicknesses are used.
Cars produced before 2001
If the valve clearances differ from the required values, adjust them.
Rotate the engine crankshaft to a position where the camshaft lobes above the valve requiring adjustment point upward.
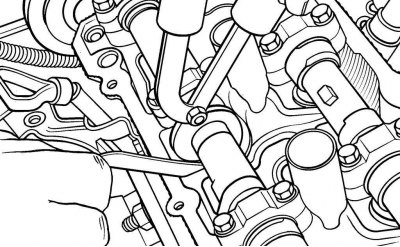
Figure 2.51. Installing a special tool on the camshaft to countersink the valve tappetg
Install the tappet driver tool onto the camshaft on the spark plug side above the valve tappet (figure 2.51). Squeeze the handles of the tool so that the valve tappet is depressed downwards, and place a stop between the edge of the tappet and the camshaft (figure 2.52). Remove the special tool for pressing the valve tappet. Use a screwdriver blade or tweezers to remove the adjusting washer and measure its thickness with a micrometer.
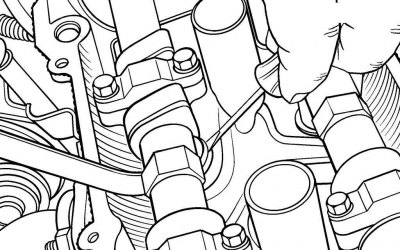
Figure 2.52. Fixing the valve tappet with a stop installed between the edge of the tappet and the camshaft, and removing the adjusting washer
Cars produced since 2001
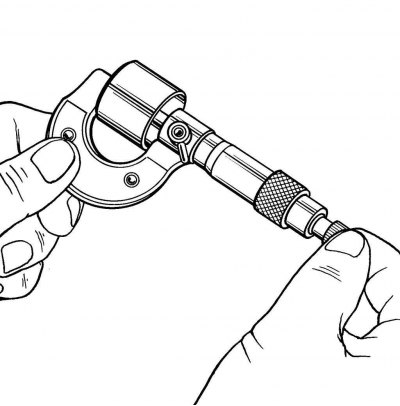
Figure 2.53. Measuring the thickness of the tappet head with a micrometer on cars produced since 2001
If the valve clearances differ from the required values, remove the camshaft (or camshafts) and pushers. Use a micrometer to measure the thickness of the tappet head (figure 2.53).
All models
Determine the thickness of the new adjusting washer or tappet head using the formula:
N = T + (A - V),
where A is the measured gap, mm;
N — calculated thickness of the new adjusting washer or tappet head, mm;
T — thickness of the removed adjusting washer or tappet head, mm;
V — nominal clearance, mm.
Select a shim or tappet with a thickness closest to the calculated value.
Spare parts supplied include adjusting washers with a thickness of 2.5 to 3.3 mm with a step of 0.05 mm, and tappets with a thickness of 5.060 to 5.740 mm with a step of 0.020 mm.
Cars produced before 2001
Rotate the engine crankshaft to a position where the camshaft lobes above the valve requiring adjustment point upward.
Install the tappet driver tool onto the camshaft on the spark plug side above the valve tappet (figure 2.51). Squeeze the handles of the tool so that the valve tappet is depressed downwards, and place a stop between the edge of the tappet and the camshaft (figure 2.52). Remove the special tool for pressing the valve tappet. Use a screwdriver blade or tweezers to remove the adjusting washer if it has not already been removed. Install a new washer in its place. Reinstall the valve tappet reaming tool. Squeeze the handles of the special tool and remove the stop.
Use a feeler gauge to measure the clearance in the valve drive.
Repeat the operations for replacing the adjusting washers on the remaining valves that require clearance adjustment.
Cars produced since 2001
Install the tappets with the calculated head thickness, having previously lubricated them with engine oil. Also apply a layer of oil to the inside of the tappet where it contacts the valve stem.
Install the camshaft (camshafts).
All models
Install the cylinder head cover, screw in the spark plugs and connect the high-voltage wire tips or ignition coils to them.